
For extra assistance contact ProcurementServices@viu.ca or a Tech Champion in your area.
See the Glossary for definitions of new terms.
Login to Employee PortalTraining materials and videos may include fields or hyperlinks that are no longer active as we continue to make adjustments to refine functionality.
See bottom of this page for training session recordings as well as helpful Q&A session videos.
See Self-assessments for onboarding tools to help your team with Employee Portal training including Procurement quizzes!
New: Purchase Requisition Standard cheat sheet so all of your Requisitions are approved!
Use the Procurement cheat sheet as an overview of the basic steps and a list of what you need before creating your Purchase Requisition.
Read the New user experience - reporting chart to better understand the changes; what you previously viewed in the Financial Report System (FRS) and what you can see now in FIS related to Purchasing.
Read the New user experience - P2P chart to better understand the changes to P2P processes (procure to pay) for the new system.
Purchase Requisitions for goods and services
This section contains documentation (including videos) for how to create a Standard Purchase Requisition in the Employee Portal FIS (Financial Information System). Use the cheat sheet to follow along!
A Purchase Requisition is a request to purchase goods or services. It is not an order. Procurement will review & transfer your Requisition to a Purchase Order which must be sent to the Supplier by Procurement prior to the goods being shipped or the services performed. The PO includes terms & conditions which minimize VIU’s risk and it’s important that the supplier agrees to these terms & conditions prior to shipping the goods or providing the services. Only Procurement staff have the authority to purchase goods or services on behalf of the university.
If you have multiple items to purchase from multiple suppliers, a separate Requisition will need to be created for each supplier. Procurement reserves the right to change the supplier selected if value can be achieved by selecting an alternate supplier.
You must create a Requisition for all goods and services that will be used for VIU business, unless those goods or services will be paid through:
- a VIU Purchasing Card,
- the Payment Requisition process (formerly Cheque Requisition), or
- petty cash.
A Requisition must not be created if the product or service is going to be paid with a VIU Purchasing Card, even if Procurement’s Purchasing Card will be used.
Note: When creating your requisition it is imperative that you use the tab key to navigate your way through the fields so everything is populated in the right order and you don't miss anything! Otherwise you may get an error message.
PROC 1. Purchase Requisition Standard
PROC 1. How to create a Purchase Requisition: part 1 of 5 - video
PROC 1 How do I create a Purchase Requisition video 1 of 5 transcript.txt
PROC 1. How to create a Purchase Requisition: part 2 of 5 - video
Sections explained in this video:
- Requisition
- Default supplier and contract
- Default GL Analysis
- Delivery Contact
PROC 1 How do I create a Purchase Requisition video 2 of 5 transcript.txt
PROC 1. How to create a Purchase Requisition: part 3 of 5 - video
Sections explained in this video:
- Requisition details
- Requisition details action buttons
PROC 1 How do I create a Purchase Requisition video 3 of 5 transcript.txt
PROC 1. How to create a Purchase Requisition: part 4 of 5 - video
Sections explained in this video:
- GL Analysis
PROC 1 How do I create a Purchase Requisition video 4 of 5 transcript.txt
PROC 1. How to create a Purchase Requisition: part 5 of 5 - video
Sections explained in this video:
- Adding documents
- Save
- Action buttons
PROC 1 How do I create a Purchase Requisition video 5 of 5 transcript.txt
Please be sure that all attachments are single PDFs. A Portfolio PDF with multiple documents is not readable by the system. Plus you must correctly name each document individually for ease of identification.
If the supplier is offering a deep discount on the product you are requesting and it will be reported under a Canadian Foundation for Innovation (CFI) project, the discount will need to be captured by Finance for CFI reporting purposes.
Prerequisite Training: PROC 1: How do I create a Standard Purchase Requisition?
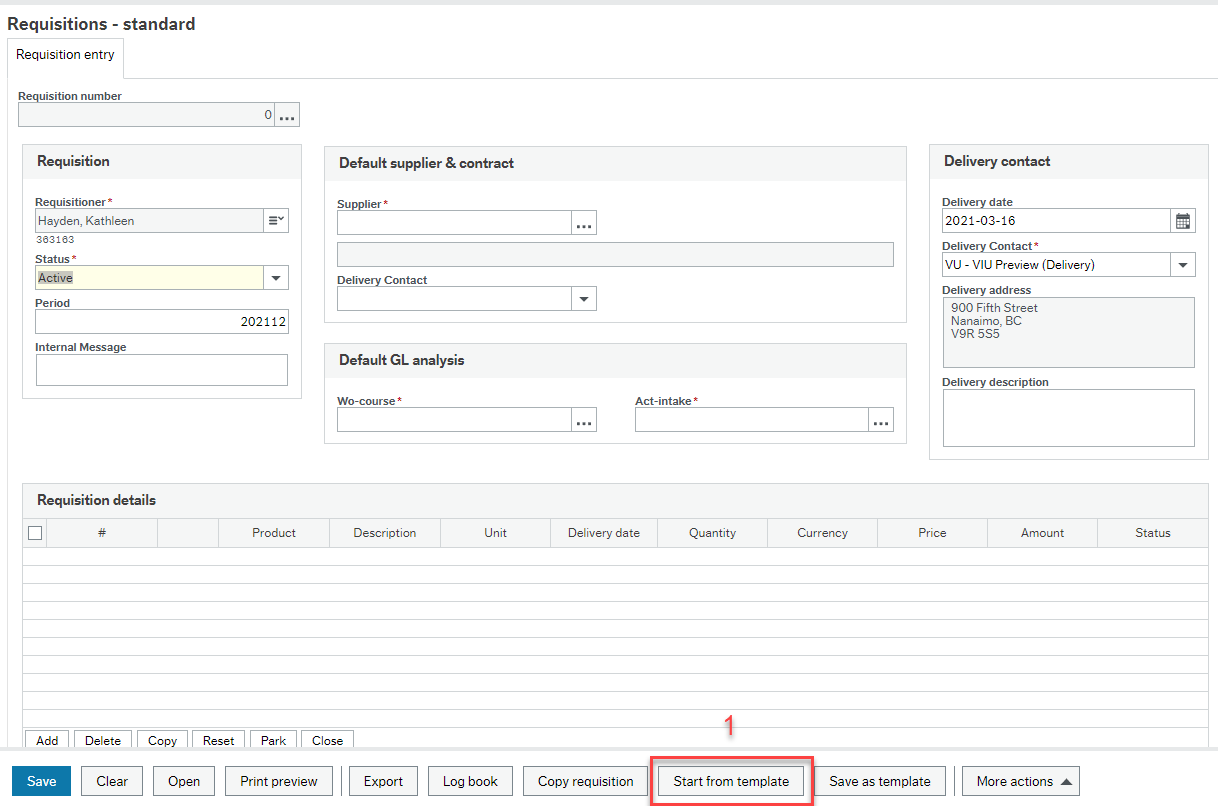
In your menu click on Procurement, and then under Requisitions click on Requisitions – standard.
Create your Requisition as per PROC 1, with the exception of the following steps:
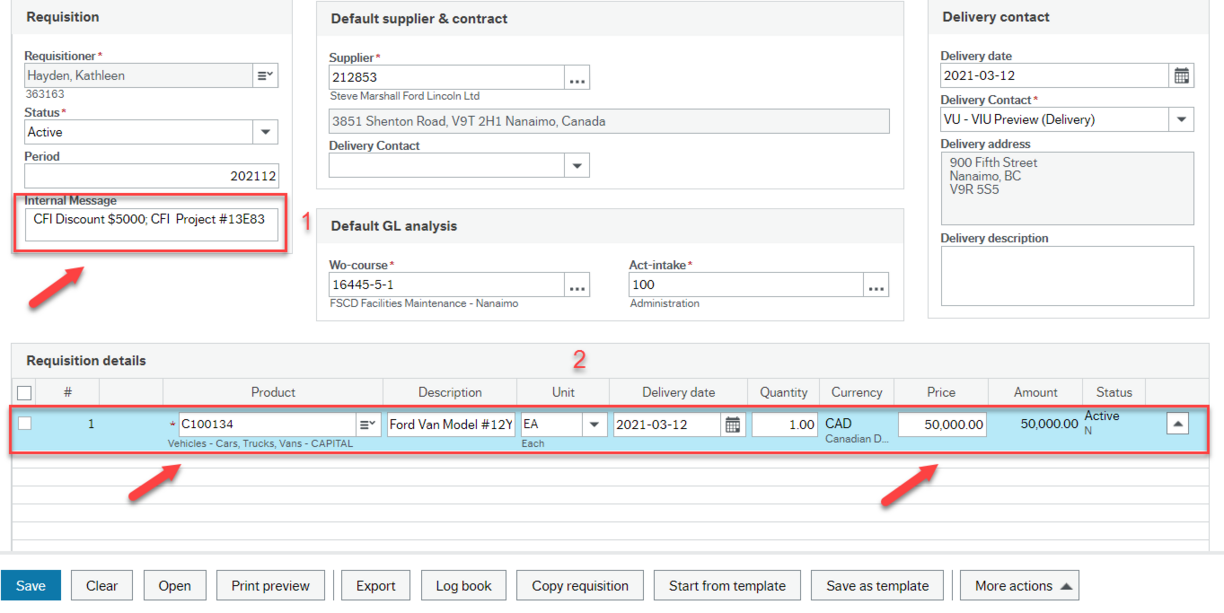
- In the "Internal message” field include a note to Procurement advising what the discount is as well as the CFI Project #. Procurement will apply the discount when processing the PO.
- Select the appropriate product code and enter the total cost of the product (without discount).
For example: You are requesting a vehicle that is $50,000 and a $5,000 discount will be recognized under a CFI project. You will:
- include a note in the “Internal message” box that the discount is $5,000 and identify the CFI Project #; and
- select the product for a capital vehicle and enter the price of $50,000.
When Procurement reviews your Requisition in workflow they will see your message, and when the Requisition is transferred to a PO, Procurement will add a line for the discount as a negative amount that will be included on the PO.
Procurement will issue the PO to the supplier. The PO will reflect the true amount payable (e.g. $45,000) and the discount can be captured by Finance for CFI reporting purposes.
If the supplier requires a deposit before shipping the goods or providing the services, specific set-up and communications are required. Only in specific circumstances should deposits be paid to suppliers (e.g. booking a venue).
Prerequisite Training: PROC 1: How do I create a Standard Purchase Requisition?
In your menu click on Procurement and then under Requisitions click on Requisitions – standard.
Create your Requisition as per PROC 1, with the exception of the following steps:
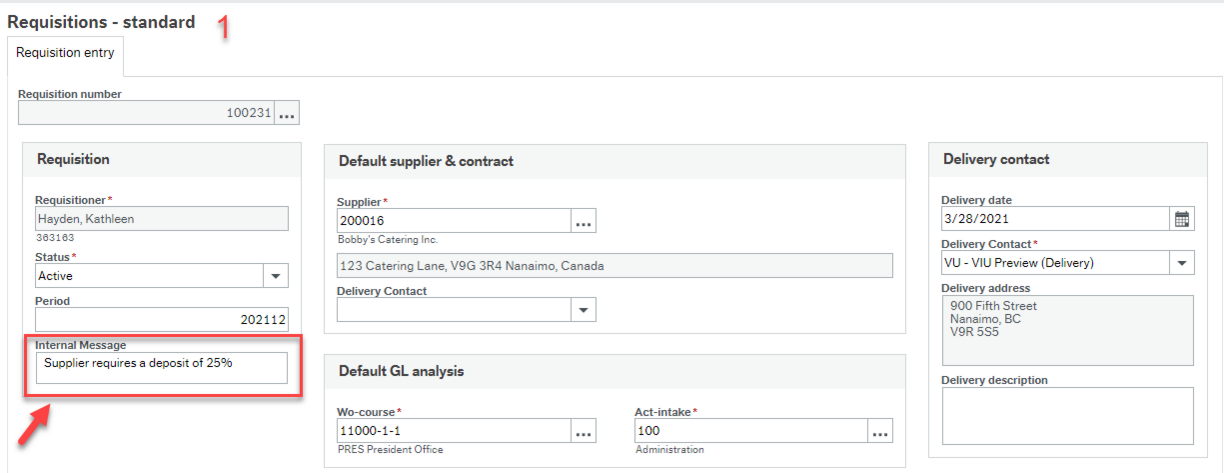
- In the “Internal message” box include a note to Procurement advising the supplier requires a deposit and the amount.

- Select the appropriate Product code and enter the total cost of the product (without deposit).
For example: You are requesting some catering services and the supplier requires a 25% deposit. You will:
- Include a note in the "Internal message" box that the supplier requires a deposit and the amount; and
- Select the appropriate product code and enter the full price of the catering services.
When Procurement reviews your Requisition in workflow they will see your message, and when the Requisition is transferred to a PO, Procurement will add 2 lines; (a positive amount for when the deposit is to be paid (Pay deposit), and a negative amount for when the deposit is to be applied to the final invoice (Apply deposit). - Advise the supplier they need to send an invoice to AP for the deposit amount so it can be paid.
- Procurement will issue the PO to the supplier. The Requisitioner will receive a task in Task management to confirm a Goods Receipt on the “Pay deposit” line. When the services have been performed and invoice has been registered, the Requisitioner will receive a task in Task management to confirm another Goods Receipt on the original product line and the "Apply Deposit" line.
This section provides instructions (including videos) on how to create a Blanket Purchase Requisition (hereafter referred to as Blanket Requisition) in the Employee Portal Financial Information System (FIS).
Please see next section "What's changed in PROC 4" below this one before proceeding.
PROC 4. Purchase Requisition Blanket Requisition
PROC 4. How to create a Blanket Requisition: part 1 of 4 - video
PROC 4 How do I create a blanket requisition 1 of 4 video transcript.txt
PROC 4. How to create a Blanket Requisition: part 2 of 4 - video
Sections explained in this video:
- Delivery Contact
- Requisition details
- GL Analysis
PROC 4 How do I create a blanket requisition 2 of 4 video transcript.txt
PROC 4. How to create a Blanket Requisition: part 3 of 4 - video
Sections explained in this video:
- Options a, b and c
PROC 4 How do I create a blanket requisition 3 of 4 video transcript.txt
PROC 4. How to create a Blanket Requisition: part 4 of 4 - video
Sections explained in this video:
- Options d and e
- Supplier communication
PROC 4 How do I create a blanket requisition 4 of 4 video transcript.txt
Blanket Requisitions will only use product codes that start with “B.”
In addition, the Quantity and Price fields for each product will be “flipped:”
- the total price of the product will be entered in the quantity field, and
- the price field will be set at $1.00.
Specific changes you can expect to see on the Purchase Requisition screen (Procurement > Requisitions > Requisitions – standard) are as follows:

- Products
Only products that start with “B” can be used on Blanket Requisitions. “B” product codes include both service-type products and supply-type products. - Quantity
For all “B” products, the quantity field is active for data entry. Enter the total dollar amount you expect to spend for the timeframe the Blanket Requisition and resulting PO will be in effect. For example, if you plan to spend approximately $1,000,000 per year of services with the selected supplier, you’ll enter a price of $1,000,000 in the quantity field. - Price
The price field defaults to 1.00 and should not be amended by the user.
Your Blanket Requisition can now be completed as per the process documented in PROC 4.
Revisions
The PDF documentation has been updated to reflect these changes; however, updates to the videos are still in progress. As much of the process remains the same, the existing videos still have relevance for training purposes. As you watch the videos, please keep in mind the specific changes to the process as described in this FAQ.
Any Requisition in Ordered or Finished status can be copied, amended and saved as a new Requisition. This saves time if some of the key data will be the same.
Prerequisite Training: PROC 1: How do I create a Standard Purchase Requisition?
In your menu, click on Procurement and then under Requisitions click on Requisitions – standard.
Steps are as follows:
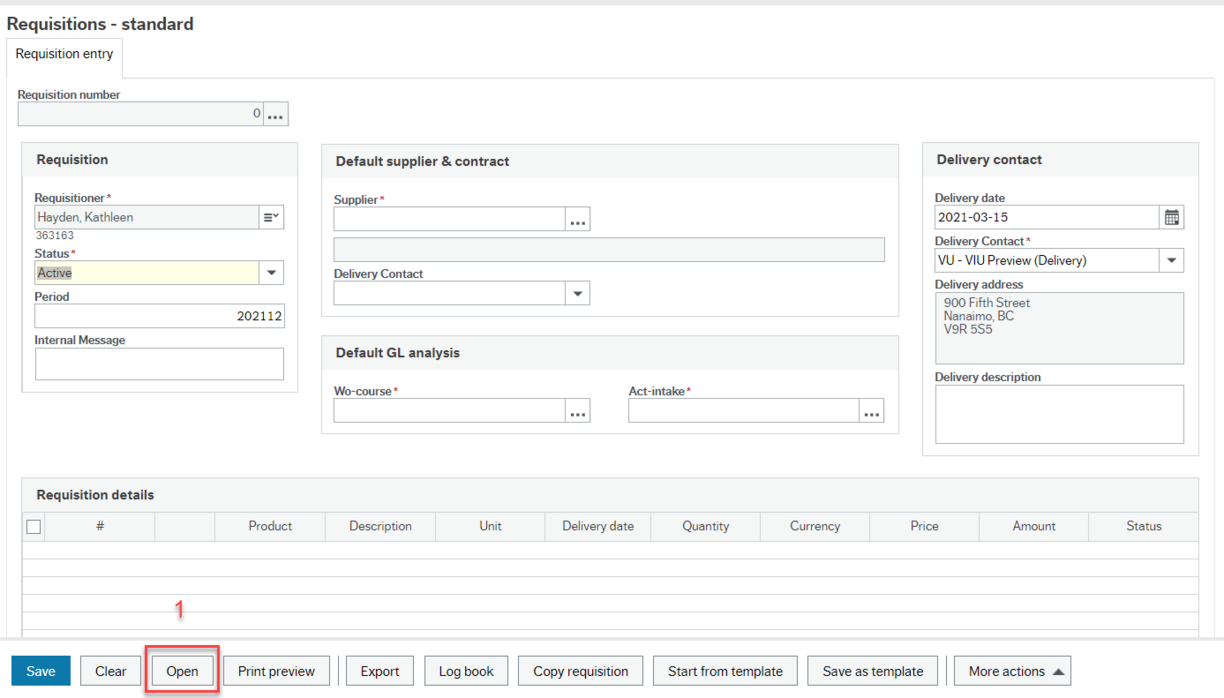
- Click on "Open" at the bottom of the screen to open the "Value lookup"
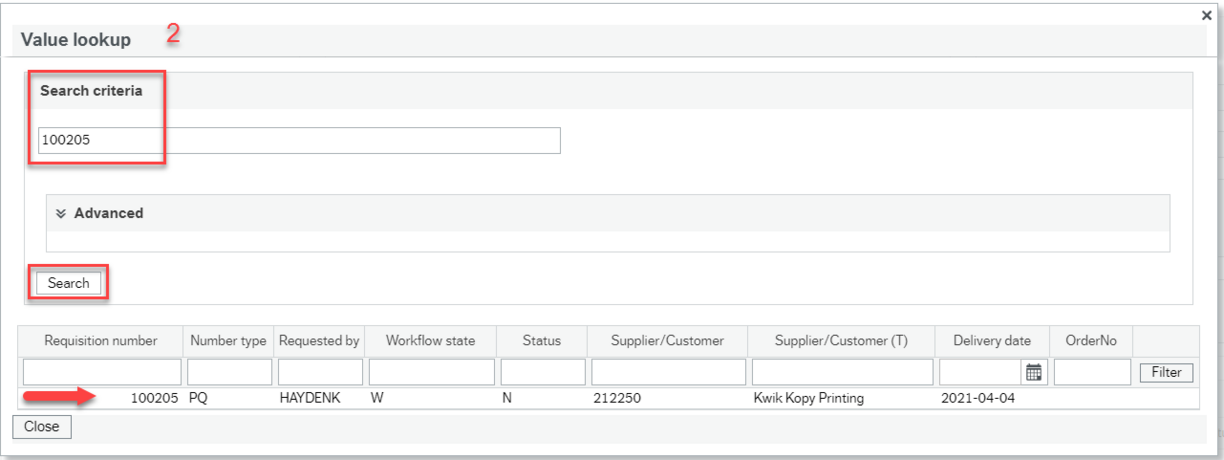
- Enter the Requisition # in the “Search criteria” field, and click “Search." The Requisition will appear in a line below. Click on the line to open your Requisition.
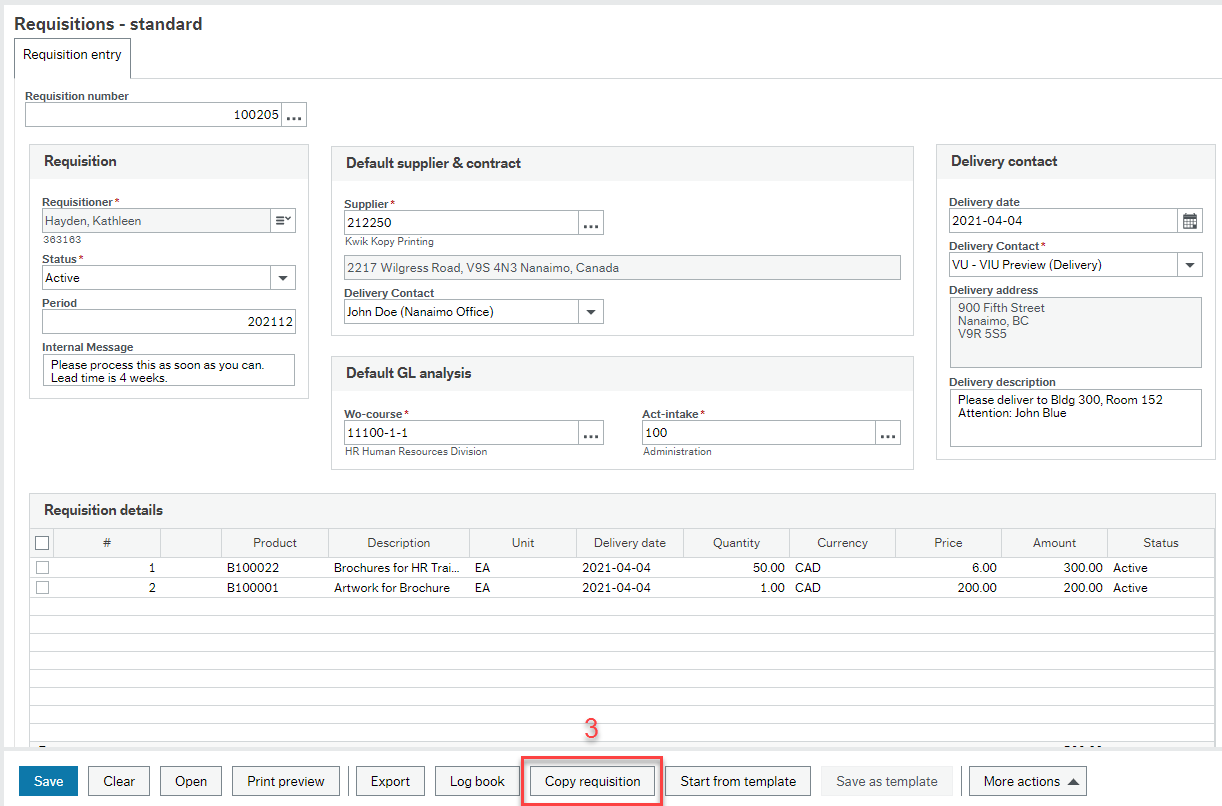
- Your previously created Requisition will appear. Click “Copy requisition” at the bottom of the screen.
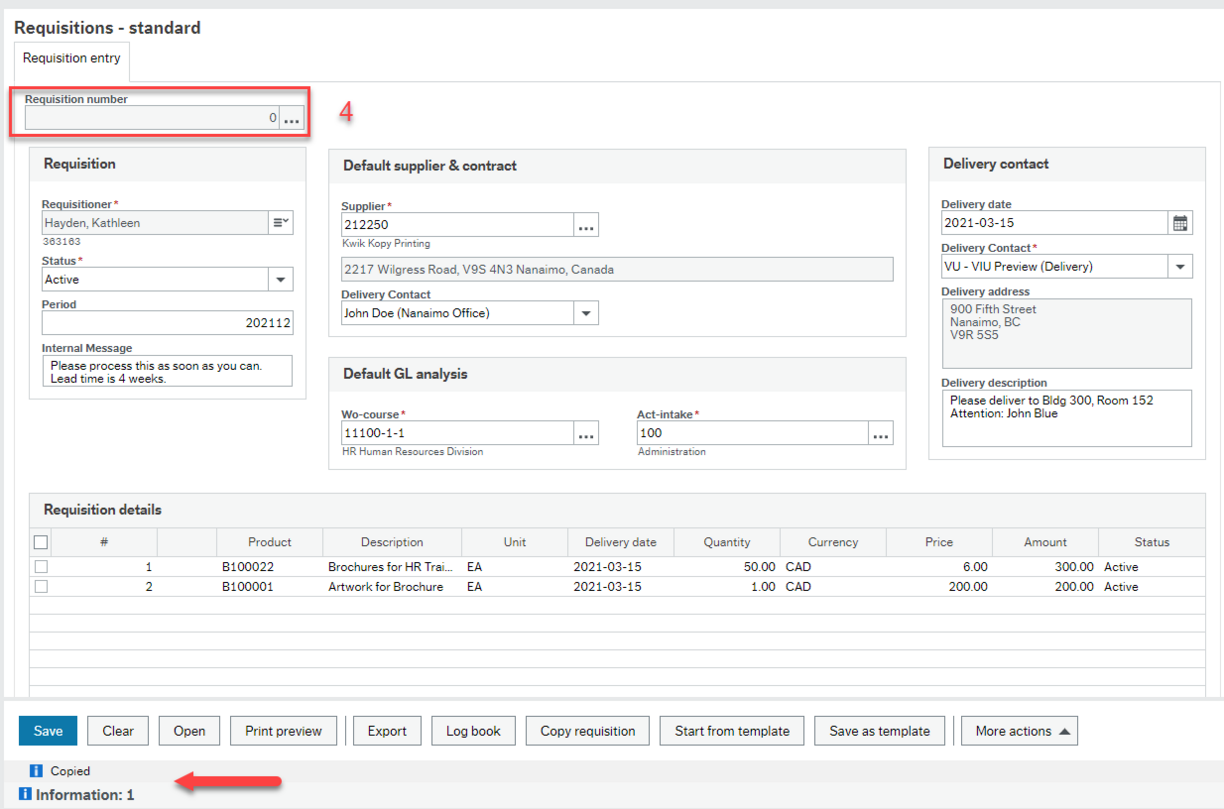
- The Requisition data will replicate with the exception of the Requisition number, which has been cleared. The information note at the bottom advises that it has “copied.” Amend any data accordingly and click “Save” when complete. The Requisition will now enter the Purchase Requisition workflow for review and approval.
Before saving your Purchase Requisition, whether it is brand new or copied, you can choose to create a Requisition template. This is particularly useful for regularly ordered products or services.
Prerequisite Training: PROC 1: How do I create a Standard Purchase Requisition? and PROC 6: How do I copy a previous Purchase Requisition?
In your menu click on Procurement and then under Requisitions click on Requisitions – standard.
Steps are as follows:

- Create or copy a Requisition as per the prerequisite training mentioned above. When your Requisition is ready to be saved click “Save as template” at the bottom of the screen.
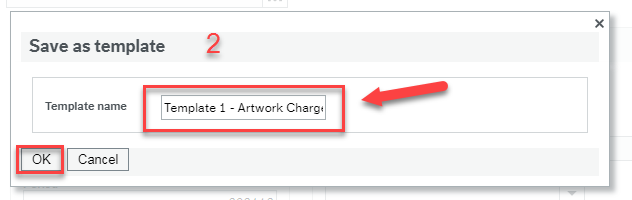
A screen appears and you will be prompted to give your Requisition template a name. It is suggested you develop a naming convention (e.g. “Template 1 – Office Supplies”, “Template 2 – Maintenance Supplies”, etc.). Type in your template name, and click “OK”.
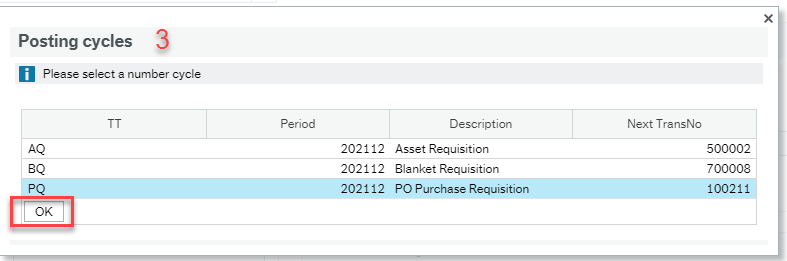
- A “Posting cycles” box will appear. Select the appropriate requisition type and click “OK”.
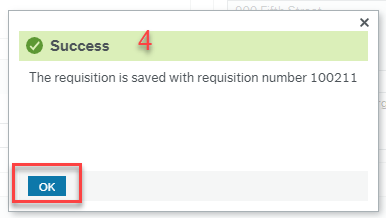
- Another pop up box entitled “Success” should appear that advises your PQ has been saved and a Requisition number is provided. Click “OK”
Notes:
- Your Requisition has now been saved as a template. Therefore:
- The workflow status on the Requisition template sets to “Do not Distribute”
- The Requisition Status sets to “N,” which stands for Active
- The template is assigned a Requisition #
- Even though the Requisition has been assigned a Requisition # it does not enter workflow nor does it transfer to a Purchase Order. If you want to put forth the actual Requisition for approval, you have to call up that Requisition Template and issue it as per the process in PROC 8: How do I use a Purchase Requisition Template?
- You can only see your own Requisition templates
- You cannot delete a Requisition template nor can you revise it. Therefore, be mindful when creating templates.
Before entering data in a new requisition you can select a previously saved template to use instead.
Prerequisite Training: PROC 1: How do I create a Standard Purchase Requisition and PROC 7: How do I save a Purchase Requisition as a Template?
In your menu, click on Procurement and then under Requisitions click on Requisitions – standard.
Steps are as follows:
- Select the “Start from template” button at the bottom of the screen.
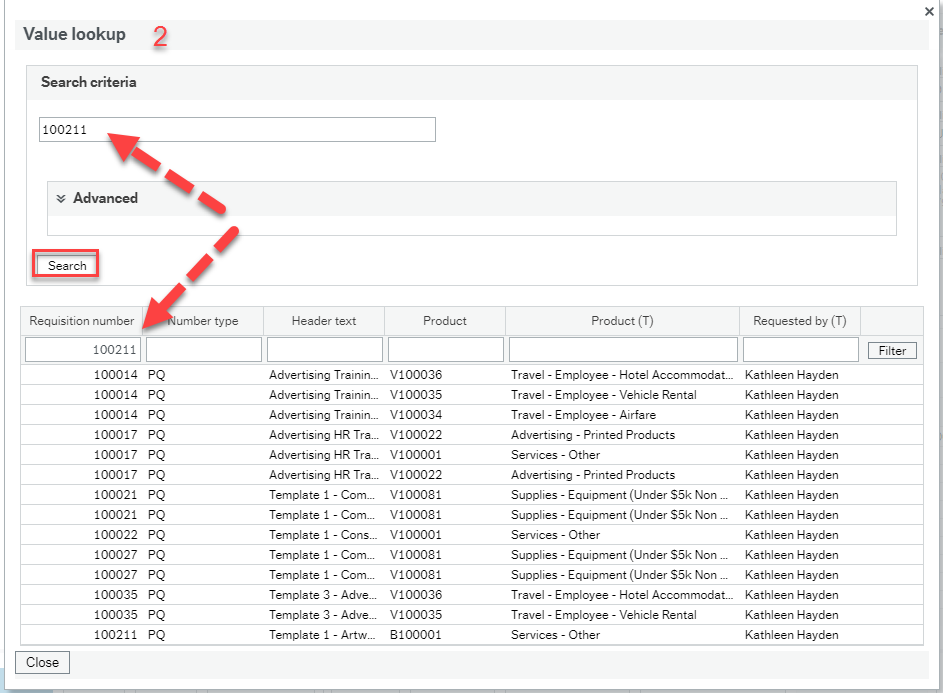
- A “Value lookup” box will appear with a list of your templates. If you have a lot of templates you can search for the template by typing in the Requisition # or template name in the “Search criteria” field or the column field (e.g. “100211”) and click “Search.”
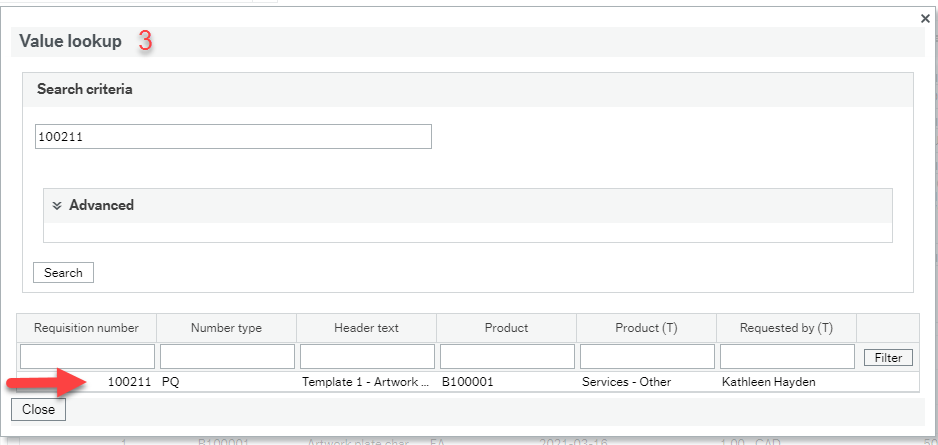
- The template you searched for will present itself. Select the template by clicking anywhere on the line and the template will open in the Requisition – Standard screen.
- Amend any details as necessary (i.e. delivery date, price, delete or add line items, etc.). If you want to amend any GL fields (Work Order, Activity, etc.) you will have to do that in the “Default GL Analysis” section at the top of the Requisition, as well as on each product line in the GL Analysis below.
- When complete, click “Save”, and select the appropriate Requisition type. The Requisition will be given a new Requisition number and will enter workflow for approval
This section contains instructions (including video) for how to amend or close your Purchase Requisition (Requisition) in FIS.
Prerequisite Training: PROC 1: How do I create a Standard Purchase Requisition
Note: Please review this process when closing a purchase requisition to avoid them getting 'stuck' in the system. The key is to know where the requisition is in the workflow first! Once it has been rejected back to you then you can change the requisition status to Closed - and only then.
Individuals who generate Requisitions (Requisitioners) may wish to amend or close their Purchase Requisition (Requisition) for a number of reasons, including:
- Requisitioner made an error when they created the Requisition (i.e. incorrect quantity or price), or they no longer require one or all of the items
- Requisition was rejected by IT or Facilities Review (e.g. IT cannot support the requested computer hardware or software)
- Requisition was rejected by Procurement (e.g. capital product code not used, incorrect Requisition type, etc.)
See PROC 9: Purchase Requisition Amend or Close for complete instructions.
PROC 9. How to amend or close a requisition - video
PROC 9 How do I amend or close a requisition video transcript.txt
This section contains documentation (including videos) for how to find out the status of a Purchase Requisition in the FIS (Financial Information System).
Please note: The training materials and videos may include fields or hyperlinks that are no longer visible as the Finance AURORA Project Team continues to make adjustments to the system to refine functionality.
PROC10. Purchase Requisition enquiries
PROC 10. How to enquire on the status of a Purchase Requisition: part 1 of 2 - video
PROC 10 How to enquire on the status of a purchase requisition video 1 of 2 transcript.txt
PROC 10. How to enquire on the status of a Purchase Requisition: part 2 of 2 - video
PROC 10 How do I enquire on the status of a purchase requisition video 2 of 2 transcript.txt
There may be instances when a new product code (for goods or services we buy), needs to be created. The requestor must complete the “New Purchase Product Request Form” and forward to the Manager, Procurement at procurementservices@viu.ca for review and approval. This form is located on VIU’s Finance Forms.
The Procurement Manager will review the completed form and decide if the requested product should be set up in FIS or if an existing product can be used. If the Procurement Manager is in agreement with the request, the Procurement Manager will create the new product code in FIS and communicate the product code information to the requestor.
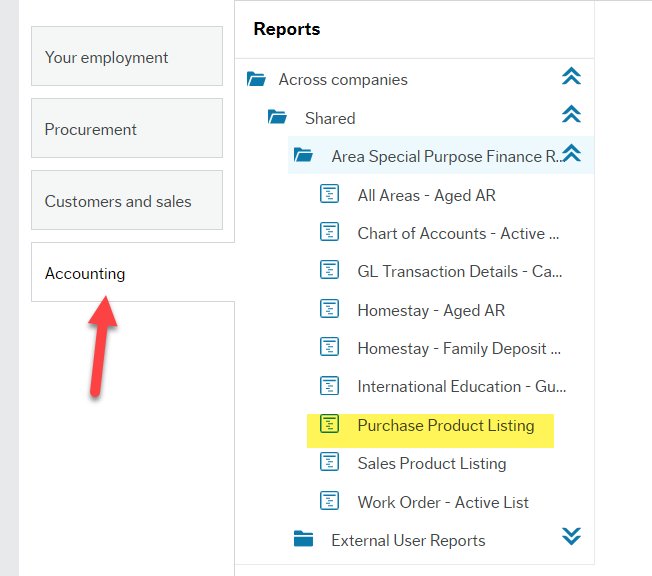
You can see a list of all current Purchase Products by navigating to the home screen in the Employee Portal and:
- Looking for the Purchase Product Listing report located under the Accounting menu item under Reports -> Across companies -> Shared -> Area Special Purpose Finance Reports; or
- By opening Requisitions - Standard under the Procurement menu item and activating a product line under Requisition details and clicking the dropdown menu arrow beside the product field. This opens a Value lookup enquiry window that includes a list of all products.
Q & A Purchase Requisitions
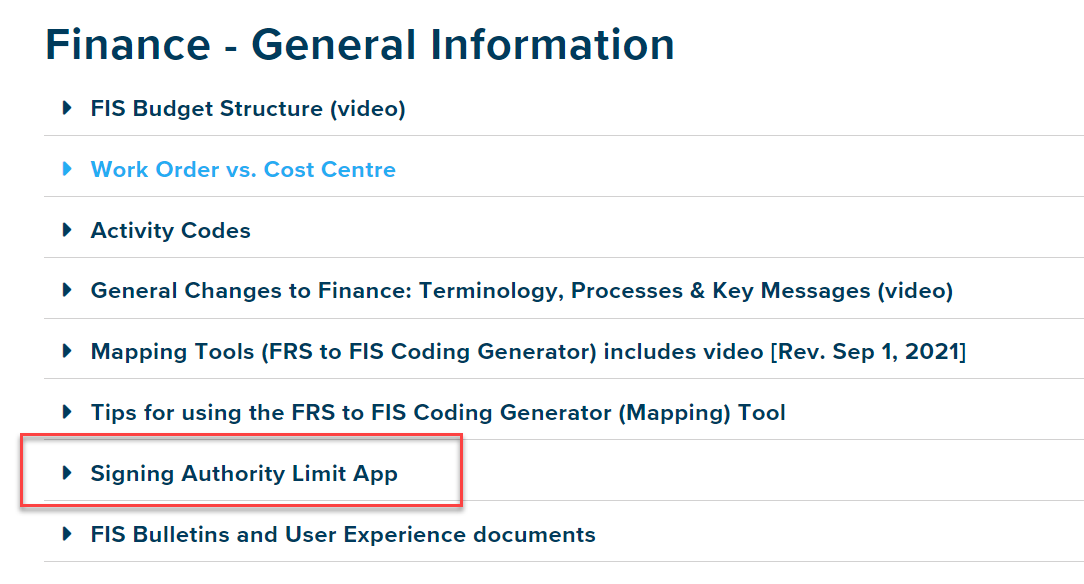
Once you know the total $ amount of your order including tax, as well as the Work Order you are going to expense this to, you need to look up who has authority to approve your order. To do this:
- On the main Finance training page scroll scroll down to the “Finance – general information” section, and click on “Signing Authority Limit App”
- Click on the “VIU Apps” button at the top left of the page and select “Signing Authority”
- Click in the blank field beside “Work Order” and scroll down to find your work order and click on it
- A list of individuals who have authority for the Work Order will appear. Since it doesn't automatically put them in order from lowest $ to highest $ you can click on the arrows beside "Amount" at the top and then they will be in order
Yes, it is called a GL Split.
Watch the video in PROC 1 (video 4 of 5) starting at 3:00 minutes in to see how this is done using the GL Analysis section at the bottom of the Purchase Requisition.
It depends what enquiry you are looking at.
The PO will only ever have a status of “Ordered.” For example, if you look under Enquires and “Own Requisitions” (which is explained in the training materials PROC 10) the PO will show a status of “O” when it’s been Ordered.

However, in the “Your Purchases” enquiry (screenshot below), "Approved" and then "Sent" are descriptions under the State column and are not considered a status. This enquiry will state "Approved" when the PO has been created successfully as a result of the Purchase Requisition workflow. It will say "Sent" when the PO is Ordered (i.e. sent to the supplier). So "Ordered" and "Sent" have similar meanings. These are also explained in the training materials for PROC 10.

With the base product coming in July 2021, you will only be able to view your own Requisitions as access cannot be limited to specific Work Orders. This may change as further enhancements are added to the system. If it’s important for your area to view all Purchase Requisitions for your department, you will have to develop an internal process in the interim.
With respect to individuals on vacation or leave, a back-up and an alternate will be assigned from each department to look after any workflow tasks that may require intervention, which will be managed by Finance. In the future, you will be able to assign a substitute in the system when you know you’ll be away.
Not at this time. With the base product, individuals will only be able to view their own requisitions. Also see above response about viewing others' requisitions.
First, be sure you are waiting (up to 10 seconds) for the document archive to load after you click on the paperclip icon.
Be sure you are attaching only single PDFs. A Portfolio PDF with multiple documents is not readable by the system. Plus you need to correctly name each document individually for ease of identification.
If you have trouble attaching documents the standard way with the window popping up, you can try the alternate “drag and drop method”:
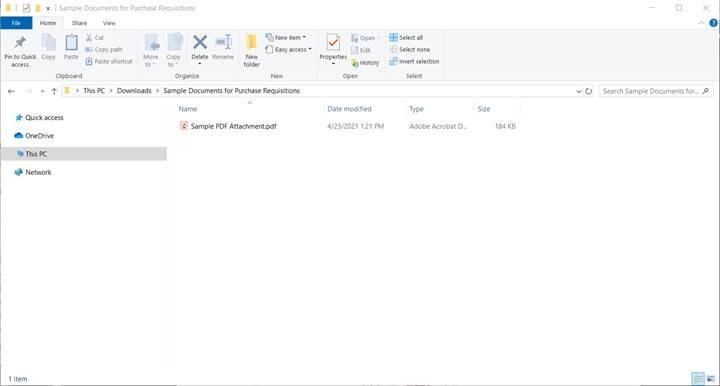
1. Locate the file in your Windows Explorer and keep that window open on your desktop or one of your monitors if you have more than one:
2. In FIS when you have the Purchase Requisition open, click the paperclip icon so the "Document archive" window opens:
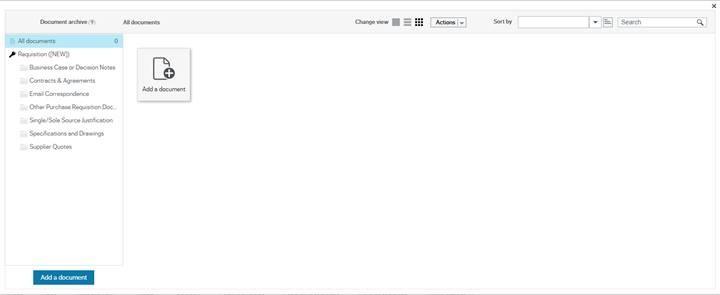
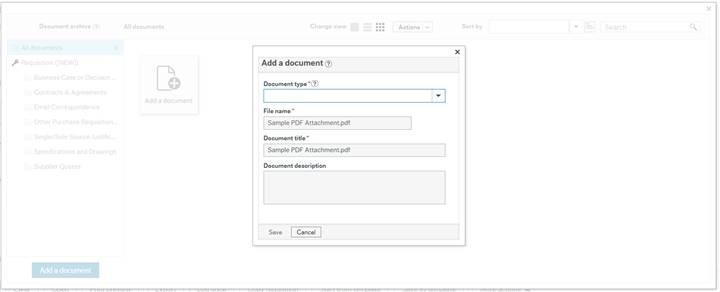
3. Drag your file from Windows Explorer and drop it anywhere in the "Document archive" screen. You will receive an “Add a document” prompt. Select the appropriate document type (mandatory) and enter in a document description (optional). Click Save.
4. You should now see your document in the "Document archive"
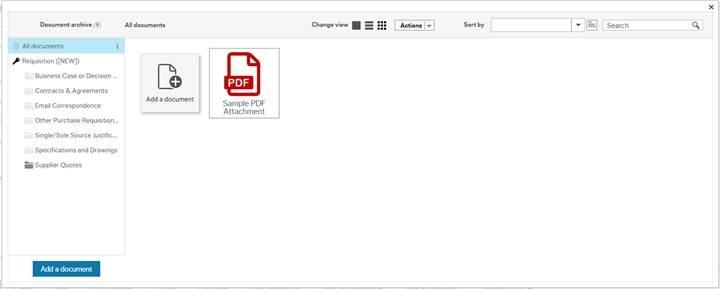
Click the X at the top right corner of this window to return to your Purchase Requisition. You will see the paperclip icon now has a blue box indicating a file is attached!
No. This is something that would have to be set up outside of FIS by the business area. When your Purchase Requisition is reviewed by Procurement, Procurement may change the Product code or supplier as needed. In the future, there may be added functionality to support standardization efforts.
All suppliers must be set up first in the FIS system before you can generate a Purchase Requisition. If you want to purchase from a new supplier, you need to send them the “Standard Supplier Setup and Maintenance Form” available on VIU’s Finance Forms. Suppliers are advised to send their completed form directly to ProcurementServices@viu.ca. You can also send a request to the Procurement department to send the form to the supplier instead.
The ability to delete documents has been restricted for audit reasons.
a) If you have attached a document in error and you have not yet saved your transaction, you will need to clear your transaction and start over.
b) If you have already saved your transaction, you will need to inform either Accounts Receivable (Sales Orders) or Procurement (Purchase Requisitions & Goods Receipts) that an incorrect document was attached. Accounts Receivable or Procurement will then reject the task back to you in workflow, at which point you will have the option to either:
- Close the Purchase Requisition or Sales Order and start over, or
- Rename the incorrect document as “Document to be deleted” and then attach the correct document, if applicable. Accounts Receivable or Procurement will submit a request to remove the document to be deleted, if applicable.
Please be sure you are attaching each document as a single PDF. Portfolio PDFs with multiple documents are not readable by the system. You must also correctly name each document individually for ease of identification.
The fiscal or accounting period will default to the current period. You do not need to change the period from the default.
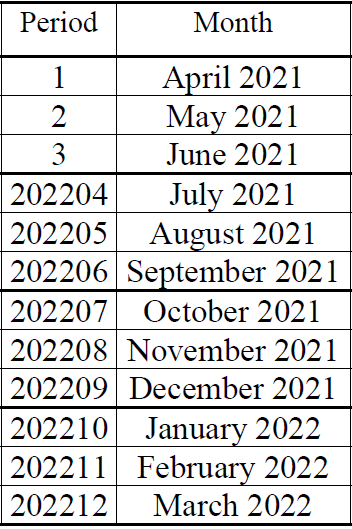
You will notice that the period terminology in FIS differs from FRS. In FRS, the periods were labelled as “1”, “2”, “3”, etc. In FIS, the periods begin with the ending year followed by the period number (two digits). For example, for the fiscal year 2021-22, July 2021 would be “202204”. See the below chart for a reference guide. As we converted to FIS on July 2021, the first quarter (April through June) uses the old FRS period terminology.
To verify that you are choosing the correct codes, do the following:
- Open the FRS to FIS Coding Generator Tool found above under Finance – general information -> Mapping tools
- From within this spreadsheet go to the Product to Account tab and select the FRS Object Code in the upper left box: Obj C. Once you’ve selected an Object code the spreadsheet will filter to show you the correct FIS Product ID(s).
You can also see a complete list of the current Products you can choose for your Purchase requisitions products including the description and the associated accounts.
After you click on the report it will open "Enter search values" window. If you simply click "Ok" you will get the complete list.
Different than most other reports in this folder you have the option to narrow down the search criteria. You can choose to restrict the list by Product ID or by Account by using the operators (defaults to "Like") such as "In list" or "Starts with" to fine tune your list.
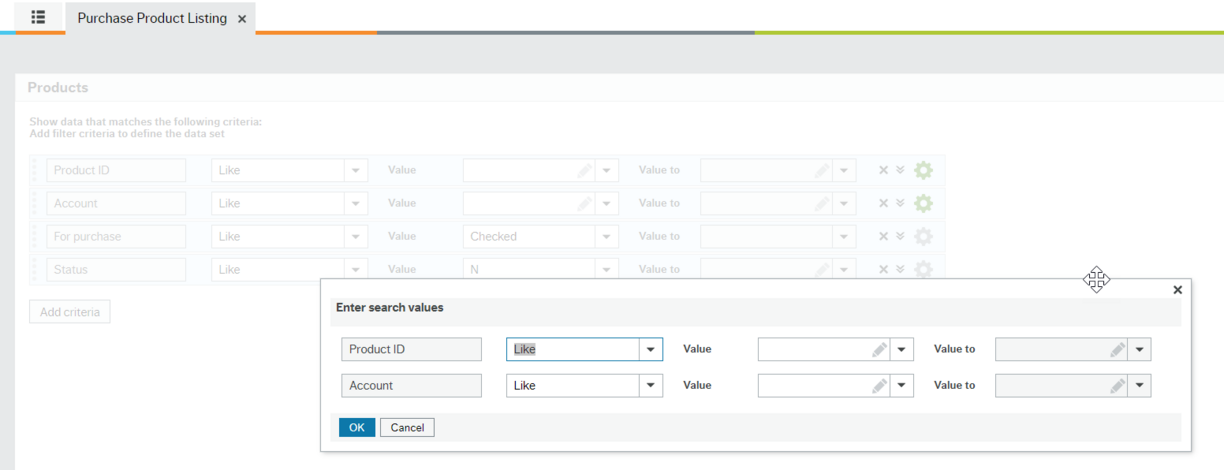
If you click on the Product ID column (or any of the columns) in the main list it will sort numerically (or alphabetically) so the A, B and C products will be grouped together.
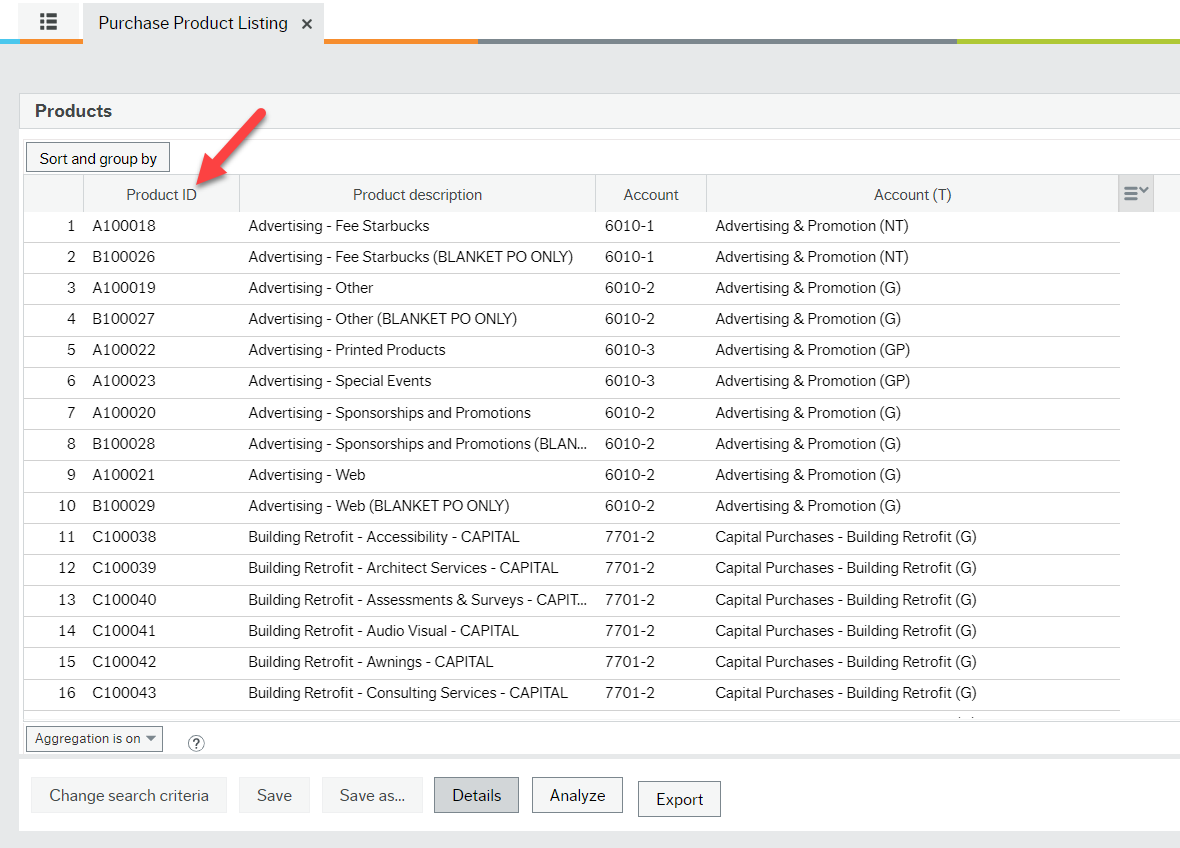
You can also see a list of all current Purchase Products by opening Requisitions - Standard under the Procurement menu item and activating a product line under Requisition details and clicking the dropdown menu arrow beside the product field. This opens a Value lookup enquiry window that includes a list of all products.
Q & A requisition approval email
It’s important to include specific details in the body of your email so your approver and Procurement are clear what the approval is for. You must also ensure your approval email is sent to the appropriate individual who has signing authority for the total $ amount of the requisition and for the Work Order(s) chosen. Be aware that attachments referenced in the email will not be visible once the email is converted to PDF format. Also, assumptions should not be made on who the approver should be.
- The email must include:
- Description of the goods/services you are requesting
- Total price including taxes
- Work order / Activity code
- Supplier name
- See Email example below - The approver must be an individual who has signing authority for the total $ amount of the requisition (including taxes) and for the Work Order(s) chosen. If you are not sure who to send your email to, you can check this in the Signing Authority App. Enter your Work Order number and a list of individuals and their signing authority limits will appear.
- In the email you also need to ask the approver to forward their approval response to procurementservices@viu.ca and to copy yourself. See email sample below.
- Once you receive the approval back, it should be converted to PDF and attached to your requisition as a document under the “Email correspondence” folder.
Any approval emails that do not include clear information or are approved by an individual without proper signing authority will be rejected.
Email example:
“Hi Sue,
I require your approval to move forward with the purchase below. Please forward your approval directly to procurementservices@viu.ca and copy me.
| Supplier: | XYZ Construction Co. |
|---|---|
| Description: | Consulting services for construction project ABC |
| Total Price: | $1,000.00 plus GST = $1,050.00 |
| Work Order: | 1-8787-1-1; Activity 100 |
If you have any questions, please let me know.
Finance has an overall One Level Up Signing Authority approval structure.
VIU has a new audit requirement for “one level up” signing authority. For example, a requisitioner cannot authorize a request that they have created (even if it is within their singing limit); the authorization must be from an individual with higher signing authority on the Work Order.
As workflow will not be configured to include approvals based on signing authority $ limits for go live, the requisitioner must request approval by email from the proper individual who has authority for the total $ amount. The approver must send the approval email directly to Procurement at procurementservices@viu.ca and copy the requisitioner. The requisitioner must attach the approval email to the requisition as a single document in PDF format. The email subject line should read “Requisition approval.”
If a requisitioner has signing authority for a specific $ amount and the requisition total is within their signing limit, the requisitioner must request approval from someone within their department with a higher signing limit (i.e. one level up). Again, the approver must send the approval email directly to Procurement at procurementservices@viu.ca. The email subject line should read “Requisition approval.” Please note this is a new audit requirement that is required moving forward.
For more details on how to access the VIU Apps -> Signing Authority application see the Spending Authority item on the Finance landing page.
This depends on whether the membership is for VIU or for different individual employees.
For VIU or a department
If someone has signing authority on all four Work Orders that is ideal. If so, that would be acceptable. If not, then we need someone with signing authority for each Work Order to sign off on the appropriate amount – this might be two, three, or four people depending on everyone’s permissions. The email approvals must be attached as single PDFs. A Portfolio PDF with multiple documents is not readable by the system. Plus you should correctly name each document individually for ease of searching.
For an individual
The same is true for the above, but please remember that a person cannot authorize their own membership. So, if for example, the membership was for person A who has signing authority on all of the Work Orders and is being split between four different Work Orders, they cannot sign for themselves. It would need to go to the next level up.
Receiving goods and services: the Goods Receipt
This section contains information (including video) on how to enquire about a Goods Receipt.
There may be instances when you want to check if your PO has been received, partially received, if an invoice has been registered against it, or to review general activity.
In your menu, click on “Procurement” and then under “Purchase orders” click on “Goods received” and then click on “Goods receipt.”
1. Goods Receipt screen
Under “Previously received” you can see if anything has already been received against your PO as follows:
A. Order number: Enter the PO# of the Goods Receipt you wish to enquire about and press the “Tab” key to bring up the information.

The 1st line for “Brochures” has been partially received (i.e. we ordered a quantity of 100 and received a quantity of 50)
- The 2nd line for “Artwork” has been fully received (i.e. we ordered a $ amount of $425 and received a $ amount of $425)
- The 3rd line for “Posters” has not been received (i.e. we ordered a quantity of 10 and received 0).
2. Order info:
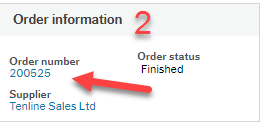
There is valuable information tucked in behind the PO# (blue hyperlink) on the Goods Receipt screen. Click on the PO number and an order screen will appear.

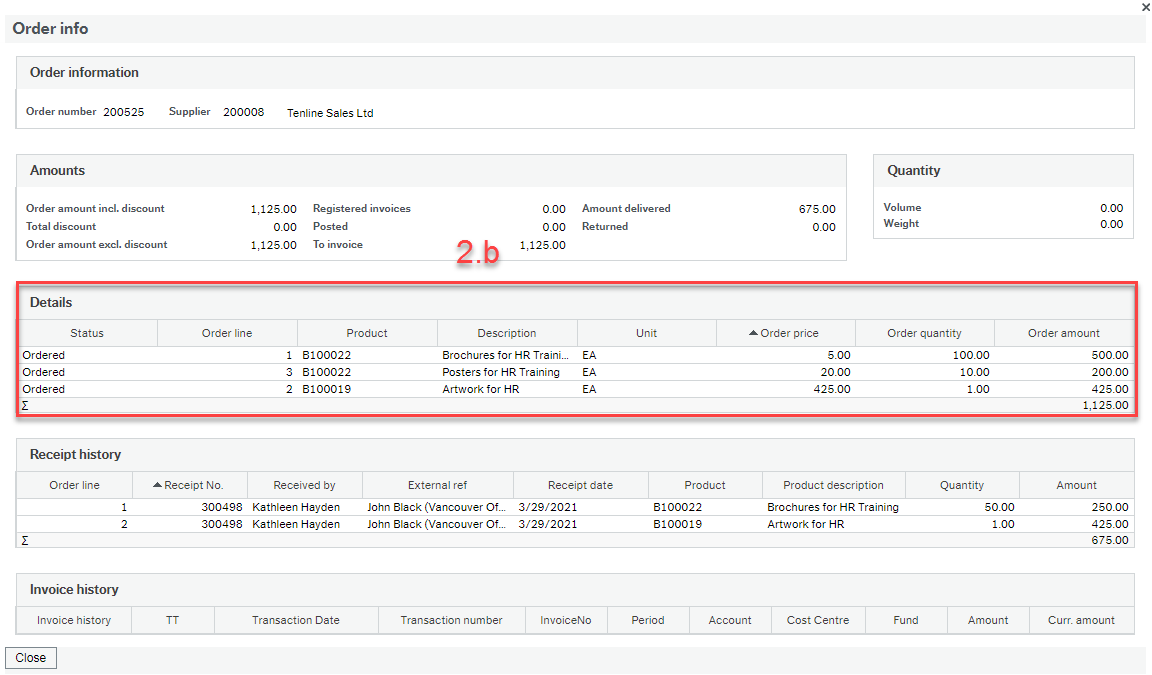
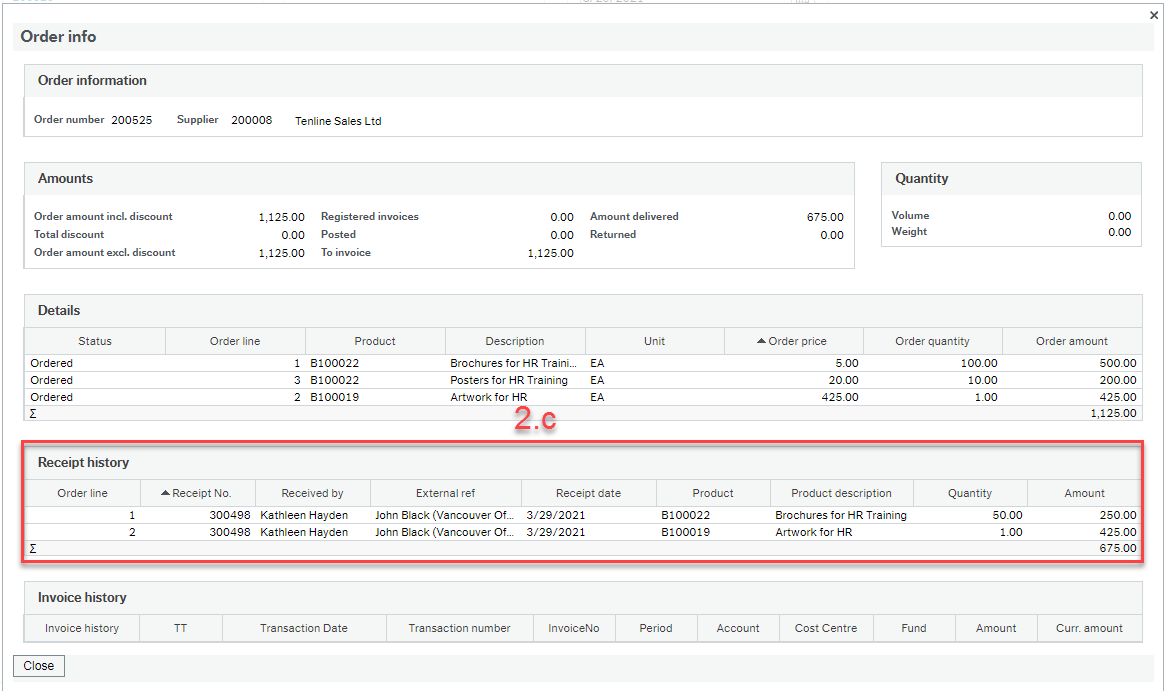
Note: Unfortunately, the “Received by” data is not accurate. To view accurate data (i.e. the individual who actually generated the Goods Receipt), you can look at the “Log book” attached to the workflow enquiry (see Section 3 in PROC 10 – Purchase Requisition Enquiries under “How do I enquire on the status of a Purchase Requisition?”
2. d Invoice history: Provides info such as whether an invoice was registered against the order, or if the order was posted for payment (e.g. doesn’t mean the supplier was paid, only that they will be paid), the date of that transaction, the transaction number, invoice number, Account, CostCentre, Fund and the $ Amount registered or posted (includes tax).
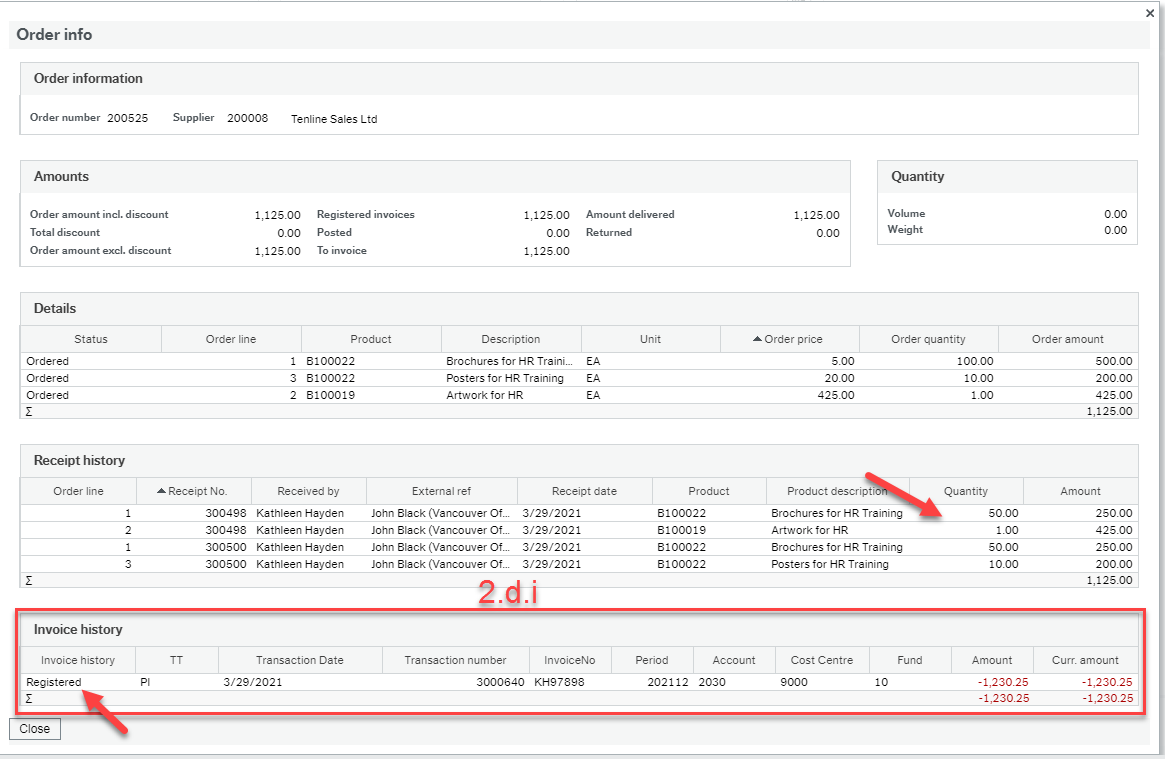
2.d.i. For example, in the screenshot above the balance of the order was received and an invoice arrived which AP registered against the PO. The “Invoice history” now shows that there is an invoice registered against the order. You see the Transaction number, Invoice number, Account, Cost Centre, and the “Amount” which includes the applicable taxes.

ii. Once the invoice registration is approved, it will be posted for payment. In the screenshot above we see the “Invoice history” now shows that the invoice is “Posted.”
Note: When an invoice is “Posted” it doesn’t mean it’s been paid. It means that it has been posted “to be paid” and is subject to the payment terms (e.g. net 30 days). There is no further indicator when the supplier has actually been paid.
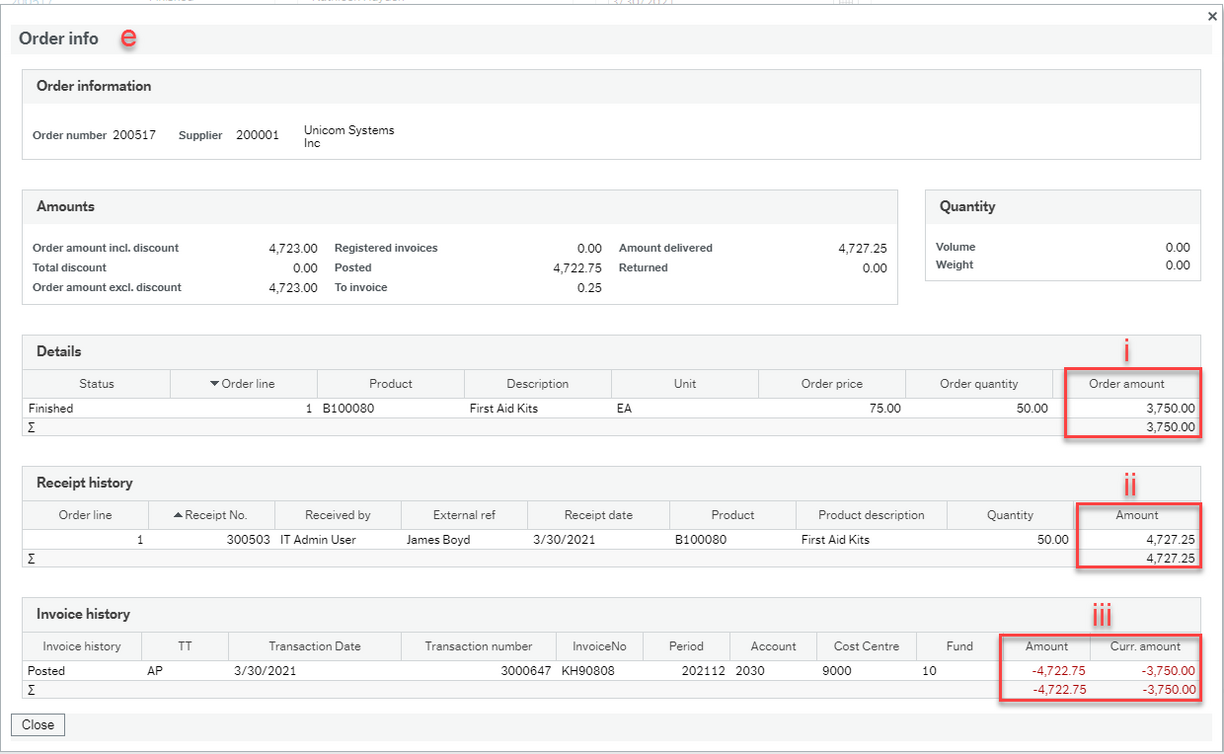
i. Details: Order amount does not include the US exchange (amount is in USD)
ii. Receipt history: Amount includes US exchange (amount is in CAD)
iii. Invoice history: Amount includes the US exchange (amount is in CAD) and Curr. amount does not include the exchange (amount is in USD)
The posted amount may also differ from the received amount because of the length of time that has lapsed between the 2 activities (i.e. the exchange rate fluctuated from the time it was received to the time it was posted for payment). Therefore, when you see fluctuations in the amounts as per the screenshot above, it will give you a clue that an alternate currency is involved.
PROC 16. How to enquire on a Goods Receipt - video
PROC 16 How do I enquire on a Goods receipt video transcript.txt
This section contains instructions for how to return a product.
There may be instances when the originator of a Purchase Requisition or accountable personnel (originator) wishes to return goods or services (or a portion thereof) that were already received in the FIS system and/or possibly paid for. This can happen at any point through the procure-to-pay process and could be returned for a number of reasons, including:
- Goods are damaged
- Incorrect goods were shipped
- Goods or services are no longer required
- Goods or services were ordered in error
- Goods or services did not meet our satisfaction
- Goods are under warranty and need to be returned for repair
Originators must contact Procurement to initiate the return. Procurement staff will be responsible for arranging the return of the goods, and if applicable, generating a goods return in the FIS system (the “Goods Return”), and ensuring replacement goods and/or a credit invoice is obtained. Accounts Payable will perform a Goods Return for food and beverage received on complex Blanket Purchase Orders, where applicable.
When an originator wants to initiate a return, they should:
- Contact Procurement at procurementservices@viu.ca with the original PO# and a description of the issue. Pictures may also be submitted to assist Procurement with providing additional information to the Supplier, especially for damage or quality issues.
- Originator will store the product until they receive further instructions from Procurement.
Q & A receiving or returning goods and services
This is something the business unit would handle and keep track of on their own (i.e. outside of FIS). If it was equipment you wanted to return to the supplier because you want a refund or want it replaced (i.e. it wasn’t working), then you need to contact Procurement. See “PROC 22: How do I return product?” under Workflow Process.
Purchase Orders
There may be instances when a change to a Purchase Order (PO amendment) is required for various reasons. These changes may come to Procurement’s attention by the original requisitioner, the supplier, Accounts Payable, etc. The process for amending the Purchase Order depends on the financial impact which is categorized as follows:
Non-financial – Changes that do not impact the total $ amount previously approved or the Work Order chosen. For example:
- change the supplier
- change the original requisitioner name (requested by)
- add a missing document
- change the product code; or
- fix a product description.
Financial – Changes that do impact the total $ amount previously approved for a specific Work Order(s). For example:
- increase in quantity or price
- change in currency
- change in tax application
- additional line item(s) for extra charges (e.g. freight); or
- change a Work Order.
When a PO amendment is required:
1) Non-financial
- Send email to Procurementservices@viu.ca. The email should reference “PO amendment – PO #[XXXXXX]” in the subject line, and include:
- A description of what needs to be changed
- If you want to change the “Requested by” name (Original requisitioner) so that associated workflow tasks are directed to another individual, this individual must have permission to action Tasks (e.g. Goods Receipts) on behalf of the selected Work Order in the Purchase Order. The email should include a reason for the name change, and a manager, dean or director must be copied on the email request.
2) Financial
- Send email to an individual in your department requesting approval for the PO amendment. This individual must have signing authority for the Work Order referenced on the PO and for the “new” total PO $ value (including taxes). If the total PO $value is within your own signing authority, you will need to send an email to an individual who has higher signing authority (one level up). Check to see who has signing authority.
- The email must reference “PO amendment – PO# [XXXXXX]” in the subject line and depending on the type of amendment, must include:
- Supplier name
- The required change. For example (increase the value on Line Item 2 Electrical Supplies from $[X] to $[X], add $[X] for freight, change Work Order from [X] to [X], etc.)
- Work Order #. This can be found in the original Requisition or in the Goods Receipt screen under the GL Analysis section
- New PO total $ amount (excluding tax). The current PO $ amount can be found in the “Your Purchases” enquiry under Purchase Order details. Calculate the new PO total $ amount (i.e. Current PO total $ amount plus the required change / increase)
- A request for the approver to forward their approval response to Procurementservices@viu.ca and to copy yourself
- See Email example below
- Once Procurement receives the approved PO amendment email, the PO will be amended accordingly.
- Depending on the PO amendment circumstance, Procurement may or may not issue the amended PO to the supplier.
Email example:
“Hi Sue,
I require your approval to amend the above noted Purchase Order as follows:
| Supplier: | XYZ Construction Co. |
|---|---|
| Change required: | Increase Line 1 from $1,000 to $2,000 |
| Work Order: | 1-8787-1-1 |
| Total price (excluding taxes): | $2,000 |
Please forward your approval directly to ProcurementServices@viu.ca and copy me.
If you have any questions, please let me know.”
Q & A Purchase Orders
At this time, the Purchase Order associated with your Purchase Requisition can be viewed when you are in the Goods Receipt screen. Enter your Purchase Order number in the “Order number” field and then tab out of the field to bring up your Purchase Order details. Click on the “Open documents” paperclip icon and view the Purchase Order that resides in the “Purchase Order Print Out copy” folder. In the future, you may be able to view Purchase Orders applicable to Work Orders in your department (even those generated by others) once further enhancements are added to the system.
You put VIU at risk.
The PO includes important terms & conditions that the supplier must agree to prior to shipping the goods or providing the services. If there is a dispute or disagreement about the quality of the goods/services, or payment, the PO would be referenced. POs make orders easier to track and they ensure clear communication. There is also a risk of the supplier not being paid on time, which can strain supplier relationships. Without a PO, there is also no commitment against your budget which may mislead your department into thinking they have more $ available than they really do. Any orders placed without a PO may be escalated to VP level depending on the risk associated with the goods or services ordered.
There are a few ways to find this information.
If you have access to view Financial Reports you can use reporting to confirm the transaction has been posted. Using the GL Account Enquiry - Details report:
- Enter the criteria as the Work Order that the PO was charged to.
- Click the dropdown arrow at the top of the “Order number” column on the far right.
- Enter your PO number in the "Equal to" field and click OK.
- Transactions paid against that PO will display and you will have the ability to click on the blue Transaction number link to see invoice details.
If you do not have access to view these reports see PROC 16: How do I enquire on a Goods Receipt? for instructions on how to view your PO details from the Goods Receipt screen.
Workflow processes (Task management)
This section provides instructions (including videos) for how to review your workflow tasks under Task management (IT Review or Facilities review) in the Employee Portal Financial Information System (FIS).
PROC 17. Purchase Requisition workflow IT Facilities review
PROC 17. How IT or Facilities reviews a Purchase Requisition in workflow: part 1 of 3 - video
PROC 17. How IT or Facilities reviews a Purchase Requisition in workflow: part 2 of 3 - video
PROC 17. How IT or Facilities reviews a Purchase Requisition in workflow: part 3 of 3 - video
This section provides instructions (including videos) on how to review your workflow tasks. Specifically, rejected Purchase Requisitions, under Task management in the Employee Portal Financial Information System (FIS).
PROC18. Purchase Requisition workflow - rejected requisition
PROC 18. How to review a rejected Purchase Requisition in workflow: part 1 of 2 - video
PROC 18 How do I review a rejected purchase requisition in workflow video 1 of 2 transcript.txt
PROC 18. How to review a rejected Purchase Requisition in workflow: part 2 of 2 - video
PROC 18 How do I review a rejected purchase requisition in workflow video 2 of 2 transcript.txt
This section provides instructions on how to review your workflow tasks, specifically Purchase Requisitions with an invalid delivery address, under Task management in the Employee Portal Financial Information System (FIS).
PROC19. Purchase Requisition workflow delivery address invalid
This section provides instructions (including videos) on how to review your workflow tasks, specifically missing Goods Receipts, under Task management in the Employee Portal Financial Information System (FIS).
PROC 21. PO Invoice workflow - Goods Receipt review
Videos will be updated soon due to new process (eff Apr 1, 2022) of originator now only accepting proposed Goods Receipts via Task management and no longer generating them from Goods Receipt activity screen.
PROC 21. How to review a Goods Receipt in workflow: part 1 of 4 - video
PROC 21 How do I generate a Goods Receipt in Task management/workflow video 1 of 4 transcript.txt
PROC 21. How to review a Goods Receipt in workflow: part 2 of 4 - video
PROC 21 How do I generate a Goods Receipt in Task management/workflow video 2 of 4 transcript.txt
PROC 21. How to review a Goods Receipt in workflow: part 3 of 4 - video
PROC 21 How do I generate a Goods Receipt in Task management/workflow video 3 of 4 transcript.txt
PROC 21. How to review a Goods Receipt in workflow: part 4 of 4 - video
PROC 21 How do I generate a Goods Receipt in Task management/workflow video 4 of 4 transcript.txt
For Blanket POs each line item was created with a “flipped” Quantity and Price field, i.e. the total price of the product was entered in the Quantity field, and the Price field was set at $1.00. For all Goods Receipt review tasks presented to you in workflow, you will see the total dollar amount of the product received in the Quantity field.
Specific changes that you can expect to see on the Missing Goods Receipt screen in workflow are as follows:
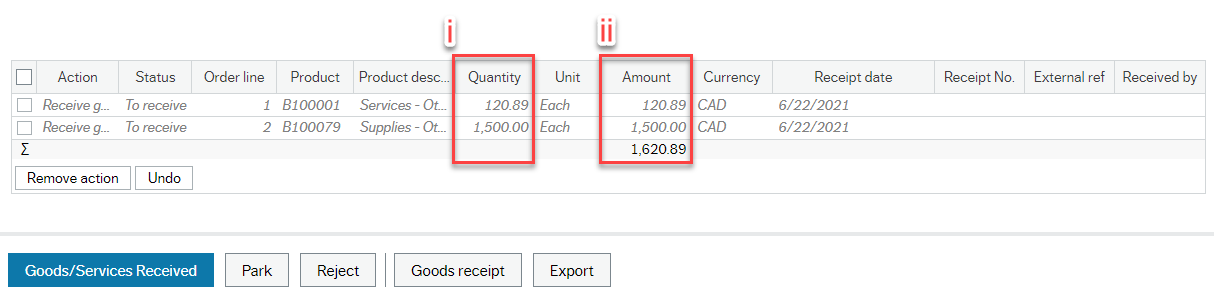
- Line items
- Quantity
The Quantity field will show the total dollar amount of the product received. In the example above, Accounts Payable received an invoice for $120.89 of supplies and $1,500.00 of services. - Amount
As the price for blanket PO products is set at $1.00, the Amount field will always equal the Quantity field.
- Quantity
Your Goods Receipt review workflow task can now be completed as per the process documented in PROC 21.
Revisions
The PDF documentation has been updated to reflect these changes; however, updates to the videos are still in progress. As much of the process remains the same, the existing videos still have relevance for training purposes. As you watch the videos, please keep in mind the specific changes to the process as described in this FAQ.
Q & A workflow processes (Task management)
Access to turn off personal alert notifications is temporarily unavailable. However, it is strongly advised that you do not deactivate personal alert notifications. Notifications are designed to provide meaningful information about tasks that need to be actioned in a timely manner within the system.
PCard purchases
Please note: effective August 2024, VIU's PCard program is being administered by the Accounts Payable department, not the Procurement department. Learn more about the Purchasing Card.
Procurement will no longer require a system generated Requisition as the approval backup for the PCard purchase and then close it out.
A requisition must not be generated if the product or service is going to be paid by PCard, even if Accounts Payable’s PCard will be used. If a requisition is created, it will be rejected.
Instead, the requisitioner will send an email with “PCard payment required” in the subject line, to the individual in their department that has signing authority for the total $ amount, and include the following:
- Supplier name and contact information
- Details about the product/service to be purchased
- Price
- The account the product/service is to be expensed and
- Work Order and Activity information
- See Email example below!
The requisitioner will also request that the approver send the approval email directly to Accounts Payable at PCards@viu.ca and copy the requisitioner.
Note: If the requisitioner has signing authority for a specific $ amount and the order total is within their signing limit, the requisitioner must request approval from someone within their department with a higher signing limit (i.e. one level up). This is a new audit requirement that will be required moving forward.
Email example:
“Hi Sue,
I require your approval to for the following purchase that will be paid with Accounts Payable's PCard:
Supplier: | Joe’s Party Palace |
|---|---|
Product: | Table decorations for graduation ceremony |
Total price (including tax): | $210.00 |
Work Order: | 18787-1-1 |
Activity code: | 100 |
Please forward your approval directly to PCards@viu.ca and copy me.
If you have any questions, please let me know.”
Zoom session recordings for P2P training
This “Procure to Pay” (P2P) launch session was recorded on April 27, 2021. Due to the amount of new processes to learn in the new Finance modules, we are rolling out the training in stages so you can learn one chunk at a time. The first stage covers the “Procure to Pay” (P2P) processes.
P2P Finance training launch session Apr 27, 2021 - video
P2P Finance training launch session Apr 27, 2021 - video transcript.txt
Slides from the presentation: P2P Q&A session #2 June 22, 2021
P2P Q&A session #2 - Jun 22, 2021 - video
Session recording:
Post go-live P2P Q&A session Oct 19, 2021 - video
Post go-live P2P Q&A session Oct 19, 2021 - video transcript.txt
CONTENTS
Reminders
1:00 - 3:40 Email approvals (one level up, signing authority limits, formats (single PDF only), what should be included, where to send)
3:40 - 9:22 Proper Product codes (overwrite description at a high level, choose correct codes A, B or C codes, product text area)
9:25 - 12:50 Payment Requisition and Expense claim Excel forms (must remain in Excel, use fresh forms, approvals)
12:50 - 13:40 Fee for Service payments (rules re: $500 and multiple payments and when to use a Purchase Requisition)
13:45 - 14:45 Goods Receipts (proposed Goods Receipt vs a new Goods Receipt - don't do both!)
14:45 - 15:10 Invoices (send to AP directly, don't attach to Requisition)
Answering chat questions
16:04 - 19:00 How do we know who the signing authority is?
19:15 - 22:30 For expense claim - where would I find the Activity Intake code?
23:24 - 25:22 When will FIS start allowing us to see details of charges?
25:25 - 27:55 Can anyone delete? Regarding saving original receipts.
28:15 - 30:35 Research receipts: what happens if we are not able to or didn't receive a receipt? - can we get a copy from AP or Procurement?
30:55 - 32:13 Can I get a cheat sheet of just the codes for my area?
32:25 - 36:16 Can you go through the Goods Receipt process again?
36:30 - 40:14 When you park a task, does that mean it will stop sending the reminders?
40:52 - 44:02 Clarify the difference between a regular goods receipt and proposed goods receipt?
Session recording:
Post go-live: P2P Q&A session Oct 26, 2021 - video
Post go-live P2P Q&A session Oct 26, 2021 - video transcript.txt
CONTENTS
Reminders
1:14 - 6:44 Approval emails (missing, one level up, signing authority limits, formats (single PDF only-not Portfolio), what should be included, where to send)
6:45 - 15:07 Product codes (explanation, overwrite description at a high level, messages, product text area, similarity to FRS Object codes)
15:20 - 19:23 Payment Requisition and expense claim new Excel forms (must remain in Excel format or will be rejected, always use fresh & updated forms, tick round trip box, approval email process, break out taxes, do not copy & paste data, use correct email address)
19:25 - 20:20 Fee for Service payments (rules re: $500 and multiple payments and when to use a Standard or Blanket Purchase Requisition)
20:25 - 20:50 Goods Receipts (proposed Goods Receipt vs a new Goods Receipt - don't do both!)
20:55 - 21:35 Invoices (have suppliers include PO on them, send all invoices directly to AP)
Answering questions
21:60 - 25:28 How do we now deal with SIN for suppliers for Payment Requisition?
25:50 - 28:23 Can I set up a Purchase Requisition for someone else so I don't have to do all the Tasks associated with it?
28:25 - 32:40 How can we look up PO information? (Enquiries)
32:45 - 35:35 How do we find details of a Goods Receipt (Order info)?
35:36 - 39:35 When do our PO transactions actually show up in the Financial reports?
40:05 - 43:04 How do we process student expense claims if they are not student employees? (Payment Requisition form)
Session recording:
Post go-live: P2P Q&A session - Nov 16, 2021 (video)
Post Go Live: P2P Q&A session Nov 16, 2021 - video transcript.txt