
For extra assistance contact GeneralAccounting@viu.ca or a Tech Champion in your area.
See Glossary page for definitions of new terms. You must be an active employee to see menus or data after you log in.
Please inform your areas of your Divisional or Expanded financial reports access so they know whom to ask for reports. Budget holders will still receive Quarterly and YTD Excel reports from the Budget office. This data can also be obtained from FIS using the "Inc Stmt" and "GL Account Enquiry - Details" reports.
New to reports? First steps:
You no longer get "view" access to see just certain "cost centres" (now Work Orders) as happened with the previous system (FRS). Access is now governed by job duties in your position at VIU. At this time the options are to view all transactions in your Division or all transactions in all Divisions. We are looking at restricting by Work Order in the future.
Types of access
There are currently four different levels of access to FIS reports depending on your position at VIU and what you need to perform your duties.
- Division access to view all financial transactions in all Work Orders in one’s own Division including payroll transactions minus the names of employees
- Division Restricted access to view all financial transactions in all Work Orders in one’s own Division including payroll transactions plus visibility of employee names (helpful for some budgeting activities and reallocation of payroll to other Work Orders if made in error)
- Expanded access to all financial transactions in all Work Orders at VIU including payroll transactions minus the names of the employees
- Expanded Restricted access to all financial transactions in all Work Orders at VIU including payroll transactions plus visibility of employee names
Access Levels 3 and 4 need approval of the Finance office.
How to obtain access
You must request access (if you don't have it already) from the budget holder in your area.
Budget holders
Can approve access to either:
- All financial transactions in all Work Orders in your Division (with or without employee names for payroll transactions) or
- All financial transactions in all Work Orders in all VIU Divisions if there is a business need. This access requires additional approval of the Finance office.
Report locations and descriptions
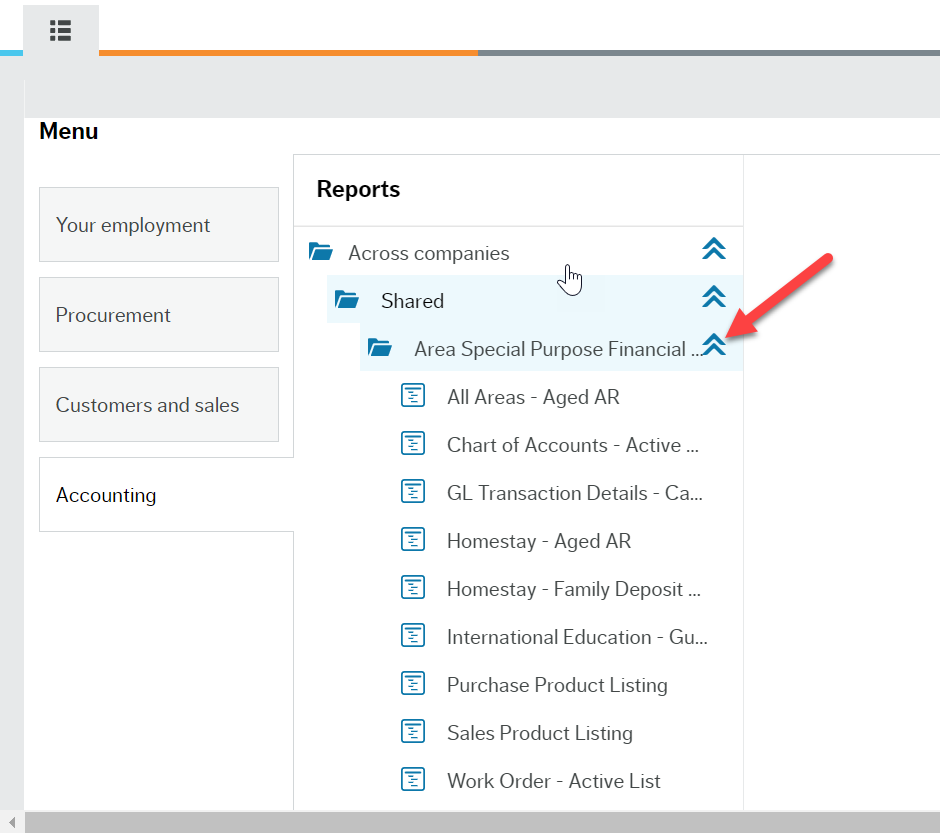
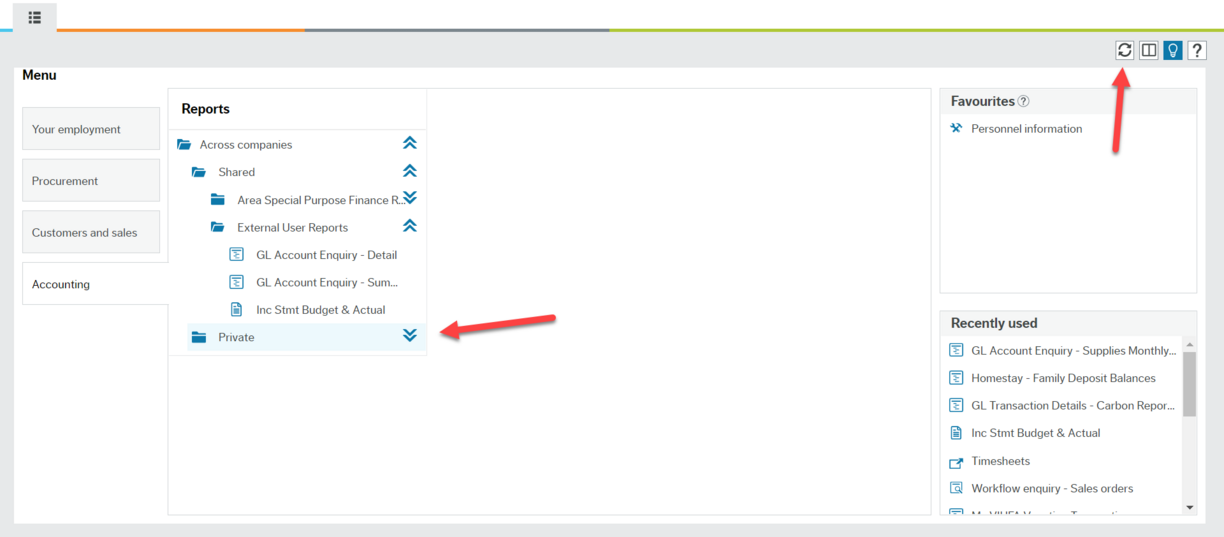
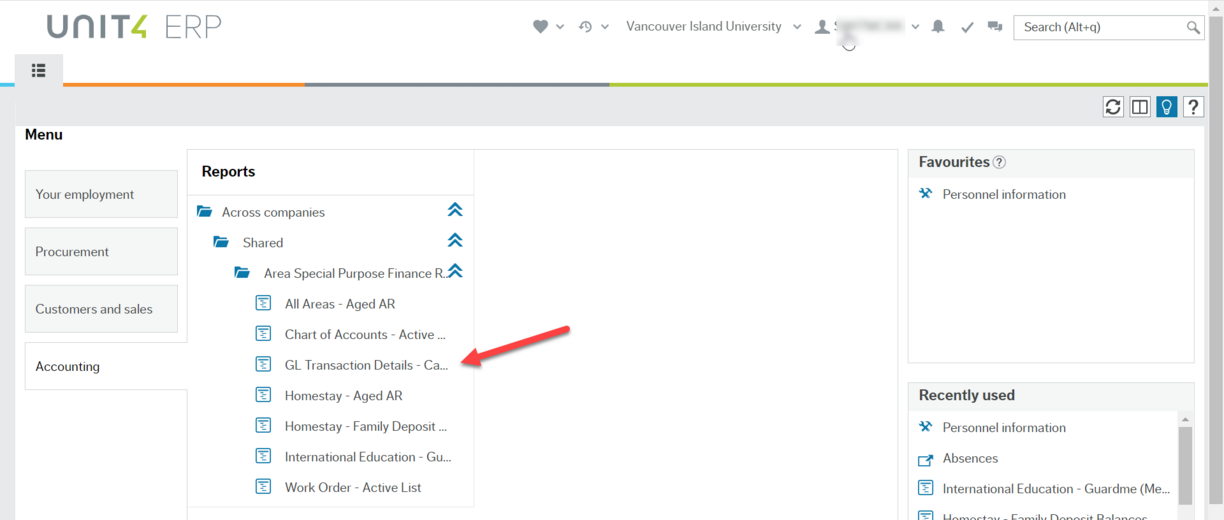
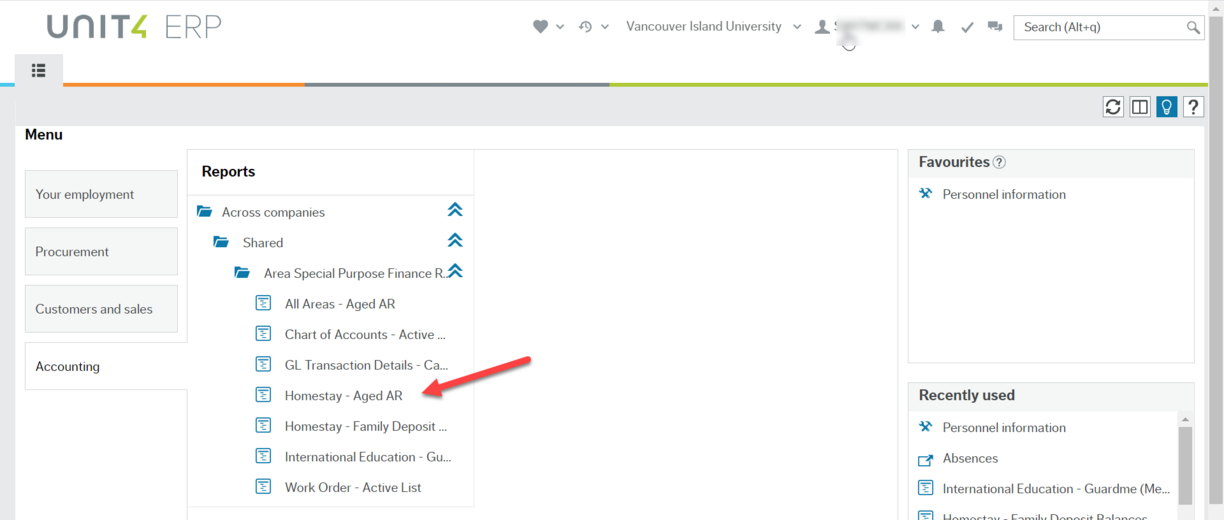
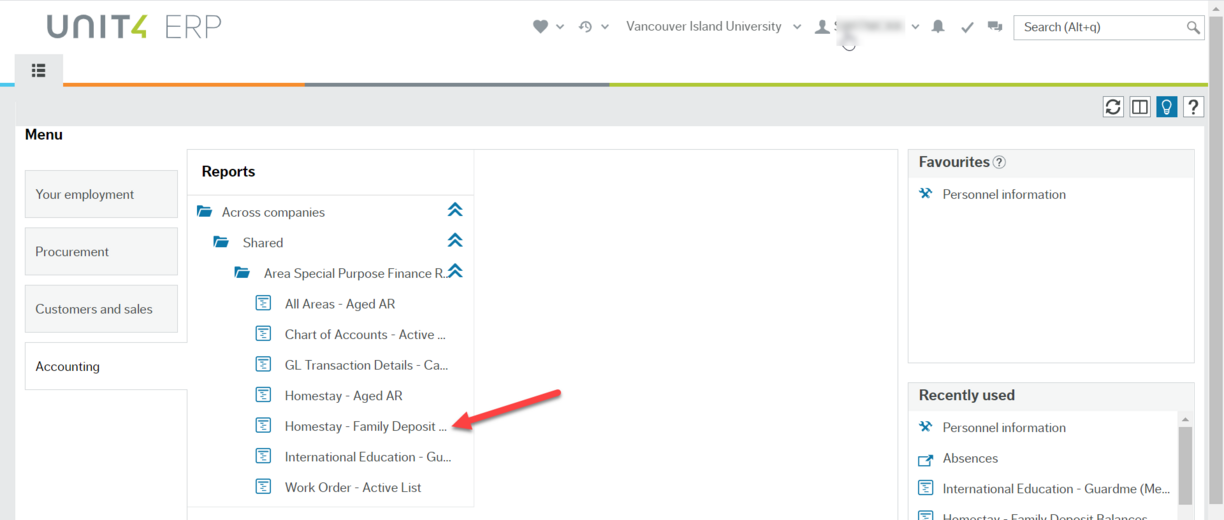
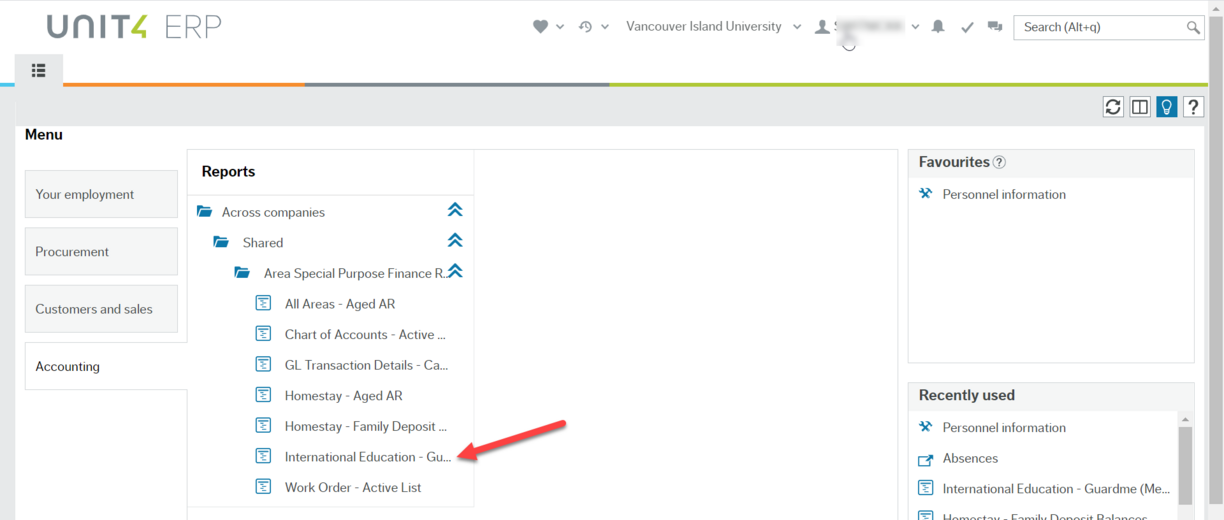
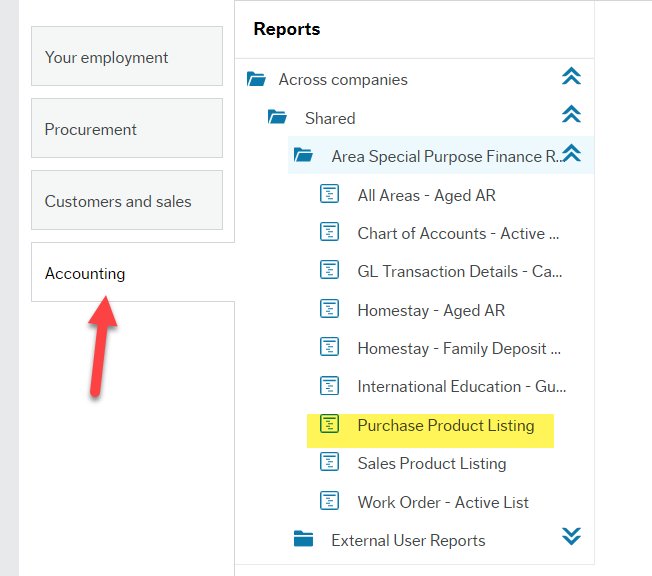
The following explains the three different folders you may see under Reports/Across companies/Shared in the Accounting menu item on the left side of the Employee Portal:
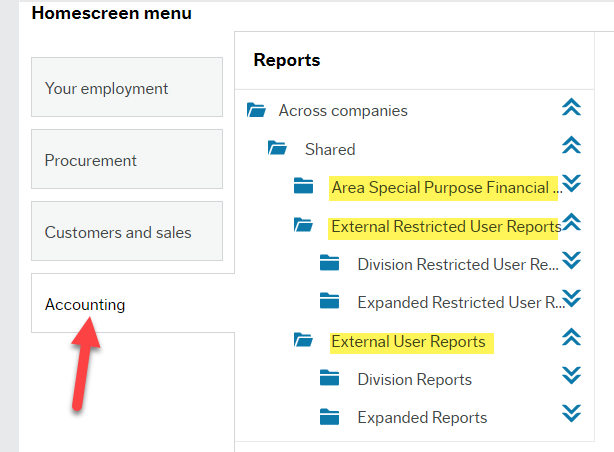
1. Area Special Purpose Financial Reports folder
The reports in this section are available to all active employees. They are simple, customized reports and typically open fully once you click on them. Some may require you to click an OK button to display the complete report or you can enter certain criteria or values to help narrow down the data you are requesting.
2. External Restricted User Reports folder
These reports are limited to only those employees who are authorized to see more sensitive data such as employee names attached to salaries accounts so they can monitor payroll transfers to other Work Orders. Users with this access will see a subfolder called either Division Restricted User Reports or Expanded Restricted User Reports.
Division Restricted User Reports
The users with Division access see a subfolder called Division Restricted User Reports. These users can view the employee names associated with payroll accounts for all Work Orders in their Budget Division using the Division GL Account Detail - Restricted report. This report requires specific criteria to be entered in a form to specify the exact data they want to see. You can experiment with different parameters to get exactly what is required. Details are below in the section for External Restricted User Reports.
Expanded Restricted User Reports
The users with Expanded access see a subfolder called Expanded Restricted User Reports. This allows them to view all of the employee names associated with payroll accounts for all Work Orders in all Budget Divisions, not just in their own Division. This report requires specific criteria to be entered in a form to specify the exact data they want to see. You can experiment with different parameters to get exactly what is required. Details are below in the section for External Restricted User Reports.
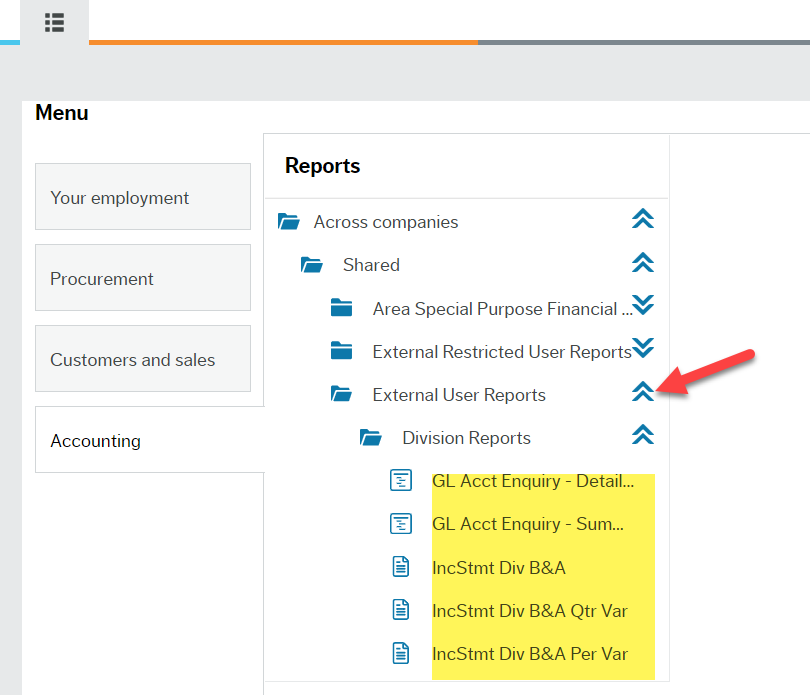
3. External User Reports folder
There are two types of user access for this folder. All users see the same set of reports, but their data access will be different, depending on what is required for their job duties.
Division Reports
The users with Division access see a subfolder called Division Reports. These users can view all of the financial transactions for all Work Orders in their Budget Division. These reports require specific criteria to be entered in a form to specify the exact data they want to see. You can experiment with different parameters to get exactly what is required. Details for each report are below in the section for External User Reports.
Expanded Reports
The users with Expanded access see a subfolder called Expanded Reports. This allows them to view all of the financial transactions for all Work Orders in all Budget Divisions, not just in their own Division. These reports require specific criteria to be entered in a form to specify the exact data they want to see. You can experiment with different parameters to get exactly what is required. Details for each report are below in the section for External User Reports.
1. If you are new to VIU and the Employee Portal please look over Orientation training for resources to become familiar with navigating around it.
2. Go to the main Finance training page and scroll down to Training preparation materials:
- Read the first item - First step - be sure you have the basic skills. Don't worry about the Self-assessments at this point. Be sure to read Welcome new reports user!
- Read the last item - Onboarding new financial employees
3. Read the Introduction to financial reports cheat sheet to get familiar with our processes and structure.
4. Then read the General cheat sheet for financial reports to learn a little of what is in the reports.
Special training for support staff
- There is a monthly Zoom session for Finance Assistants. Please reach out to Suzanne Armour to join that group.
- There is a Teams group for Financial Support staff. Please reach out to Michelle Whitehead to join that group.
- Sign up for in-person or short Zoom sessions via InVIU on the ProD calendar or see the top of this page for any other training opportunities available.
1. If you are new to VIU and the Employee Portal please look over Orientation training for resources to become familiar with navigating around it.
2. Watch the 2 minute Naming convention video explaining the structure of the Employee Portal.
3. On the Finance training home page read the first section under Finance: general information: FIS budget structure and watch the video.
4. Read the General cheat sheet for financial reports to learn a little of what is in the reports.
5. Below under Area Special Purpose Financial Reports read the item Work Order - Active List and watch short video to gain some familiarity with how to find active Work Orders and to see how to work with a basic report.
To produce an Income Statement
There are three versions of the Income Statement reports:
- Budget and Actual (YTD Totals)
- Displays the Actual, Budget and Variance of all revenue and expense amounts as YTD Totals from period 1 (or April) of the fiscal year up to and including the "Period to" (or ending date) that you enter in the selection screen. If current Period is chosen, only transactions entered as of today will be reflected in the totals.
- Provides aggregated year to date amounts (YTD) for either all Work Orders chosen or you can see report by individual Work Orders if "Include WO Sub Reports?" box is ticked.
- Quarterly variance
- Displays the Actual, Budget and Variance of all revenue and expense amounts as above, but grouped by fiscal quarter (can be expanded by period) so it is useful for the quarterly variance reporting process.
- Provides aggregated amounts for all Work Orders chosen or you can see report by individual Work Orders if "Include WO Sub Reports?" box is ticked.
- Period variance
- Allows for selection of a range of periods that don’t need to start at period 01. Useful for non-standard period range and variance information showing only the range selected.
- Will show Actual, Budget and Variance for each period chosen.
- No annual or YTD variance will be shown to avoid misleading information due to partial data only.
- No option to choose viewing by individual Work Order Sub Reports.
For detailed instructions look at these four items in the External User Reports section below as shown:
To produce a detailed General Ledger (GL) transaction report
This report provides you with all of the transaction data that has been posted to the GL (entered into the system) for the criteria parameters you select. For detailed instructions look at the item in the External User Reports section below as shown:
To discover why a variance exists
Look at the FAQ section below for details on how to drill down into transactions to find the reason why you have a variance:
FAQ: general
The FIS is an integrated accounting system and not a report output system like the previous FRS (Financial Records System) so the reporting is very different.
Currently, only base financial reporting has been rolled out for "all employee" access. After the stabilization period we will focus resources on further building out discrete financial reporting.
Customizable reports became available in Oct 2021 for one assigned user per budget division. Further access was rolled out in spring 2022 to other users (as required) that limits their view to only financial transactions in their own Division. We will continue to add more access and update report functionality throughout 2022.
All employees can see the Accounting menu tab on the left and the folder Area Special Purpose Financial Reports under Across companies > Shared:
If this or any other sub-menu item is missing, please email AURORA_help@viu.ca with details.
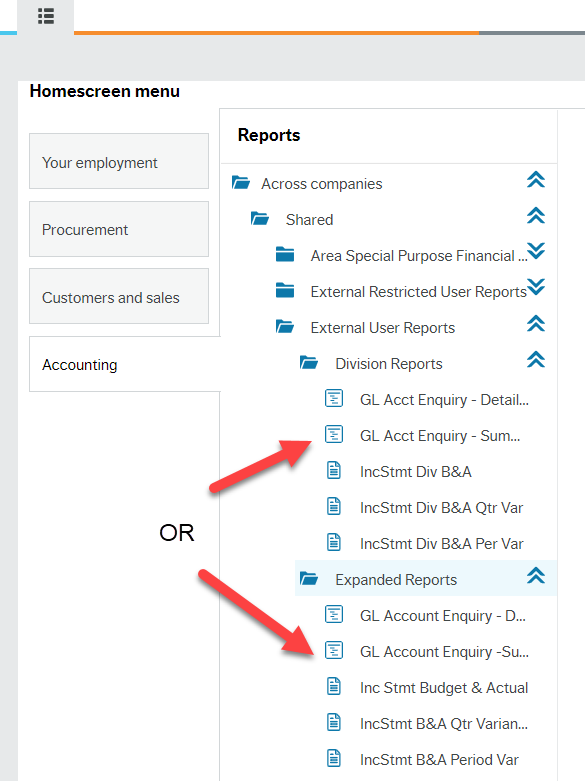
At least one person per budget division area (if required) has access to view the External User Reports folder with a subfolder called Expanded. This allows them to see transactions in all Work Orders in all Divisions at VIU. Other users will see a subfolder called Division and it allows them to view all Work Order transactions in their Division only. Each group sees a variation of these five reports:
- GL Account Enquiry - Details
- GL Account Enquiry - Summary
- Inc Stmt Budget & Actual
- Inc Stmt B&A Qtr Variance
- Inc Stmt B&A Period Var
Previously closed or finished Purchase Orders and Invoices will not be imported into the FIS. Balances as at June 30, 2021 were transferred into the FIS.
You can view historical information in a “read only” view of the FRS for a yet-to-be-determined period of time. We understand you may need data from both systems to prepare various reports. The FRS was frozen at Jun 30 for viewing of older transaction details and closed POs or Invoices for your reference.
Open Purchase Orders (including Blanket POs) and open Invoices were imported into the FIS and will be processed using the new procedures.
Although FRS will no longer be accessible after June 30, all FRS data will be retained and can be accessed through the following links:
- FRSWeb
- FRS Reports Menu “VIU Apps” -> “FRS Reports”
No, you cannot. At this time the options are to view all transactions in a Division or in all Divisions. We are looking at restricting by Work Order in the future.
With the transition to FIS, signing authority forms only need to be submitted to set-up individuals who have a signing authority $ spending limit (ex: $1,000). In the past (with FRS), the signing authority system was also used to set up viewing access to FRS cost centres. However, viewing access to FIS reports is not at all related to these forms. Access to FIS reporting is attached to the position at VIU and what is required to perform that position's duties.
There are 2 types of Sales Order products:
(1) grants and contracts and
(2) trade products.
If a Sales Order with trade products is posted, the revenue goes directly to the Work Order identified by the area. If a Sales Order with grants and contracts products is posted, this revenue briefly goes to the Work Order identified by the area and then a trigger automatically pushes it out to an Account on the central balance sheet under Deferred revenue/contribution. So it goes in and then right out of the Work Order account.
This is a shift in business process from FRS. In FRS, revenues went directly to the Work Order (cost centre) identified by the area and then at year-end, Finance reviewed all cost centres with the areas and moved amounts (as appropriate) to the central balance sheet to defer them to next year. In FIS, this process is reversed to better align with accounting principles: all grant and contract revenue will initially be deferred centrally and then Finance will review the balances and push revenue amounts out to each Work Order a portion at a time after review.
Areas won’t be able to see their grants and contracts revenues in their Income Statement reports until it is 'earned', but they can see it in the GL Account Enquiry - Details reports. There is no connection between when the cash is received and when the revenue is posted to the Work Order.
The timing and specifics of this review, recognition, and reporting process are explained further in the document Grants and Contract Funding - Deferred Revenue and Revenue Recognition.
Previously in FRS the fringe accounts were all posted to a single object code: 240. Similarly, this information will not be identifiable by employee in the FIS for a few reasons.
1) this will reduce the volume of transactions posted to the GL and
2) this continues to protect confidentiality.
This will not change in the future.
The intention is that when reviewing your resource costs, you are to examine salary data only. When or if you notice anything amiss please send the specific timeframe/pay period information to Payroll either through an HR appointment change form or directly to Payroll@viu.ca for salary reallocation. Payroll can then extract the pertinent payroll data (containing salaries and fringe details) for the time period in question and then move all salaries and fringe dollars for the given period of time/pay periods.
Use the GL Account Enquiry - Details reports or the Labour Variance report to check all salaries posted to Work Orders in your area prior to yearend to allow time for any changes to be made! If you notice an error where a payroll amount has been posted to the incorrect Work Order there are different steps to take depending on the situation.
Background: Salary reallocations must start with an Appointment Change Form done by the Appointment Creator for that area. The HR Appointment Creators Manual is located on the Appointment Creators shared drive and it contains instructions for Appointment Change Forms.
Appointment Creators indicate cost distribution (by Work Order) in the initial appointment when employees are hired or on Appointment Change Forms for changes. However, this does not impact the master Work Order that each position is associated with in the HR Position Register. Each position is associated with one Work Order which informs payroll (in the absence of cost distribution). This also informs the Employee Directory Service (EDS), organization listings and so on. Therefore, it is crucial that area Finance or Admin Assistants email HR@viu.ca with the subject line “Base position work order change” along with the details so the data is updated in the HR Position Register.
Submitting Work order transfer forms supports Payroll to include benefit re-allocation (fringe costs) in the adjustments since FIS reports do not show the full benefit costs by employee.
Steps to take for salary reallocation:
- An individual employee/position has been charged to the wrong Work Order and you discover it within the current fiscal year
Solution:
- Contact the Appointment Creator to initiate an Appointment Change Form to correct the base Work Order and/or update the cost distribution for the appointment for future pay periods.
- Once Payroll gets the change form from HR they will determine when a retroactive salary JV is required (including fringe costs) for previous pay periods and process as time/month-end cut-offs permit. You will see these as adjusting GL entries for the associated payroll account codes. - Multiple employees/positions have been charged to the wrong Work Order and you discover it within the current fiscal year
Solution:
- Contact the Appointment Creator to initiate Appointment Change Forms to correct the base Work Orders and/or update the cost distributions for the appointments for future pay periods.
- Once Payroll gets the change form from HR they will determine when a retroactive salary JV is required (including fringe costs) for previous pay periods and process as time/month-end cut-offs permit. You will see these as adjusting GL entries for the associated payroll account codes. - A one-time reallocation of hours or dollars for a single or multiple employee/position is required which does not impact ongoing payroll, but just a certain time period.
Solution:
- Appointment Change Form is not required.
- Submit to Payroll a Work order transfer form (on the Financial Forms web page) for all impacted employees so they can do the calculations for all costs to adjust as required. You can also submit your own departmental form if you have developed one. Do not submit this form to finance.
- Payroll will do the retroactive salary JV as required and process as time/month-end cut-offs permit. You will see these as adjusting GL entries for the associated payroll account codes. - An employee/position is changing their Work Order allocation (such as faculty changing their teaching allocation between subject areas) and you know this in advance of the change
Solution:
- Contact the Appointment Creator to initiate an Appointment Change Form to correct the base Work Order and/or update the cost distribution for the appointment for future pay periods.
- No payroll adjustment is necessary.
- You must inform HR@viu.ca with subject line “Base position work order change” and include the details if this is a permanent change in the department so the HR Position Register can be updated since the Appointment Change Forms do not go to the person maintaining the HR Position Register.
Due to the manual nature of the work, retroactive changes via email instructions to Payroll are processed on a case-by-case basis. Such as when a department or Payroll team member makes an error in the HR appointment change form process.
The ES team can only create reports based on resource availability and after receiving detailed specifications and instructions (including priority level) from Finance (or any business unit). At this point there has been a pause on creating new FIS reports due to lack of resources in both Finance and ES. There is no-one currently available to oversee new FIS report creation.
Any changes to currently existing reports needs to first go through Finance and they can then make a determination and if it is to move forward they send in a ticket to IT.
At this time, if an area requires information they cannot get on their own then they are to ask someone in Finance to produce the data report for them. They may consider adding your report request to their list of future reports when someone is able to oversee this process.
How to use reports: overview
This Budget structure cheat sheet may help you fine-tune your reporting. You can learn more about this structure by watching the video at the top of Finance training.
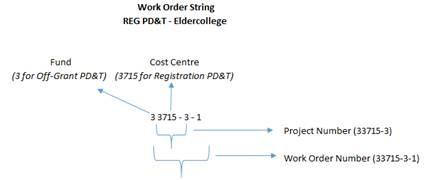
Once you understand the breakdown of the Work Order string (set of numbers) you can create reports by using the Division, Subdivision, Cost centre or Project fields to get different information than by just using Work Order or Account, depending on the report.
Each Work Order number is structured as follows:
- The first digit represents the “fund” that the activity belongs to:
- 1 = Operating
- 2 = Off-grant
- 3= PD&T
- 4= Ancillary
- 5= Capital
- 8= High School
- The second 4 digits represent the FIS cost centre that the activity falls within. A cost centre in this case represents a significant activity stream within a division.
- The final two digits identify the project # and work order #. The first “-1” indicates that this is the first project under the cost center. The second “-1” indicates that this is the first work order under the project. A project may have up to 999 Work Orders that fall under it.
- The Work Order number is considered to be the full string (ex: the work order number for REG PD&T – Eldercollege is: 33715-3-1)
So if you have Work Orders 22705-2-1, 22705-2-2 and 22705-2-3 you could instead search using:
- Project 2705-2 will pull all of the Work Orders under that project.
If you also want to include other Work Orders such as 22705-1-1, 22705-1-2 then you could search using:
- Cost Centre 2705 will provide data for all of the Work Orders noted above (22705-1-1, 22705-1-2, 22705-2-1, 22705-2-2, 22705-2-3).
See details in sections below for specific types of reports.
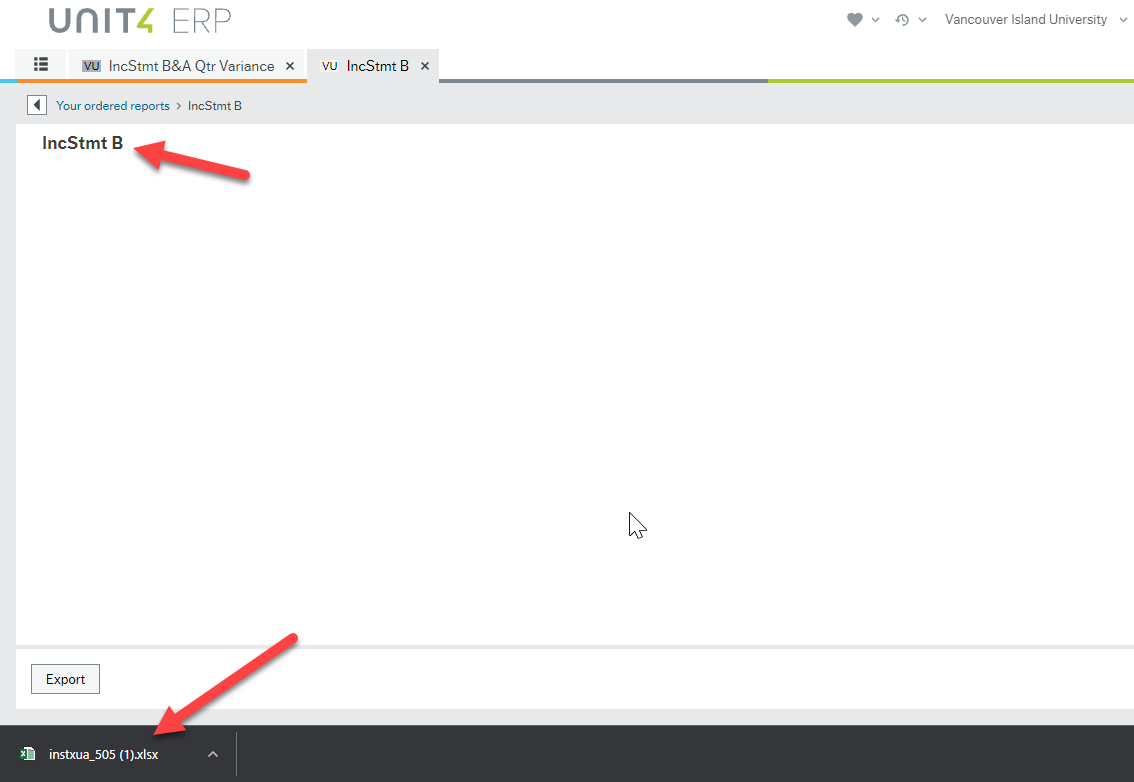
In general, you click on a report to open it right away or there may be a next step or two before you can view and or download it. Inc Stmt reports can only be viewed by opening the downloaded file.
Area Special Purpose Financial Reports folder
The reports in this section are available to all active employees. They are simple, customized reports and typically open fully once you click on them. Some may require you to click an OK button to display the complete report or you can enter certain criteria or values to help narrow down the data you are requesting. Be patient since the report data may take a minute to fully generate before displaying. Some of these reports may have linked areas that are "clickable" within the report for further drill down on details.
All report access is logged in the system.
External User Reports folder
There are two types of user access for this folder. All users see the same set of reports, but their data access will be different, depending on what is required for their job duties.
Division Reports
The users with Division access see a subfolder called Division Reports. These users can view the financial transactions for all Work Orders in their Budget Division. These reports require specific criteria to be entered in a form to specify the exact data they want to see. You can experiment with different parameters to get exactly what is required. Details for each report are below in the section for External User Reports.
Expanded Reports
The users with Expanded access see a subfolder called Expanded Reports. This allows them to view the financial transactions for all Work Orders in all Budget Divisions, not just in their own Division. These reports require specific criteria to be entered in a form to specify the exact data they want to see. You can experiment with different parameters to get exactly what is required. Details for each report are below in the section for External User Reports.
External Restricted User Reports
These reports are limited to only those employees who are authorized to see more sensitive data such as employee names attached to salaries accounts so they can monitor payroll transfers to other Work Orders. Users with this access will see a subfolder called either Division Restricted User Reports or Expanded Restricted User Reports.
Division Restricted User Reports
The users with Division access see a subfolder called Division Restricted User Reports. These users can view the employee names associated with payroll accounts for all Work Orders in their Budget Division using the Division GL Account Detail - Restricted report. This report requires specific criteria to be entered in a form to specify the exact data they want to see. You can experiment with different parameters to get exactly what is required. Details are below in the section for External Restricted User Reports.
Expanded Restricted User Reports
The users with Expanded access see a subfolder called Expanded Restricted User Reports. This allows them to view the employee names associated with payroll accounts for all Work Orders in all Budget Divisions, not just in their own Division. This report requires specific criteria to be entered in a form to specify the exact data they want to see. You can experiment with different parameters to get exactly what is required. Details are below in the section for External Restricted User Reports.
Income Statement reports are automatically produced as excel spreadsheets. The following instructions are for GL Detail and GL Summary reports.
After your report is generated on screen, you can rearrange columns, group and sort based on different needs, or remove columns you don't need. Once you are satisfied that the report has what you need, you can Export it.
Not all customization configurations will transfer to the exported data. Renaming of columns or customizations like bolding will not be in the Exported file. If you reduce the visible data by only showing certain rows, the full data set will still be exported so you will have to remove it yourself in the Excel file.
Click Export at the bottom of the screen to open the "Report engine" window. Users can export the data directly into Excel or as a PDF. PDF is not advised as it may not provide you with a clean, easy to use presentation of your data. The PDF export is only suitable for results with a small number of columns and rows. If you really need a PDF, export it as an Excel spreadsheet and convert it to PDF outside of FIS.
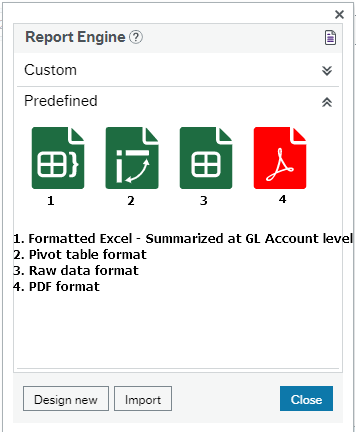
Option 1 is the formatted version of the data in Excel showing the groupings and sub-totals as you have set them up.
Option 2 provides a pivot table which is an advanced Excel format. Search online for information on how to use this Excel tool.
Option 3 provides the data in a plain Excel format without the groupings or sub-categories so you can filter and format as you like in Excel.
Option 4 is the PDF version which only works well with a small data set.
Only internal Finance staff can create new reports or save reports at this time.
Some area external users may eventually be able to use Save as to copy their own modified report into a Private folder. This function is currently available only to Finance and ES teams. A naming convention will be followed for naming your own Private reports. Format still TBD.
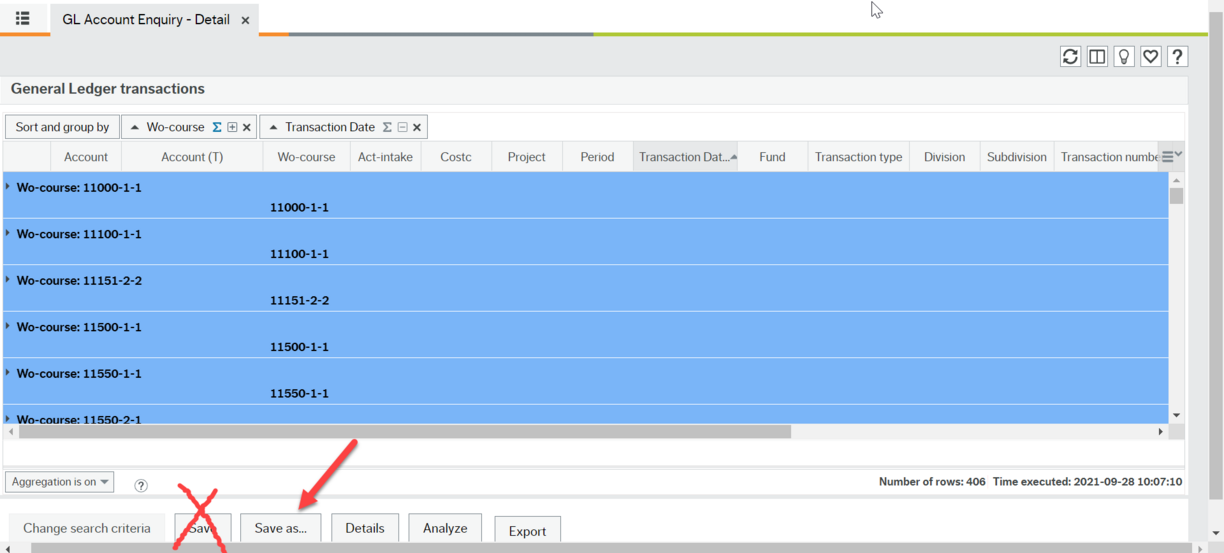
- Open the report you wish to modify
- Modify the layout and do any "Sort and group by" to suit your purposes
- Click the Save as... button and not the Save button
- This brings up the "Save as" dialogue box where you enter the Name of your customized report, a description for what it is for, tick the box if you want it to run automatically and then you will click on the Across Companies folder.
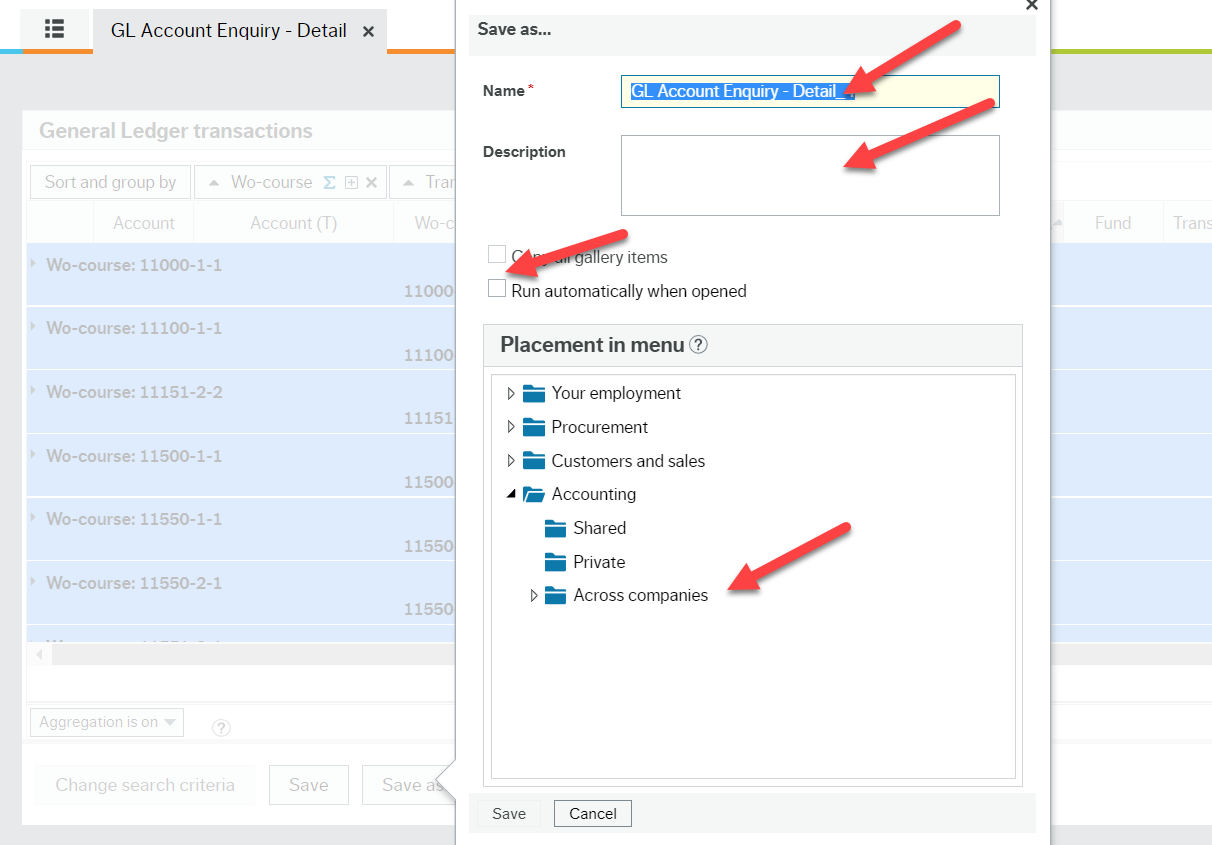
- Once you enter all your details and click the "Across companies" folder, it will open to show you your Private folder that only you have access to. Note these reports are also saved in the master report log file. Click on the Private folder and only then will the Save button turn blue for you to click it. This may take a moment so be patient.
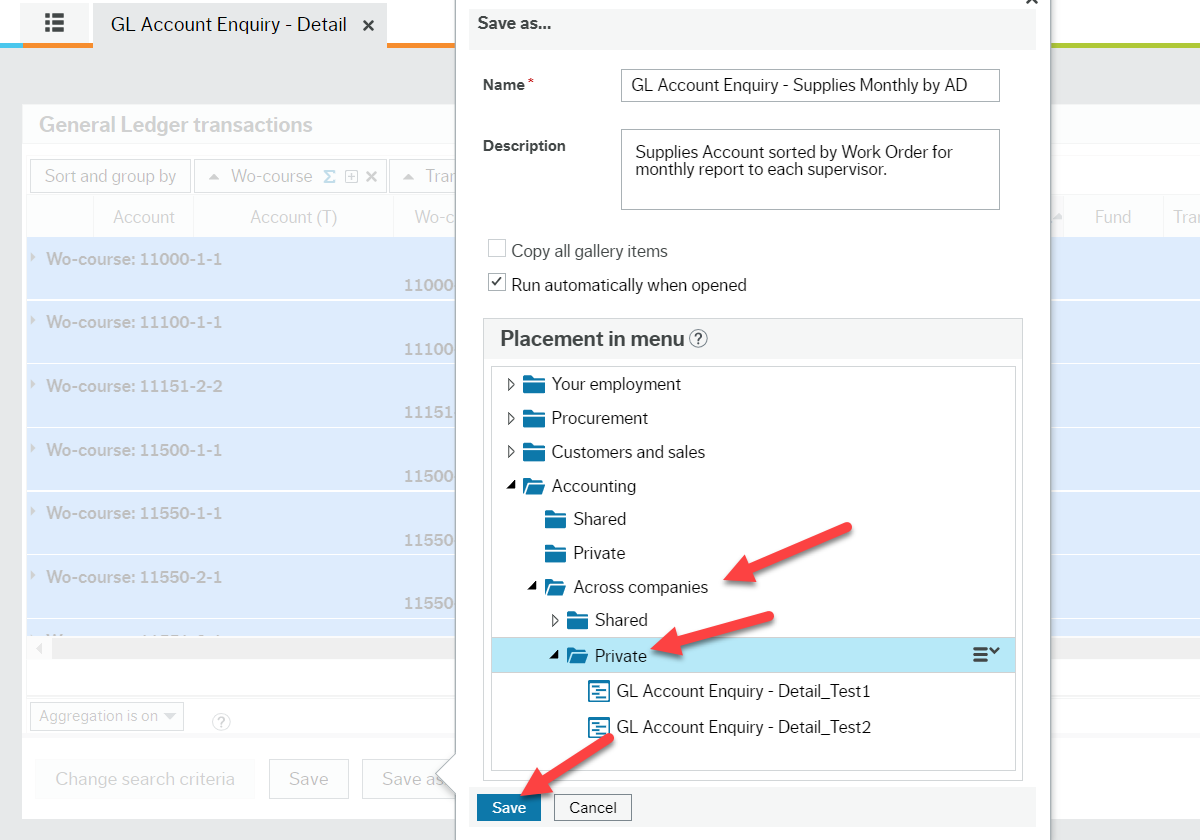
- Then you should see the green Success dialogue box and note the name of your new report is now at the top of that window. Click Ok.
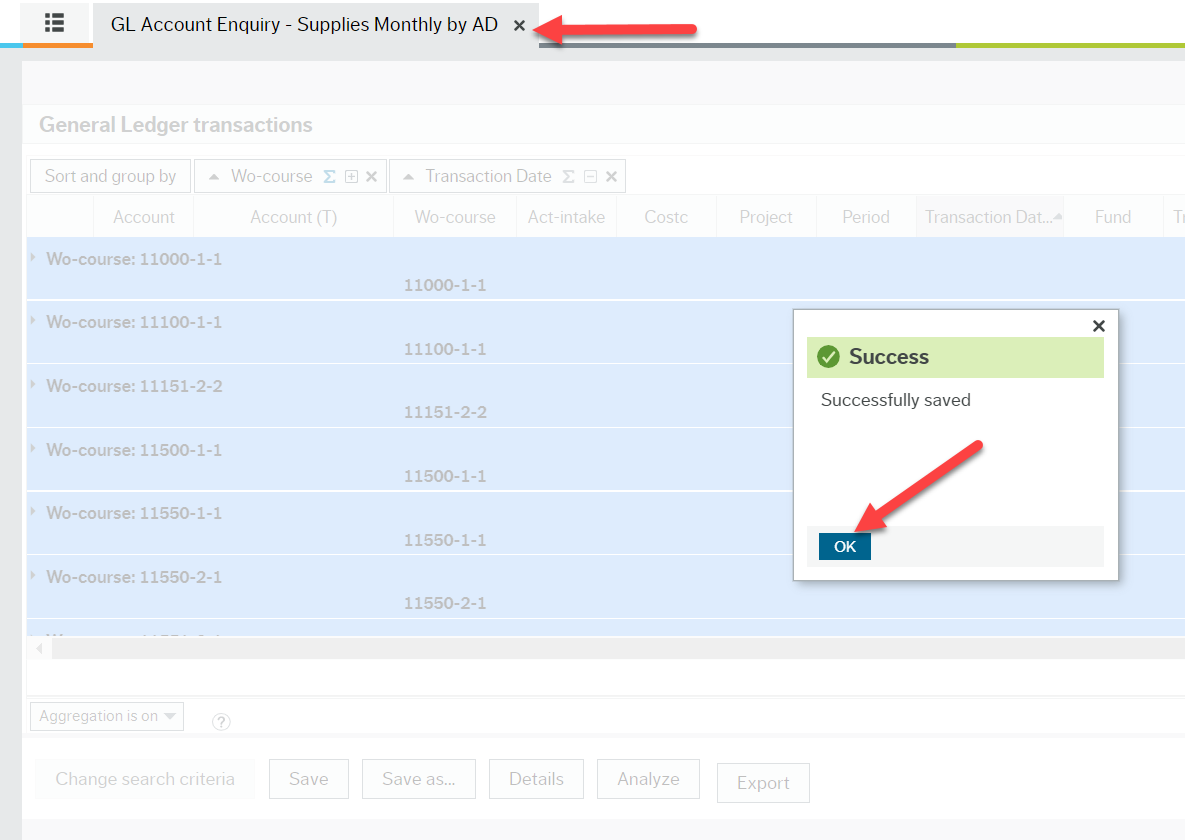
- You will see your new report.
- Close your new report window. In your workspace click on the refresh button and then go back to your Private reports folder.
- Your new report will now be in your Private folder list!
You can sort data by clicking on the column header (title) to reorder data in alphabetical or numeric order:
Manipulating reports by ascending or descending data - video transcript.txt
You can rearrange columns in the reports using drag-and-drop to move a column into another position. To move a column, simply hold the cursor on the header (top) of the column you want to move until the
You can remove columns from the results by simply clicking on the down arrow icon on the right side of the column header to open the column customization menu and then selecting Remove column.
If you rearrange column order or remove a column, this will transfer to the exported report. Experiment with the Chart of Accounts for Work Order - Active list.
Moving or removing columns will export as desired - video transcript.txt
The following video shows you how to use the "Sort and group by" function for GL Detail reports. Screen shots and other information follows. Cheat sheet for "Sort and group by" is also above.
Sort and group by instructions - video transcript.txt
There are different ways to manage how you group or sort the various data columns.
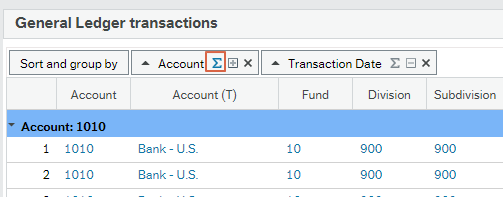
Option 1 – Drag and drop columns up to the sort bar:
Each icon next to the column names listed in the sort bar can be used as short-cuts to quickly sort/group the column.
- Sort the column ascending or descending by clicking the arrow (each data column can also be sorted this way by clicking the heading)
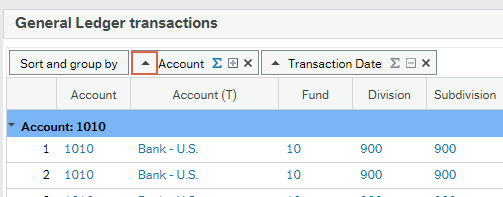
- Group the column – When it’s grouped, the icon turns blue.
- Expand or collapse to see more or less details

Option 2 - Click the Sort and group by button
Following are some options you have available:
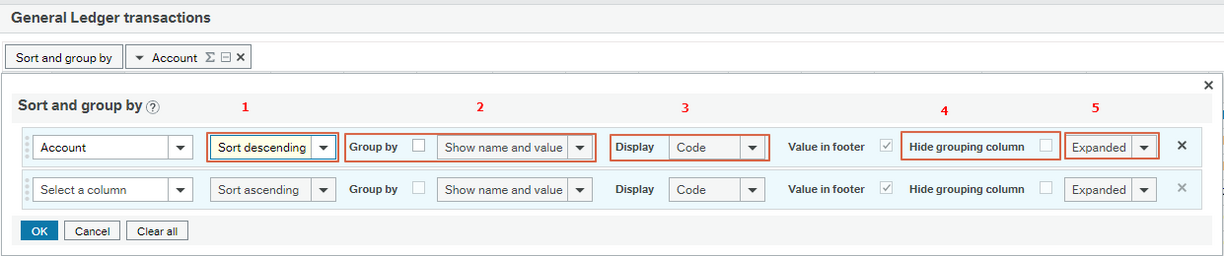
1. Choose to Sort the column either in ascending or descending order.
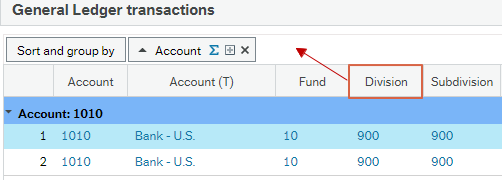
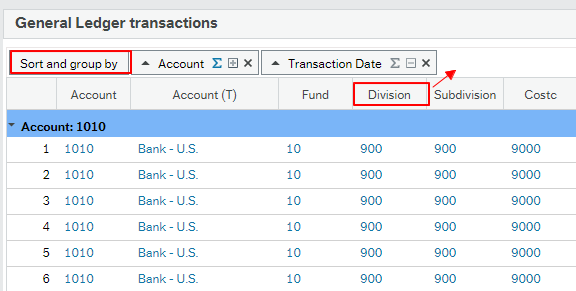
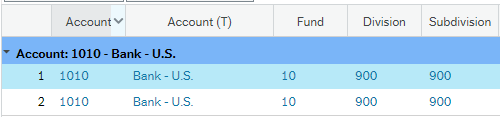
2. Select 'Group by' by ticking the box. If you tick this box, select how the group line is displayed. Here are some examples of what each option looks like when grouping by Account:
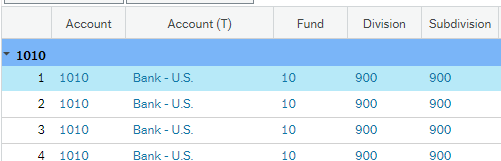
- Show value - will only show the number. In this case: 1010 in bold at the top.
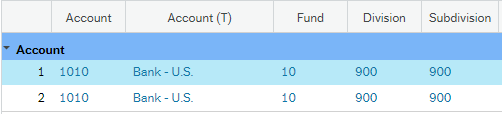
- Show name - will show the name of the item you are grouping. In this case: Account.
- Show value and name - will show the value (1010) before the field/column name (Account)
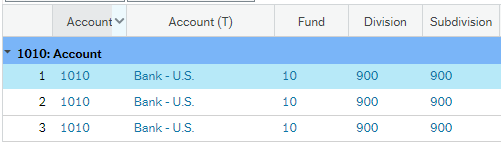
- Show name and value - will show the field/column name (Account) before the number (1010)
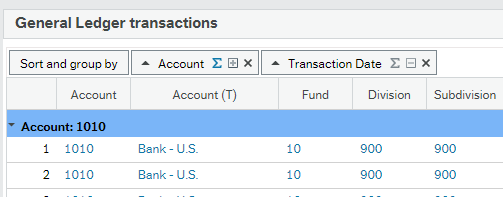
3. Choose whether the group line should show or Display the Code only, the Text only, both Code/Text, or Text/Code. For example, if you chose Show name and value (d. above), and then you pick Code/Text, it will show like this: Account: 1010 - Bank -US
4. Hide grouping column – if selected the grouping column will be hidden.
5. Expanded or Collapsed determines whether the report result is displayed in a detail or grouped level.
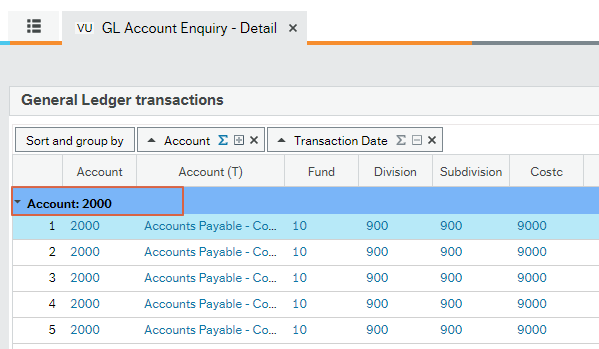
Users can always expand each account to see the detailed transactions by clicking on the account headers in the report.
You can filter the results on one or more columns to select which values to display by clicking the down arrow icon on the right side of the column header to open the column customization menu and then select which values to display.
For date columns you can set a specific date or a date range. The options in the menu depend on the data type of the column.
Note that filtering is done on the retrieved results and does not initiate a new query. This means that when exporting the report, it will export the full report, not the filtered result.
For numerical columns you can also set how many decimal places to show in the results by choosing column format and decimal places.
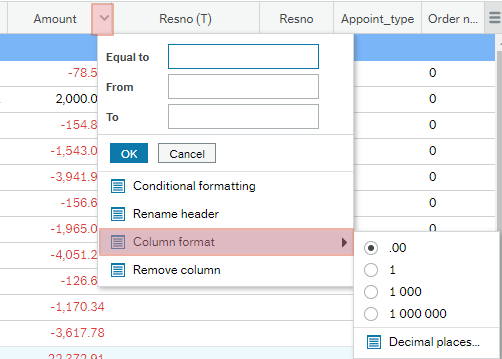
| Option | Description |
|---|---|
| .00 | Two decimals (default value for amount columns) |
| 1 | Rounded to nearest whole number |
| 1 000 | Rounded to nearest thousand |
| 1 000 000 | Rounded to nearest million |
| Decimal places | Allows selecting the number of decimal places from 1 to up to 8 decimals |
If you select from the list the values ‘1’, ‘1 000’ or ‘1 000 000’, a reference is shown in the header column showing the currently selected format of the amounts.
You can rename columns simply clicking on the down arrow icon on the right side of the column header to open the column customization menu and then selecting Rename header. Note this renaming will not transfer to the exported data. You will need to rename within in your Excel file:
The report result is produced as of the time it is run. Newly posted transactions will not automatically show up in this report while it’s open.
To reload the result, click the refresh button (Reload grid) in the activity toolbar (located on the top right corner under the search bar). The search criteria will prompt you again before refreshing the report.
If you wish to see a smaller amount of data you may choose to see only certain rows. When it comes time to Export the file, all of the data will be exported, not just what is visible. However, removing a data column will remove it from the resulting exported report.
Exports full data set even if you reduce the visible data - video transcript.txt
The following sections explain the various folders you may see when you click on the main Accounting menu litem in the Portal. Not all users have the same access. If you believe your access is incorrect, contact the budget owner for that Division or Finance for clarification.
All employees see: Area Special Purpose Financial Reports
Only authorized employees see: External User Reports or External Restricted User Reports
Area Special Purpose Financial Reports
This report as shown below provides the current listing of all outstanding receivables for VIU. See video below for how to use it.
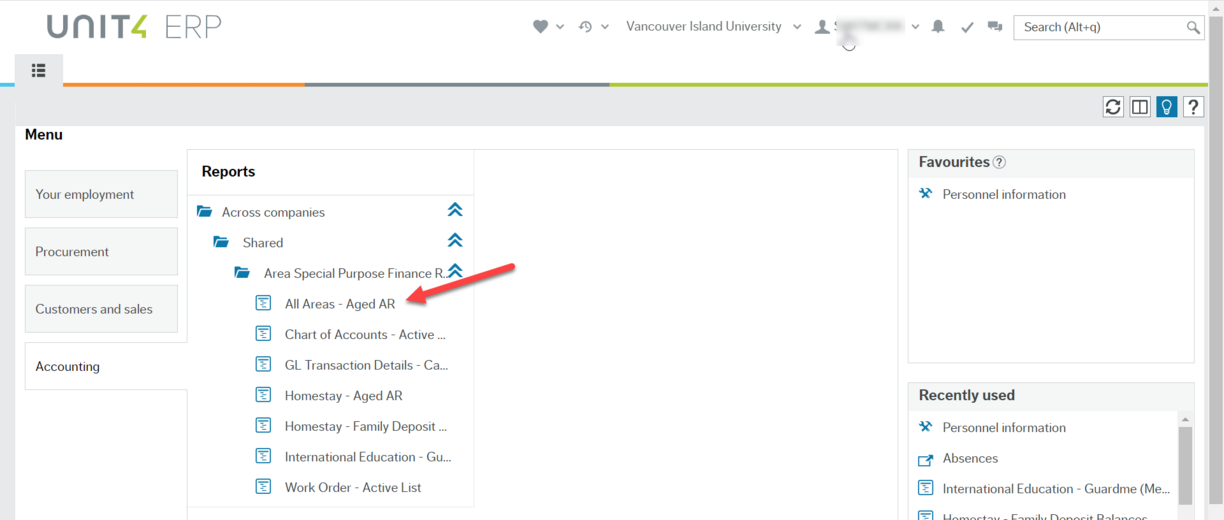
All areas aged AR report - video
This report provides a listing of all active Accounts in the VIU Chart of Accounts:
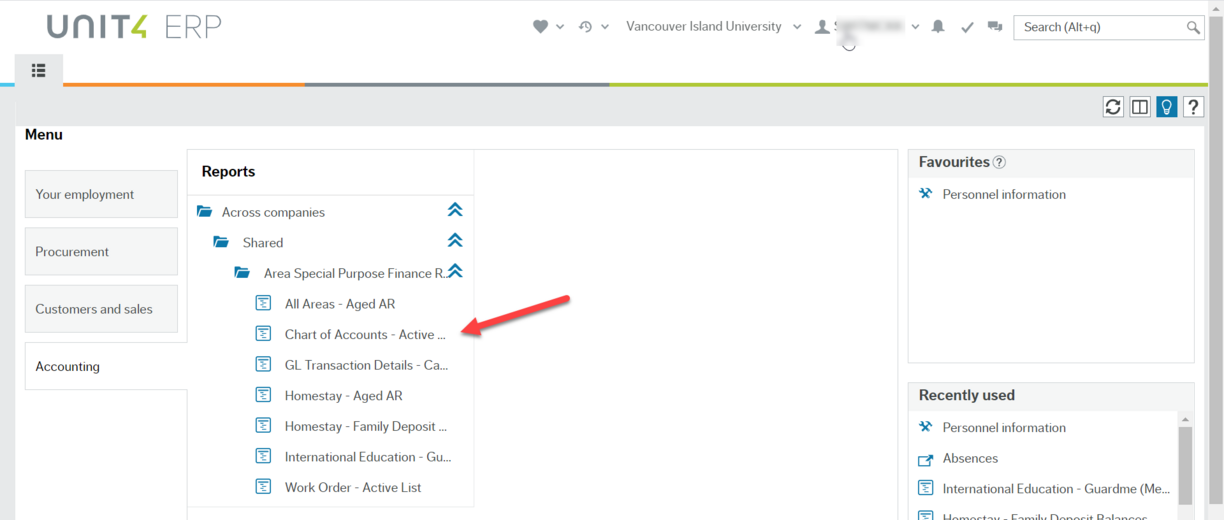
See the above section "How to use Reports: overview" for tips on how to customize this report to suit your needs.
This report provides details for the institutional carbon reporting requirements:
This report provides a listing of the outstanding receivables for Homestay:
See the above section "How to use reports: overview" for tips on how to customize this report to suit your needs.
This report provides a listing of the outstanding Homestay family deposits:
See the above section "How to use reports: overview" for tips on how to customize this report to suit your needs.
This report provides information for Guardme insurance for International Education:
See the above section "How to use reports: overview" for tips on how to customize this report to suit your needs.
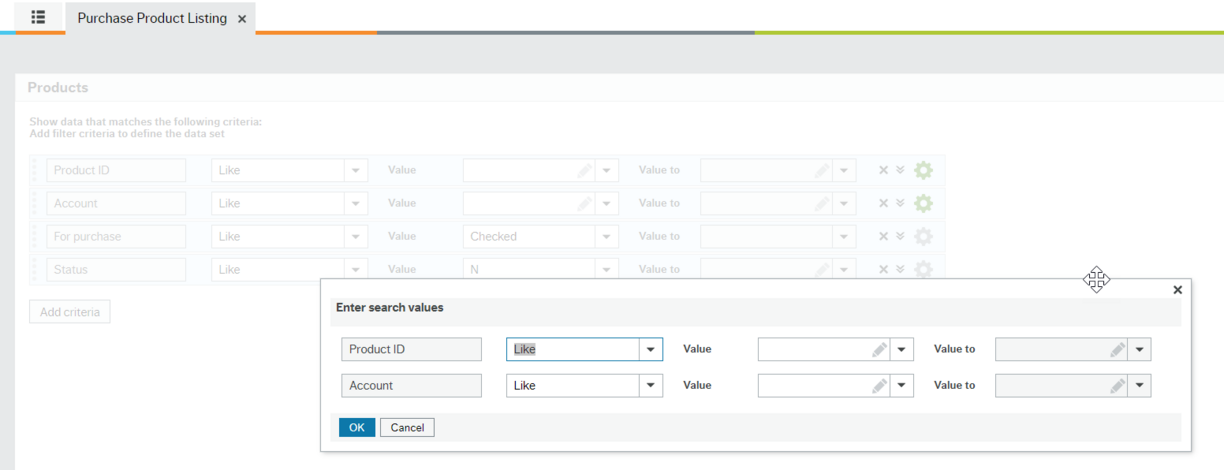
This report will give you a complete list of the current products you can choose for your purchase requisitions products including the description and the associated accounts.
After you click on the report it will open "Enter search values" window. If you simply click "Ok" you will get the complete list.
Different than most other reports in this folder, you have the option to narrow down the search criteria. You can choose to restrict the list by Product ID or by Account by using the operators (defaults to "Like") such as "In list" or "Starts with" to fine tune your list.
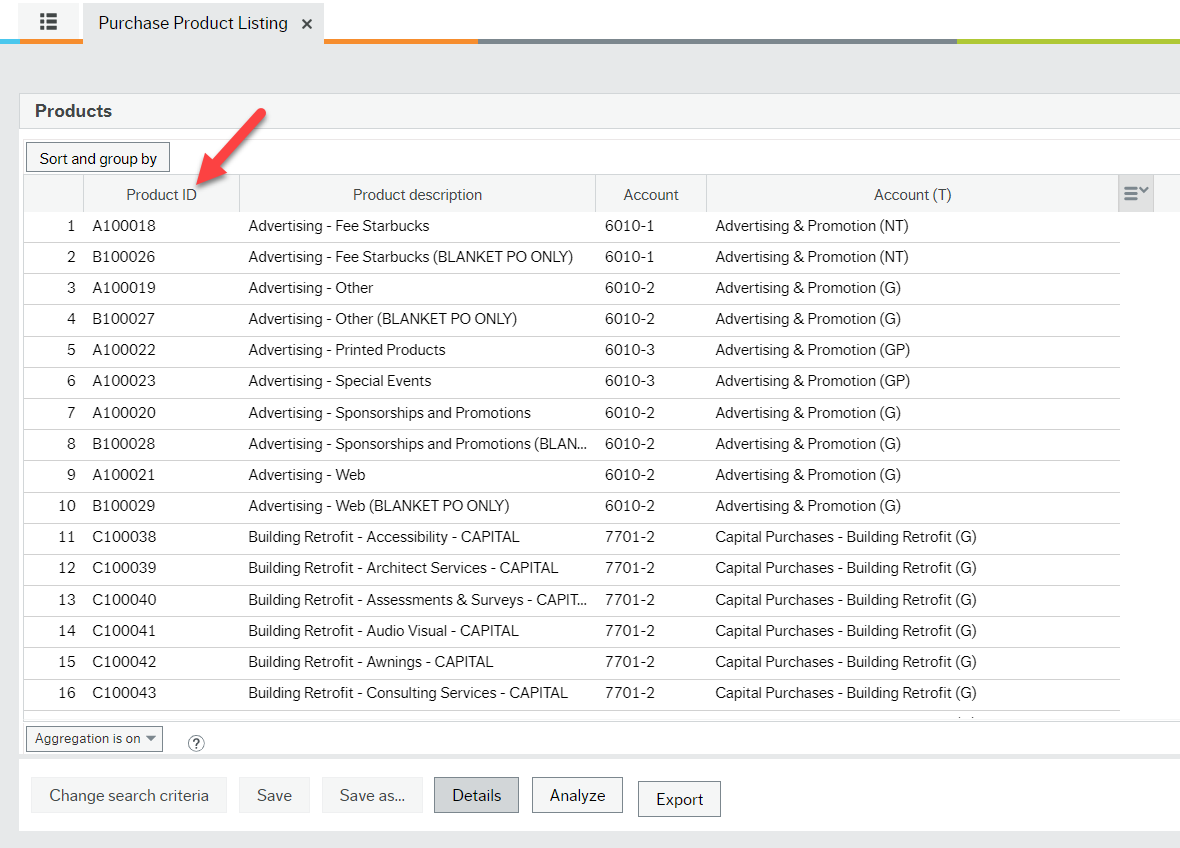
If you click on the Product ID column (or any of the columns) in the main list it will sort numerically (or alphabetically) so the A, B and C products will be grouped together.
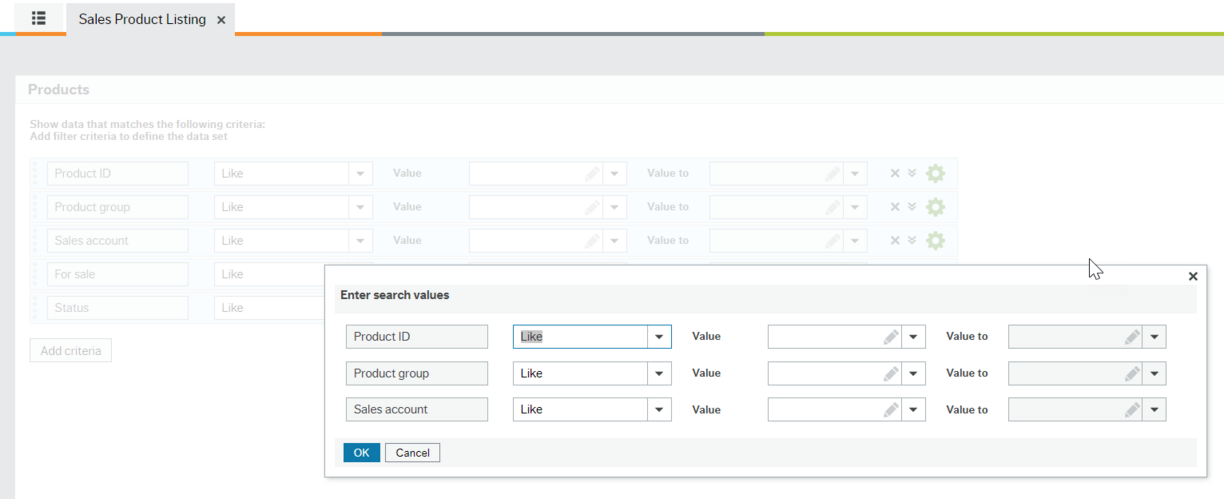
This report will give you a complete list of the current products you can choose for your sales orders including the description, product group and sales accounts.
After you click on the report it will open "Enter search values" window. If you simply click "Ok" you will get the complete list.
Different than most other reports in this folder you have the option to narrow down the search criteria. You can choose to restrict the list by Product ID, Product group or Sales account by using the operators (defaults to "Like") such as "In list" or "Starts with" to fine tune your list.
If you click on the Product ID column (or any of the columns) in the main list it will sort numerically or alphabetically to suit your needs.
This report provides a listing of all active Work Orders. See video below for an option to see just your area's Work Orders by using Sort and group by function.
Work Order - Active List options
Work order active list option - video transcript.txt
See the above section "How to use reports: overview" for more tips on how to customize this report to suit your needs.
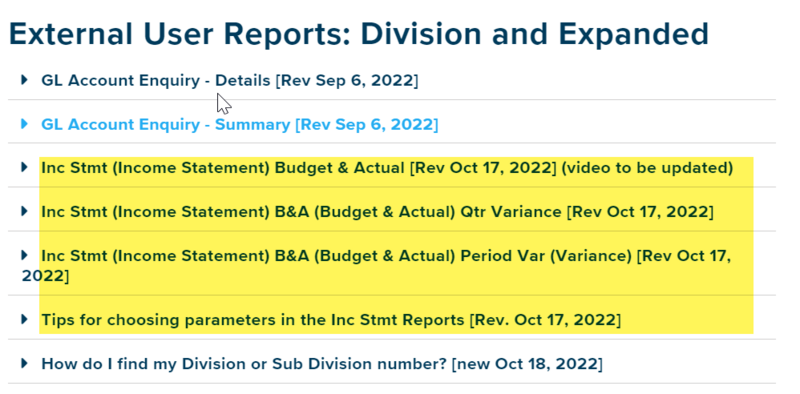
External User Reports: Division and Expanded
The Detail and Summary reports will provide you with the transaction data you need to explain variances to the Budget office and to support you managing your budget while we await more specific and niche reports. This report provides all of the transactions that have been posted to the GL for the criteria parameters you select.
There is a cheat sheet to support you with the "Enter search values" window at the top of this page.
This report is located under Accounting > Reports > Across companies > Shared > External User Reports. You will see then either Division Reports if you have access to view all GL transactions in your own Division or Expanded Reports if you have access to view all GL transactions at VIU. If you have Expanded Report access to university wide data, we ask that you respect confidentiality and restrict your searches to only those Accounts and Work Orders you are authorized to view. All reports run are logged for audit tracking purposes.
This report offers you access to all of the transactions you should need enabling you to customize the report (see Overview section above for customization instructions) according to your area's needs. The aim is to eventually restrict this volume of data to only those users who are authorized to view it.
To run the report:
- Click on GL Account Enquiry – Detail report
- Enter any search values you require in the grid
- Click Ok to run the report
Instructions for Entering search values (cheat sheet)
A) First column
You must enter criteria into this grid to help narrow down your search by time period and dat a required to reduce report running time. This is especially important if you have Expanded Report access so you only run the data you are seeking. Without any criteria you will run a report containing all data from Apr 1, 2021 for all criteria. A report this size will slow down the entire report queue. You might also encounter an error if the amount of data is too large.
Expanded access users must enter a Division to reduce the report to data for only that Division. Division users will only see the Subdivision option since they are already restricted to view only their Division transactions. They do not need to enter a Subdivision unless they want to only view data for a particular Subdivision.
The following criteria options are available:
- Accgrp1 (T): different groupings of accounts as they are categorized on the Income Statement. Hit the space bar to see options available such as Salaries and benefits.
- Account (refers to GL Account): For more information about the VIU Chart of Account structure please refer to the General cheat sheet for financial reports. You can view the complete Chart of Accounts – Active List under the folder Area Special Purpose Financial Reports.
- Period (T): Transaction posting fiscal period.
The item Period is currently hidden from users outside of Finance and is fixed as "Greater than or equal to 202203” to exclude transactions posted before go-live. This prevents unnecessary transactions from showing in your results. 202203 contains all opening balances for go-live as at period 202203.
Period (T) is available for users to define. Do not choose any periods before 202203. Do not use "Between," "Less than" or "Greater than" or their variations since this is a text field looking only for words of months such as Jan, Feb, Mar, Apr, etc. The following are the only parameters to used for this criteria:Option 1 - Leave it blank to produce all posted GL transactions from 202203 (Jul 2021 which includes Apr- Jun 30, 2021) to date.
Option 2 - Use “Like” to produce results based on the specific month.
Option 3 – Use “In list” and click in the Value field. The window below will pop up so you can choose multiple periods/months to include.
Option 4 - Use the operator "Contains" and the current fiscal year as the value (ex "2023") to see only the current fiscal year data.
Tick both “Active” and “Closed” and click Apply to produce the available list of periods.
Press “Shift” key or “Ctrl” key while selecting to allow the selection of a range of values or multiple values at the same time.
Once the correct periods are selected, click the arrows in the middle to add or remove periods to/from Selected list.
Example of fiscal periods for FY2022 versus calendar months:Period Date to Period Name 202201 2021-04 Apr 2021 (202201) 202202 2021-05 May 2021 (202202) 202203 2021-06 Jun 2021 (202203) 202204 2021-07 Jul 2021 (202204) 202205 2021-08 Aug 2021 (202205) 202206 2021-09 Sep 2021 (202206) 202207 2021-10 Oct 2021 (202207) 202208 2021-11 Nov 2021 (202208) 202209 2021-12 Dec 2021 (202209) 202210 2022-01 Jan 2022 (202210) 202211 2022-02 Feb 2022 (202211) 202212 2022-03 Mar 2022 (202212) 202213 2022-03 202213 - Closing balance 202200 2022-04 202200 - Opening balance
- Division: this only appears on Expanded reports and refers to the budget Division areas of responsibility in VIU's Consolidated resource plan
- Subdivision: not all Divisions have subdivisions; they are a portion of a Division reflecting different oversight requirements such as for directors or managers within a Division
- Costc: a significant activity stream within a Division; enter the appropriate number (digits 2, 3, 4 & 5 of the Work Order number)
- Fund: represents the fund the activity belongs to; enter the appropriate number if you want to search on this value
10 – Operating
20 – Off grant
30 – Off grant - PD&T
40 – Ancillary
50 – Capital
80 – High School - Project: The number indicating the project under a Work Order; can have up to 999
- Wo-course: Work Order number. This is a numeric field though you can use the 'type ahead' feature using numbers or text to help you search for the correct number. For more information on Work Order structure please refer to the Area Special Purpose Finance Report Work Order – Active List above.
- Wo-course (T): Text field useful for searching the name of the Work Order based on text values such as a unique word in the Work Order name. Use only one of these Wo-course criteria at a time; never both. Best using the 'Like' or 'Contains' operators.
- Act-intake: will be used more in future for detailed reporting for class intakes.
- Grant-award: not commonly used, but may be useful for certain areas based on type of grant or award
- Resno (T): Employee resource name or number can be searched, but only for Restricted access users.
B) Second column
The search parameters appear as a list showing the options where you can define the limits for each one using operators such as “Like, Not like, Less than, Greater than” etc. More details in the cheat sheet at the top of this page.
They are defaulted to “Like” to perform an exact search on the value entered. Not all options are suitable for all criteria so practice and experiment since there are many ways to get the same data.
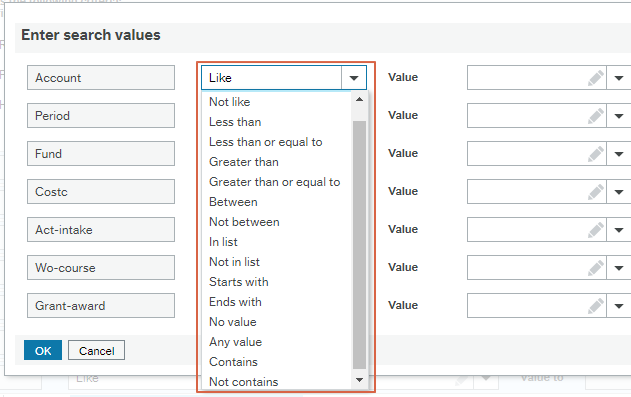
When “In list” or “Not in list” is selected, click on the Value field. The selection window will pop up to select the values for the field and the multiple values selected will be used to include or exclude the selected attributes and will populate in the field once you click ok.
It is important to tick “Active” or “Closed” if you want your search result to generate a complete list of values for choosing. For example, when searching for Wo-course and In List, ticking "Closed" will ensure currently closed Work Orders show up in the available list. There might be search results from previous periods that used the currently closed Work Orders. This is also true for Period (T) since there is usually only one (or two) Periods open at a time.
C) Third column
Values:
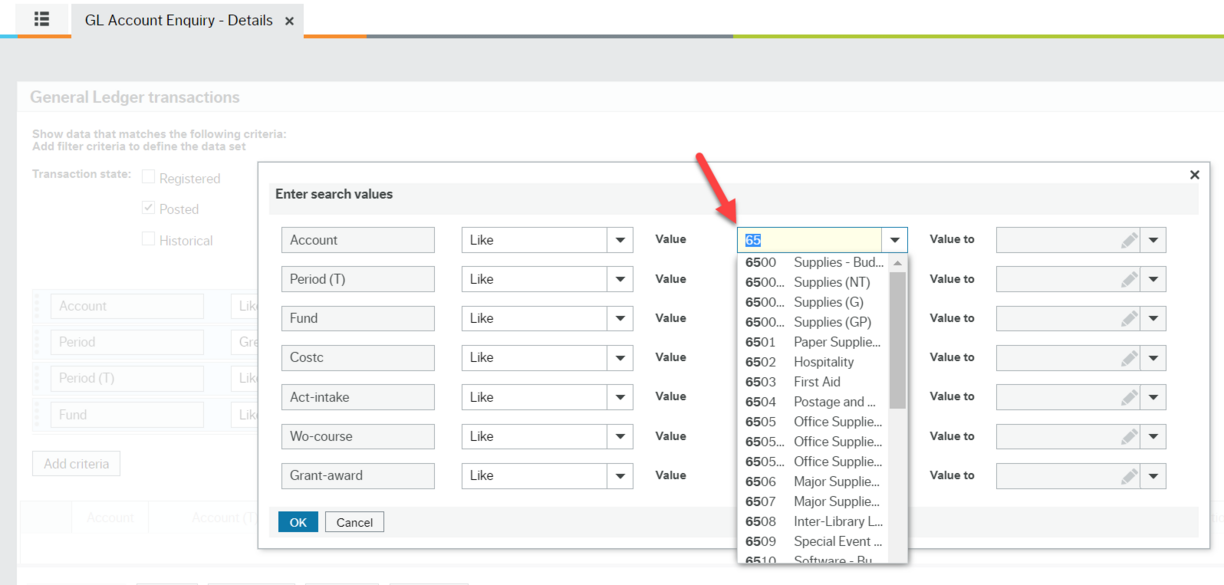
Start typing what you want in this field to help narrow down your choice. Click the down arrow next to this field to see potential values for that criteria. Some have too many to show so you must start by entering data to narrow the list down.
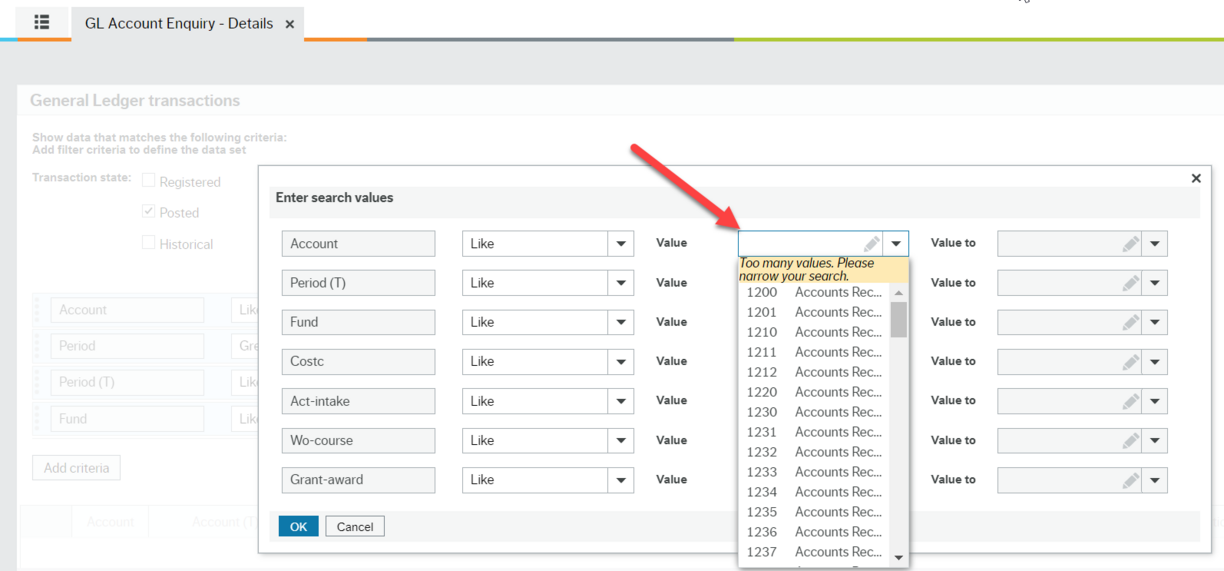
Typing part of the description in will narrow down the list to allow easier selection.
Click OK to run the report.
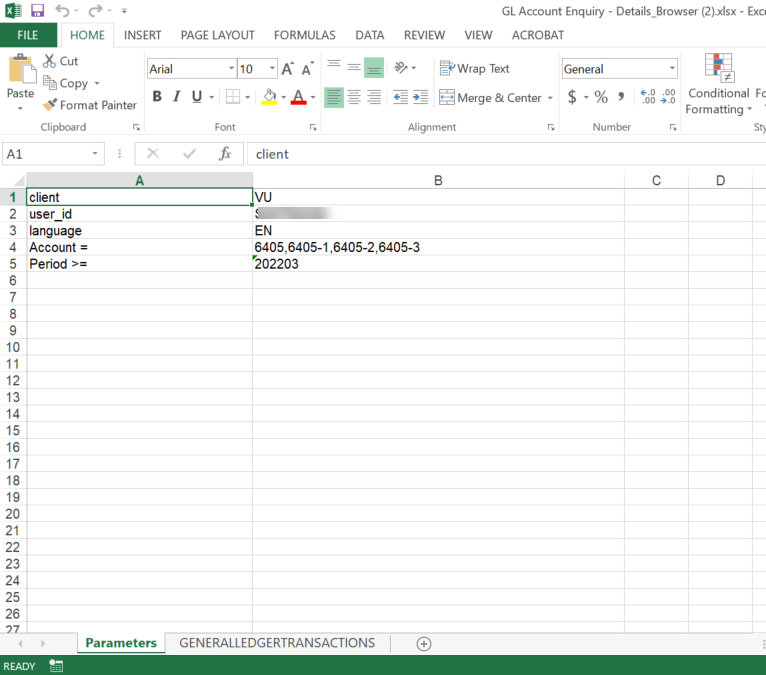
Once you have downloaded the report in Excel format, you will see two tabs when you open it. The tab that says "Parameters" contains the details of your selection criteria in case you forget what you asked for!
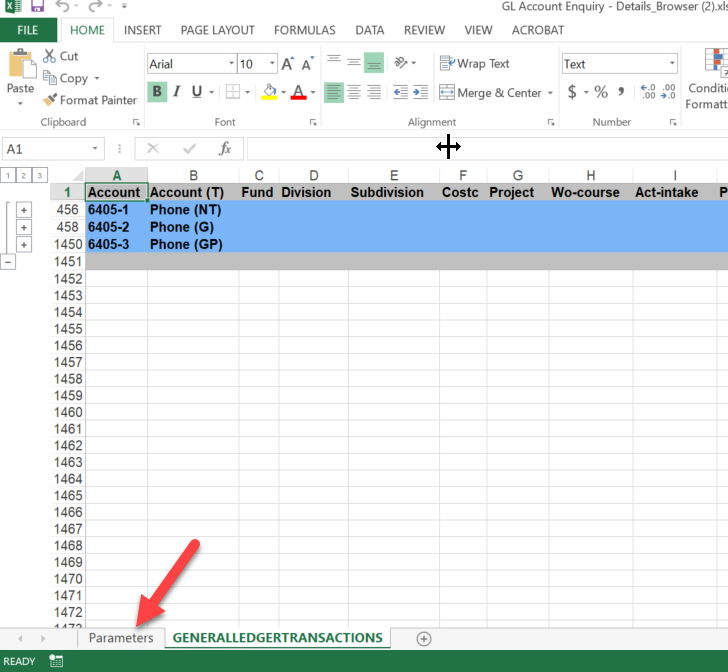
This is an example showing you that you asked for all data for accounts 6405, 6405-1, 6405-2 and 6405-3 for all periods greater than June 2021:
From your onscreen report you can click the "Reload grid" button to go back to the Enter search values window to modify your criteria selection instead of starting over and it will bring up the window again.

See Troubleshooting section below if you are having issues viewing or downloading reports.
The GL Summary reports provide the same data as in the Detail reports, but as sub-totals with no details for all of the transactions that have been posted to the GL for the criteria parameters you select.
This report is located under Accounting > Reports > Across companies > Shared > External User Reports and then either Division Reports or Expanded Reports folder. This report offers you access to a large amount of data enabling you to customize the report (see Overview section above for customization instructions) according to your area's needs. If you have Expanded Reports access we ask that you respect confidentiality and restrict your searches to only those Accounts and Work Orders you are authorized to view. All reports run are logged for audit tracking purposes.
The steps to run this report are the same as running the GL Account Enquiry – Detail report (see above item). The differences between this report and the GL Account Enquiry – Detail report are:
- In the GL Account Enquiry – Detail report, the GL transactions are grouped by Account, but you can customize this
- In the GL Account Enquiry – Summary report, the GL transactions are grouped by Wo-course, but you can customize this
- Different column headers are used which was determined based on level of details required.
See Troubleshooting section below if you are having issues viewing or downloading reports.
A video with detailed instructions is at the bottom of this explanation.
This report is most useful if period or quarter subtotals are not required.
- Provides an Income Statement report that displays revenues and expenses for the period ending date for criteria you enter in the selection screen.
- Provides aggregated year to date amounts from period 01 through to the period selected in the criteria screen.
- Columns show amounts for Actuals, Year to date (YTD) Budget values, YTD Variance, Annual Budget and Total Variance.
- Rows are grouped (subtotaled) by Revenue or Expenses or Capital, then Account Category (grants, tuition, etc.), then Head Account, then accounts.
- Option to produce individual reports by Work Order along with the aggregated statement by ticking a box.
This report is located under Accounting > Reports > Across companies > Shared > External User Reports > then either Division or Expanded Reports folder, depending on user access level. See video below for a walk through of running this report.
The aim is to eventually restrict data to only users who are authorized to view it. Since there are currently users with access to Expanded Reports (institution wide access), we ask you to respect confidentiality and restrict your searches (and viewing) to only those Accounts and Work Orders you are authorized to view. All reports run are logged for audit tracking purposes.
The Inc Stmt reports are different than the GL Account Enquiries. You must enter your criteria and then go to another screen to produce an Excel spreadsheet that you must download to view.
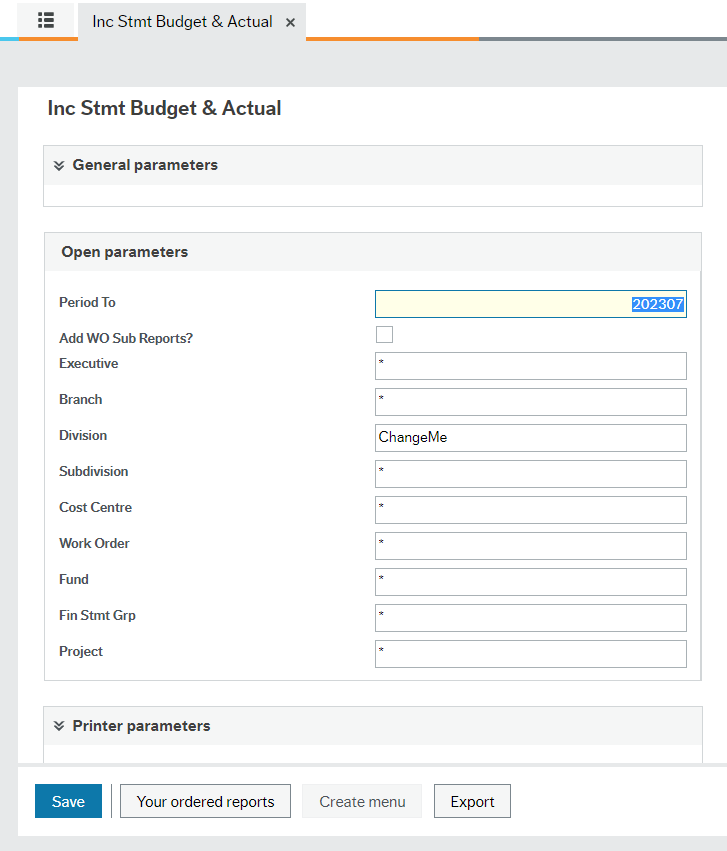
The steps for Division Reports are:
- Click on IncStmt Div B&A report.
Enter the parameters/criteria as needed. There is no drop-down menu for selecting values for each parameter. You need to enter the correct searching values. An * is used as a wildcard, meaning all values are selected. You must have a value or * in each field.
See cheat sheet for Inc Stmt criteria window at top of page for how to use parameters
You can use the * at the beginning or end of a number such as a Work Order to produce all Work Orders starting with 22705 by entering 22705* in the Work Order parameter field.
Please only request searches for Work Orders, Divisions, etc. that you are authorized to view.
For every criterion entered, make sure to tab through to the next field so FIS recognizes data has been entered and moves you to the next field.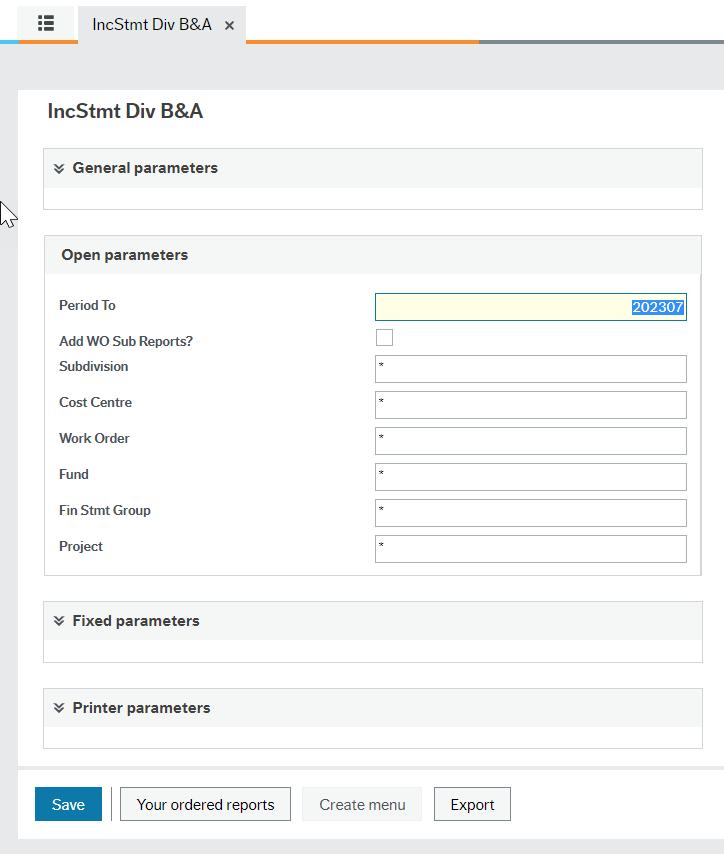
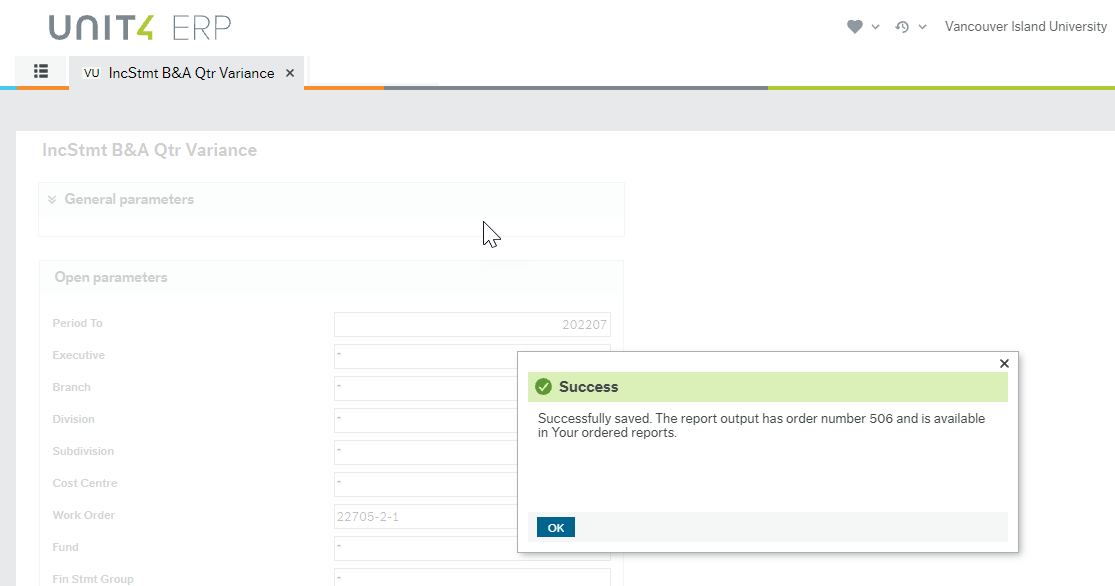
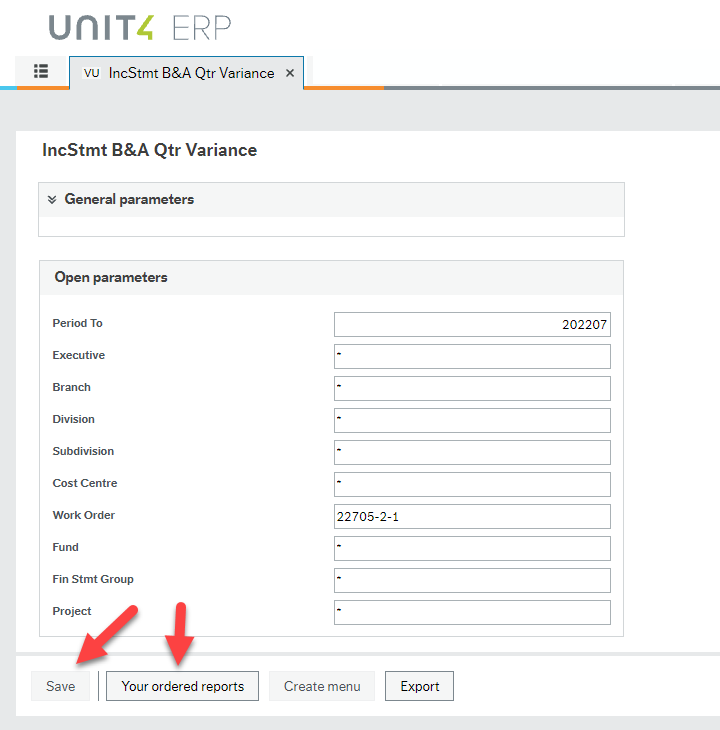
Click Save at the bottom of the screen to run the report. A window will pop up to say the report has been run successfully and it will give you the order number of your report. If it does not, click Save again.
Click OK to return to the previous screen. The Save button is now greyed out showing that the report has been run (image in Inc Stmt B&A Qtr Variance report instructions below).
Click Your ordered reports button at the bottom of the screen to open the Your ordered reports window.
- This window shows you the last 30 reports run and you can filter it if you have too many to sort through.
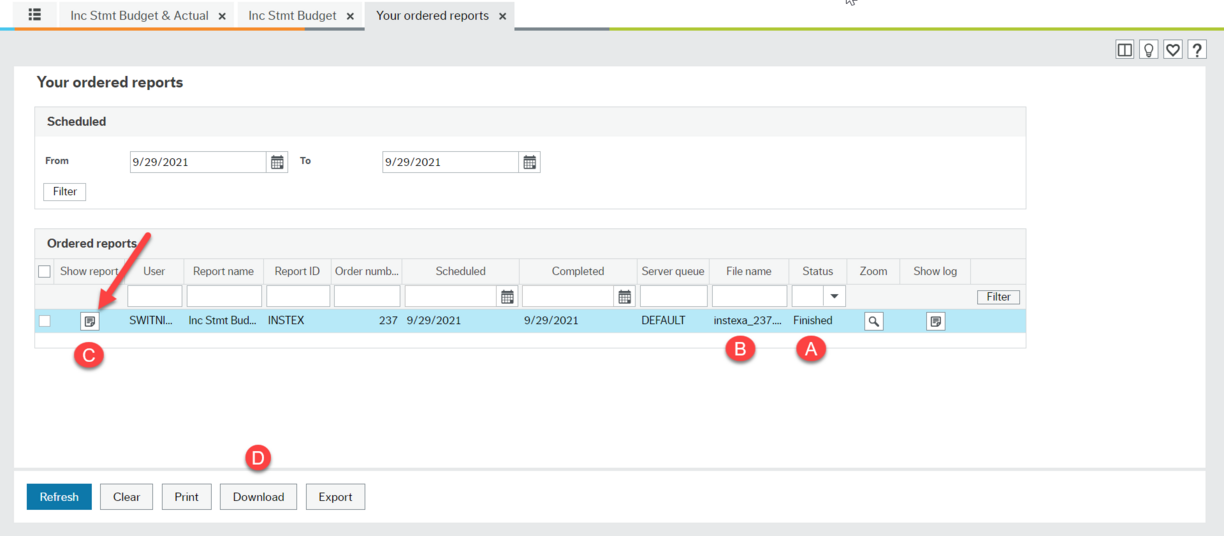
Filtering is made simple through search fields at the top of each column. Simply enter the required filter criteria in one or more fields and click the Filter button to return reports with that criteria.
The wild card * is allowed, for example entering F* in the Status field returns the last 30 reports with status Finished.
The date range at the top defaults to today’s date. You can change the date range to show reports run on other dates and filter the result.
A) Make sure the Status of the report shows Finished (this screen does not auto-refresh so if you are producing a large report that is taking time (it says “Running” under status) you can refresh the screen by hitting the Refresh button at the bottom until it says Finished.
B) Make sure the Report name (number) matches the report you just ran
C) Click on the file icon in the "Show report" column (red arrow). The report will then download as an Excel file. Open it to view the report. The file icon will be greyed out if the report has not finished or if there is no data.
D) Alternatively you can click the Download button to download the Excel file
See Troubleshooting section below if you are having issues viewing or downloading reports.
The steps for Expanded Reports are the same as for Division, other than having a few different options for parameters.
See cheat sheet for Inc Stmt criteria window at top of page for how to use parameters
- Click on Inc Stmt Budget & Actual report.
- Follow steps 2-6 above.
Income Statement report viewing - video
A walk through how to run this and other Income Statement reports
A video with detailed instructions is at the bottom of this explanation.
This report provides information for each period grouped by quarter and is useful for a quarterly variance reporting process.
- Provides an Income Statement report that displays revenues and expenses for the period ending date for criteria you enter in the selection screen.
- Provides period total information from period 01 through to the period selected in the criteria screen.
- Columns show 12 periods of actuals, grouped by quarters, with a YTD Actual total, 12 periods of budgets, grouped by quarters, with a YTD Budget total, YTD Variance, Annual Budget and Total Variance.
- Rows are grouped (subtotaled) by revenue, expenses or capital, then account category (such as grants, tuition, salaries, etc.), then Head Account, then accounts.
- Option to produce individual reports by Work Order along with the aggregated statement by ticking a box.
This report is located under Accounting > Reports > Across companies > Shared > External User Reports > then either Division or Expanded Reports folder, depending on user access level.
The aim is to eventually restrict data to only users who are authorized to view it. Since there are currently users with access to Expanded reports (institution wide access), we ask you to respect confidentiality and restrict your searches (and viewing) to only those accounts and Work Orders you are authorized to view. All reports run are logged for audit tracking purposes.
The Inc Stmt reports are different than the GL Account Enquiries. You must enter your criteria and then go to another screen to produce an Excel spreadsheet that you must download to view.
The steps for Division Reports are:
- Click on IncStmt Div B&A Qtr Var report.
Enter the parameters/criteria as needed. There is no drop-down menu for selecting values for each parameter. You need to enter the correct searching values. An * is used as a wildcard, meaning all values are selected. You must have a value or * in each field.
See cheat sheet for Inc Stmt criteria window at top of page for how to use parameters
You can use the * at the beginning or end of a number such as a Work Order to produce all Work Orders starting with 22705 by entering 22705* in the Work Order parameter field.
Please only request searches for Work Orders, Divisions, etc. that you are authorized to view.
For every criterion entered, make sure to tab through to the next field so FIS recognizes data has been entered and moves you to the next field.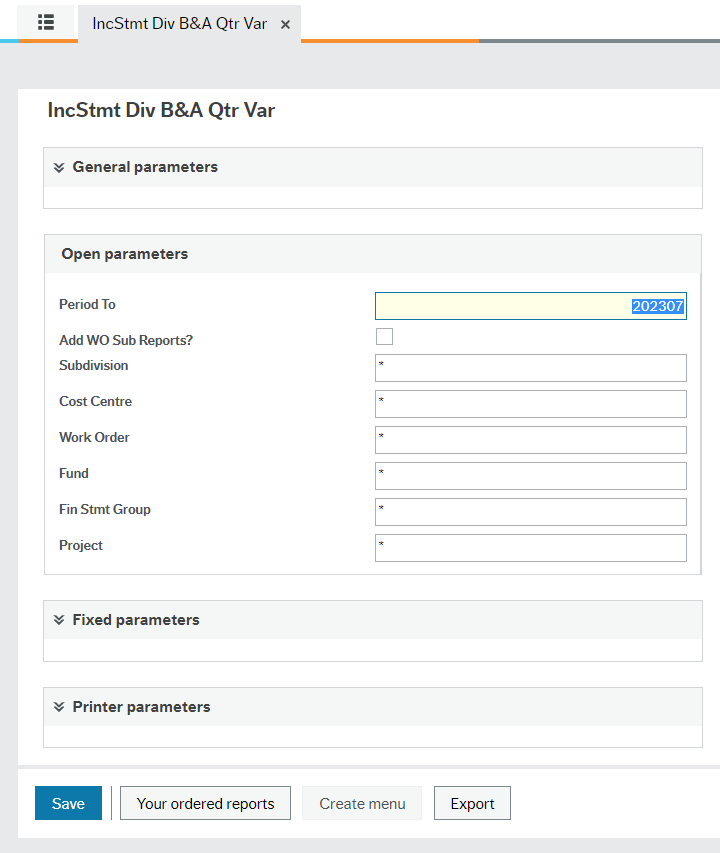
Click Save at the bottom of the screen to run the report. A window will pop up to say the report has been run successfully and it will give you the order number of your report. If it does not, click Save again.
Click OK to return to the previous screen. The Save button is now greyed out showing that the report has been run.
Click Your ordered reports button at the bottom of the screen to open the Your ordered reports window.
- This window shows you the last 30 reports run and you can filter it if you have too many to sort through.
Filtering is made simple through search fields at the top of each column. Simply enter the required filter criteria in one or more fields and click the Filter button to return reports with that criteria.
The wild card * is allowed, for example entering F* in the Status field returns the last 30 reports with status Finished.
The date range at the top defaults to today’s date. You can change the date range and filter the result.
A) Make sure the Status of the report shows Finished (this screen does not auto-refresh so if you are producing a large report that is taking time (it says “Running” under status) you can refresh the screen by hitting the Refresh button at the bottom until it says Finished.
B) Make sure the Report name (number) matches the report you just ran
C) Click on the file icon in the "Show report" column (red arrow). A window will open with the type of report at the top (in this case IncStmtB) and it will be blank, but the report will download as an Excel file.
Open it to view the report. The file icon will be greyed out if the report has not finished or if there is no data.
D) Alternatively you can click the Download button to download the Excel file.
See Troubleshooting section below if you are having issues viewing or downloading reports.
The steps for Expanded Reports are the same as for Division, other than having a few different options for parameters.
See cheat sheet for Inc Stmt criteria window at top of page for how to use parameters
- Click on Inc Stmt B&A Qtr Variance report.
- Follow steps 2-6 above.
Income Statement report viewing - video
A walk through how to run this and other Income Statement reports (same video as above item).
A video with instructions is at the bottom of this explanation.
This report allows for selection of a range of periods that don’t need to start at period 01. Useful for non-standard period range and variance information.
- Provides an Income Statement report that displays revenues and expenses for the period from and period to for criteria you enter in the selection screen.
- Presents a budget vs actual variance for each period and a total actual, total budget and period variance with amounts for only the period range selected.
- Columns show all 12 periods, but those periods outside the range selected will be presented with zero amounts.
- The annual budget and annual variance columns are not included to prevent misleading annual variance results for non-standard period or periods(s)
- Rows are grouped (subtotaled) by revenue, expenses or capital, then account category (such as grants, tuition, salaries, etc.), then Head Account, then accounts.
- No option to produce individual reports by Work Order along with the aggregated statement by ticking a box - other two Inc Stmt reports have that option.
This report provides period variances according to the parameters you set, not just by the quarter. It is located under Accounting > Reports > Across companies > Shared > External User Reports > then either Division or Expanded Reports folder, depending on user access level.
The aim is to eventually restrict data to only users who are authorized to view it. Since there are currently users with access to Expanded reports (institution wide access), we ask you to respect confidentiality and restrict your searches (and viewing) to only those accounts and Work Orders you are authorized to view. All reports run are logged for audit tracking purposes.
The Inc Stmt reports are different than the GL Account Enquiries. You must enter your criteria and then go to another screen to produce an Excel spreadsheet that you must download to view.
The steps for Division Reports are:
- Click on IncStmt Div B&A Per Var report.
- Enter the parameters/criteria as needed. There is no drop-down menu for selecting values for each parameter. You need to enter the correct searching values. An * is used as a wildcard, meaning all values are selected. You must have a value or * in each field.
See cheat sheet for Inc Stmt criteria window at top of page for how to use parameters
You can use the * at the beginning or end of a number such as a Work Order to produce all Work Orders starting with 22705 by entering 22705* in the Work Order parameter field.
Please only request searches for Work Orders, Divisions, etc. that you are authorized to view.
For every criterion entered, make sure to tab through to the next field so FIS recognizes data has been entered and moves you to the next field. - Click Save at the bottom of the screen to run the report. A window will pop up to say the report has been run successfully and it will give you the order number of your report. If it does not, click Save again.
- Click OK to return to the previous screen. The Save button is now greyed out showing that the report has been run.
- Click Your ordered reports button at the bottom of the screen to open the Your ordered reports window.
- This window shows you the last 30 reports run and you can filter it if you have too many to sort through.
Filtering is made simple through search fields at the top of each column. Simply enter the required filter criteria in one or more fields and click the Filter button to return reports with that criteria.
The wild card * is allowed, for example entering F* in the Status field returns the last 30 reports with status Finished.
The date range at the top defaults to today’s date. You can change the date range and filter the result.
A) Make sure the Status of the report shows Finished (this screen does not auto-refresh so if you are producing a large report that is taking time (it says “Running” under status) you can refresh the screen by hitting the Refresh button at the bottom until it says Finished.
B) Make sure the Report name (number) matches the report you just ran
C) Click on the file icon in the "Show report" column (red arrow). A window will open with the type of report at the top (in this case IncStmtB) and it will be blank, but the report will download as an Excel file.
Open it to view the report. The file icon will be greyed out if the report has not finished or if there is no data.
D) Alternatively you can click the Download button to download the Excel file.
See Troubleshooting section below if you are having issues viewing or downloading reports.
The steps for Expanded Reports are the same as for Division, other than having a few different options for parameters.
See cheat sheet for Inc Stmt criteria window at top of page for how to use parameters
- Click on IncStmt B&A Period Var report.
- Follow steps 2-6 above.
Income Statement report viewing - video
A walk through how to run this Income Statement report.
To fine-tune your reporting, become familiar with the Budget structure at VIU. There is short video explaining the budget structure on the Finance home page under Finance: general information. Experiment with areas you are entitled to view.
See cheat sheet for Inc Stmt criteria window at top of page for how to use each parameter.
Division Report Users: If you run the default report with no changes you will receive a consolidated Income Statement for your Division as of today's date. If you tick the Add WO Sub Reports? box you will also get the Inc Stmts for each Work Order in that Division as of today's date.
Expanded Report Users: Do not run the default report with no changes. You must enter a Division number (or a Sub Division number with an * in the Division field) to produce a consolidated Division or Sub Division report. You can also produce a report of a single Work Order by putting an * in Division and entering the Work Order number in the Work Order field as of today's date. If you tick the Add WO Sub Reports? box you will also get the Inc Stmts for each Work Order in that Division (or Sub Division) as of today's date.
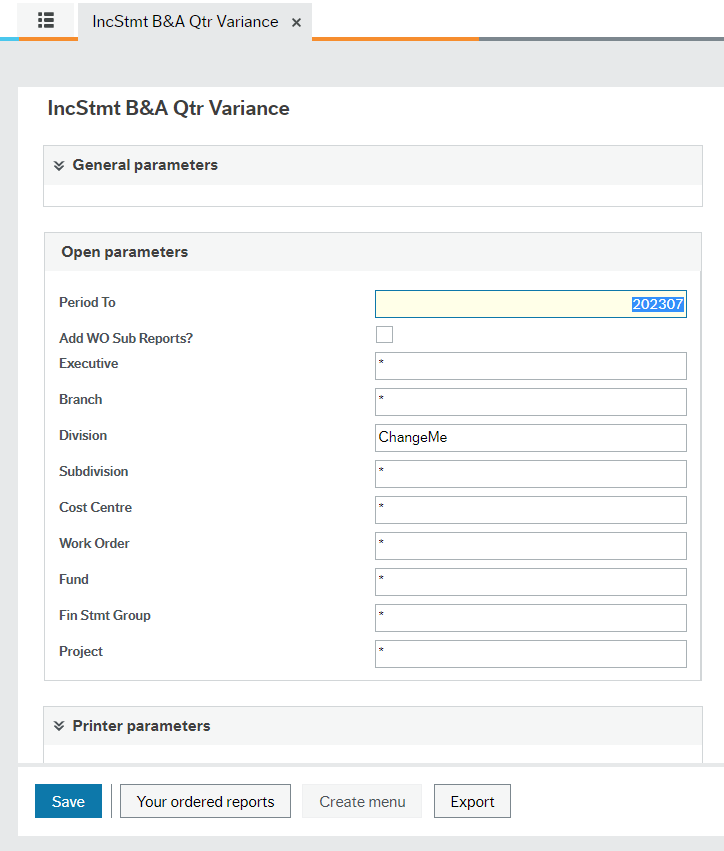
Here are some detailed explanations of the "Open parameters" available:
Period To: The report defaults to include period 1 of the current fiscal year so you choose which period it goes "up to" for the report. The exception is the Period Variance report where you choose the starting and ending period. Remember the report will only show what Finance has entered to that point. Check the Month End Closing Schedule for 2023 for dates that periods are complete.
Add WO Sub Reports?: If you leave this box blank you will get a single Inc Stmt as per the other criteria you enter. If you tick this box, you will get both a consolidated statement as well as any sub reports which are the Inc Stmts for all individual Work Orders in the user's Division (if they have Division access) or for the Division they enter in the Division field (that says ChangeMe). If you enter a Sub Division also you will restrict the sub reports (Inc Stmts) to only those Work Orders in the Sub Division.
Executive - This level is for the 3 senior budget holders; President and two Vice Presidents. You will not likely use these parameters unless you are responsible for one of these three offices. These reports will cover data for their entire portfolios of responsibility:
- 10 - President
- 20 - Provost & VP Academic
- 60 - CFO & VP Administration
Branch - This next level down covers the AVP level of responsibility and offers the following options:
- 10 - President
- 11 - AVP, Human Resources
- 15 - AVP, Community Partnerships
- 16 - University Secretary
- 20 - Provost and VP Academic
- 40 - AVP, Academic
- 50 - AVP, Scholarship, Research and Creative Activity
- 55 - AVP, Student Affairs
- 60 - CFO & VP Administration (University Secretary)
- 64 - AVP, Facilities and Ancillary Services
- 70 - AVP, Financial Services
Division - This level supports reports for the area's responsibility as per VIU's budget. This includes areas such as President, VPs, Financial Services, all Faculties, Registration and Aboriginal Education.
It says "ChangeMe" here for all Expanded Reports users (Division users do not see this field) indicating you MUST enter a Division (or a Sub Division number with an * in the Division field) in that field to avoid running a consolidated report for the entire institution which will weigh down the system delaying everyone's reports. If this is done inadvertently please send an urgent notice to IT to cancel your report.
Division # | Division Description |
|---|---|
100 | President - Office |
105 | President - Institutional |
110 | Human Resources |
150 | Community Partnerships |
160 | University Secretary |
200 | Provost and VP Academic - Office |
201 | PVPA - Centralized Academic Units |
210 | Academic and Career Preparation |
220 | Arts and Humanities |
230 | Education |
240 | Health and Human Services |
250 | International Education |
260 | Management |
270 | Science and Technology |
280 | Social Sciences |
290 | Trades and Applied Technology |
350 | Indigenous Education and Engagement |
360 | Library |
370 | Registration Services |
410 | Centre for Innovation and Excellence in Learning |
440 | Cowichan Campus |
460 | Powell River Campus |
500 | Scholarship, Research and Creative Activity |
550 | Student Affairs |
600 | CFO and VP Administration - Office |
603 | CFOVPA - ASA (Administrative Support Activity) |
610 | Information Technology Services |
640 | Facilities Services and Campus Development |
670 | Ancillary Operations |
700 | Financial Services |
750 | Enterprise Risk Management |
900 | CFOVPA - Institutional |
910 | Institutional Revenue |
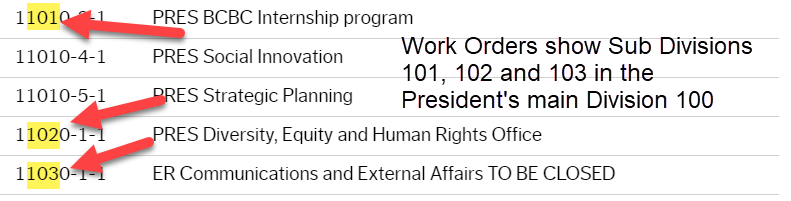
Subdivision - This level supports reports for the associate deans, directors and managers responsible for portions of activity within the Division. Enter a Sub Division if you want only data for the Work Orders in a Sub Division. Digits 2, 3 and 4 of the Work Order number are the Subdivision.
Cost Centre, Work Order, Fund and Project
Once you understand the breakdown of the Work Order string (set of numbers) you can create reports by using the Cost Centre or Project fields to get more information than just using Work Order.
Each Work Order number is structured as follows:
- The first digit represents the “Fund” that the activity belongs to:
- 1 = Operating
- 2 = Off-grant
- 3= PD&T
- 4= Ancillary
- 5= Capital
- 8= High School
- The next 4 digits represent the FIS Cost Centre that the activity falls within. A cost centre in this case represents a significant activity stream within a Division.
- The final two sections identify the Project # and Work Order #. The first “-1” indicates that this is the first project under the cost center (-2 would indicate 2nd project). The second “-1” indicates that this is the first work order under the project. A project may have up to 999 Work Orders that fall under it.
There are further details up above in the Cheat Sheet FAQ item under How to Use Reports - Overview at the top of this page.
Work Order: Enter a single Work Order number to get an Inc Stmt for just that Work Order.
Fin Stmt Grp: This is also known as Accgrp1. This selection produces results for specific Financial Statement account group categories such as: Tuition and student fees, Materials and supplies, etc. The following account groups are available:
Fin Stmt Grp # aka Accgrp1 | Financial Statement Group name |
|---|---|
400 | Province of British Columbia grants |
410 | Government of Canada grants |
420 | Other grants and contracts |
430 | Tuition and student fees |
440 | Sales of goods and services |
450 | Rental income |
455 | Revenue recognized from deferred capital contributions |
460 | Investment income |
470 | Gifts, grants and bequests |
480 | Gain (Loss) on investments |
485 | Gain (Loss) on sale of tangible capital assets |
490 | Other revenue |
495 | Other revenue - Capital |
500 | Salaries and benefits |
600 | Fees and purchased services |
610 | Travel and training |
620 | Scholarships and bursaries |
630 | Equipment rental and maintenance |
640 | Utilities, insurance and taxes |
650 | Materials and supplies |
660 | Cost of goods sold |
680 | Grants and Contributions |
750 | Amortization of tangible capital assets |
755 | Capital expenses - Other |
770 | Capital additions - to be capitalized |
780 | Transfers to Capital Assets |
800 | Internal ordering - revenue |
820 | Internal ordering - expenditures |
840 | Overhead received |
845 | Overhead paid |
See Troubleshooting section below if you are having issues viewing or downloading reports.
Divisions at VIU represent areas that have different responsibilities and budgets. You can find the Division for any Work Order on the Work Order - Active List which is in the folder: Area Special Purpose Financial Reports accessed via the Accounting tab on the left in the Employee Portal.
Here is a list of all VIU Divisions:
Division # | Division Description |
|---|---|
100 | President - Office |
105 | President - Institutional |
110 | Human Resources |
150 | Community Partnerships |
160 | University Secretary |
200 | Provost and VP Academic - Office |
201 | PVPA - Centralized Academic Units |
210 | Academic and Career Preparation |
220 | Arts and Humanities |
230 | Education |
240 | Health and Human Services |
250 | International Education |
260 | Management |
270 | Science and Technology |
280 | Social Sciences |
290 | Trades and Applied Technology |
350 | Indigenous Education and Engagement |
360 | Library |
370 | Registration Services |
410 | Centre for Innovation and Excellence in Learning |
440 | Cowichan Campus |
460 | Powell River Campus |
500 | Scholarship, Research and Creative Activity |
550 | Student Affairs |
600 | CFO and VP Administration - Office |
603 | CFOVPA - ASA (Administrative Support Activity) |
610 | Information Technology Services |
640 | Facilities Services and Campus Development |
670 | Ancillary Operations |
700 | Financial Services |
750 | Enterprise Risk Management |
900 | CFOVPA - Institutional |
910 | Institutional Revenue |
To find a Sub Division (a sub portion of a Division) look at any Work Order in your area. The second, third and fourth numbers in a Work Order indicate the Sub Division.
The Sub Division represents a part of a full Division - a discrete activity within the Division such as for the associate deans, directors and managers who are responsible for portions of activity within the Division.
Example:
FAQ - All External User Reports
Using parameters:
To choose multiple Work Orders in one Inc Stmt report you can use the wild card symbol: * (asterisk) if the Work Orders start with the same prefix.
As an example, to search for three Work Orders that all start with the same digits use the asterisk (*).
To view Work orders 22705-1-1, 22705-1-2 and 22705-1-3 you enter “22705*” and the report will be produced using data for all Work Orders that start with 22705. If you tick the box that says "Include WO Sub Reports" the Income Statement will automatically produce a separate report for each Work Order.
At this time you cannot enter multiple Work Orders using a comma or semi colon. We are looking at adding this enhancement feature in future versions of the report so you can view this report with multiple Work Orders that do not start with the same numbers. You can use the GL Account Enquiry - Details report to group transactions by Work Order and transaction date to create your own version of this report also with a lot more flexibility.
Choose all Work Orders in an area:
When you create an Inc Stmt report for the Sub Division or Division the Work Orders are in, tick the box that says "Include WO Sub Reports" so the Income Statement report automatically includes all Work Orders in the Division or Subdivision chosen. Keep just the ones you want to see and delete the rest. Work with an experienced Finance Assistant to help you produce your ideal Inc Stmt reports.
You can also choose to search by Project or Cost Centre (if appropriate) to have other Work Orders included. See the top of this page under How to Use Reports: Overview for the cheat sheet and budget structure explanation.
See Troubleshooting section below if you are having issues viewing or downloading reports.
If you have a line item in a report that you are unsure of you may be able to find out more by looking up the associated PO number info from the Goods Receipt activity screen. Note you can now also click on Transaction number to find details of all entries (see item below this one):
Find PO details from goods receipt screen - video transcript.txt
If you have a line item in a report that you are unsure of you can find out more about it by clicking on the blue Transaction number link to see the entry details including attached documents:
If you have a sales line item in the GL report that you are unsure of you may be able to find out more by looking up the associated Sales Order from the Order number column in the report.
- Once you have the number, open "Customers and sales."
- Click the Open button at the bottom of the screen.
- Enter the Sales Order number in the Search bar and hit Search.
- Click below on the appropriate line item and the Sales Order will open showing you the details of the order.
At this point we need two reports to do that.
1) First you produce your Inc Stmt report that provides the income and expenses for a particular area for a period of time. This report shows the total for any given income or expense account in that area.
2) To see the details, you produce the GL Account Enquiry - Details report using the same criteria to match the consolidated numbers that are on the Inc Stmt report. A simple way to do this is to choose the correct four digit cost centre (details on determining the cost centre below). If you have more than one cost centre you can either choose "In list" to add all of your cost centres or if they fall under a similar number string you can use the first two or three numbers with an asterisk such as 22* or 227* (see example below) to give you data for all cost centres that start with those two or three numbers.
Then you will have a detailed report by account that matches the totals on your Inc Stmt report.
How to determine your cost centre
Find your cost centre(s) by looking at the Work Orders in your area. Once you understand the breakdown of the Work Order string (set of numbers) you can create reports by using the cost centre.
Each Work Order number is structured as follows:
- The first digit represents the “fund” that the activity belongs to:
- 1 = Operating
- 2 = Off-grant
- 3= PD&T
- 4= Ancillary
- 5= Capital
- 8= High School
- The second 4 digits represent the FIS cost centre that the activity falls within. A cost centre in this case represents a significant activity stream within a division.
- The final two digits identify the project # and work order #. The first “-1” indicates that this is the first project under the cost center. The second “-1” indicates that this is the first work order under the project. A project may have up to 999 Work Orders that fall under it.
- The Work Order number is considered to be the full string (ex: the work order number for REG PD&T – Eldercollege is: 33715-3-1)
So if you have Work Orders 22705-2-1, 22705-2-2 and 22705-2-3 you could instead search using:
- Project 2705-2 will pull all of the Work Orders under that project.
If you also want to include other Work Orders such as 22705-1-1, 22705-1-2 then you could search using:
- Cost centre 2705 will provide data for all of the Work Orders noted above (22705-1-1, 22705-1-2, 22705-2-1, 22705-2-2, 22705-2-3).
Use "Contains" and current fiscal year (ex "2023") to see only the current fiscal year data.
You can now sort your report by the value "Accgrp2" so the data will match the Income Statement output order. See short video for how this works:
Sort by Accgrp2 column to match output to income statement - video transcript.txt
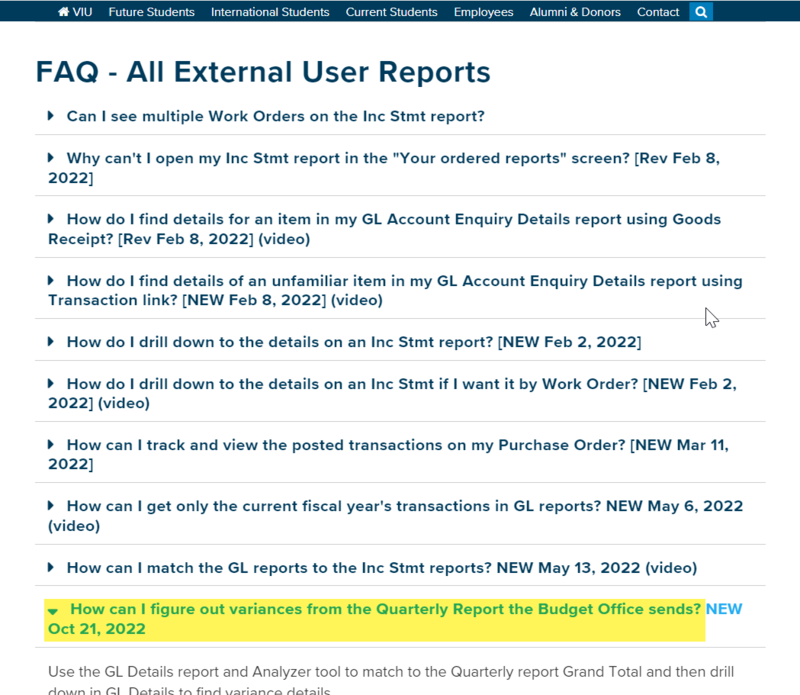
Use the GL Details report and analyzer tool to match to the quarterly report grand total and then drill down in GL Details to find variance details.
Step 1
Find your bottom line number on the Quarterly Report under Total Actuals in the last row: Grand Total. This is the number you want to match.
This number should also match the Grand Total (YTD Actual column) if you run your Inc Stmt for the same "Period To" matching the quarter. (eg. "Period to" 202306 for the Q2 report covering April to September, 2022)
Step 2
Create a GL Account Enquiry - Details report for the same time period as the quarterly report for the same Division (or the same Work Orders) you want to verify.
- Period (T): choose "In List," tick the "Closed" box and hit "Apply." Then scroll down to choose all periods for that quarterly report including period 202X00 (opening balance!) and then say OK.
- Choose the Division (a must for Expanded access). Division users leave the other fields blank (unless looking to match a single Work Order) and say OK. This will produce a report with all transactions (including balance sheet entries like prepaids or deferred revenue), not just the Inc. Stmt accounts.
Step 3
Use the analyzer tool to easily filter the data to be sure you are matching to the same bottom line.
Analyzer options:
- Rows per page: choose All
- 1 - Select values: choose Amount
- 2 - Distribute over: choose Accgrp2
Now click on the small funnel icon to the right of the Accgrp2 column title to see a list of the Accgrp2 categories in your report. Click on each of the Income Statement Categories you see:
- 40 Revenue
- 50 Expenses
- 77 Capital Additions
- 78 Transfers
- 80 Internal Revenues
- 82 Internal Expenses
This will now exclude balance sheet categories from view though they are still in your GL Details report.
The number you see at the bottom in the Grand Total row should match the Grand Total on your Inc Stmt or quarterly report, though rounded.
You have verified the GL Detail report has the correct data to drill down into it to look up invoices, purchase orders, sales orders, payroll and other entries, etc. to find answers about your variances.
Step 4
Go back into the GL Details report (blue hyperlink in top left of analyzer window) and expand on the appropriate account that has the variance. You can see helpful details here such as:
- Period it was entered
- Work Order number
- Supplier or customer name
- Description of item
- Transaction date
- Transaction number hyperlink to click (if appropriate)
- Order number hyperlink (if appropriate) to see more details of the transaction such as a copy of the invoice or expense claim form.
This video will show you how to create and match a GL Account Enquiry - Details report that is sorted by Work Order so you can match it to an Inc Stmt.
Note that in this video we missed a Work Order group starting with 326 for FOM, but the example still shows you how to tackle this for your own department.
Note also that Income Statement reports now show detailed breakdowns though not with hyperlinks.
How to match GL detail with Income Statement by Work Order - video transcript.txt
If you have access to view financial reports you can use reporting to confirm the transaction has been posted. Using the GL Account Enquiry - Details report:
- Enter the criteria as the Work Order that the PO was charged to.
- Click the dropdown arrow at the top of the “Order Number” column on the far right.
- Enter your PO number in the "Equal to" field and click OK.
- Transactions paid against that PO will display and you will have the ability to click on the blue Transaction number link to see invoice details.
Sometimes you run a report and you forget what the parameters were that you asked for by the time you download and open the Excel report. Or you think the data has to be wrong so it's good to verify what you actually asked for. Here is a tip!
Once your report is open in Excel you will see two tabs in the workbook. The one labelled "Parameters" will identify the criteria you selected. If you don't want to keep this tab, you can add a line to your report indicating the parameters you asked for or you can rename the report to clearly define it (Apr 1 to Sep 30, 2022 for Library Division 360).
Reload the report to easily modify the criteria. A GL report result is produced as of the time it is run. To reload the result, click the refresh button (Reload grid) in the activity toolbar (located on the top right corner under the search bar). The Enter search values window will open so you can modify your criteria before refreshing the report.
Remember that any newly posted transactions will not automatically show up in this report while it’s open.
External Restricted User Reports
This report is for approved users only. It is the same as the regular GL Account Enquiry - Details report (see above under External User Reports) other than the addition of Resno and Resno(T) columns so users know which employee (Resno and name - T is for Text) is referenced for the salaries accounts (5XXX series) in order to correct payroll amounts applied to incorrect Work Orders or to assist with budget planning.
The other difference is that you can search by employee in the Enter search values window:
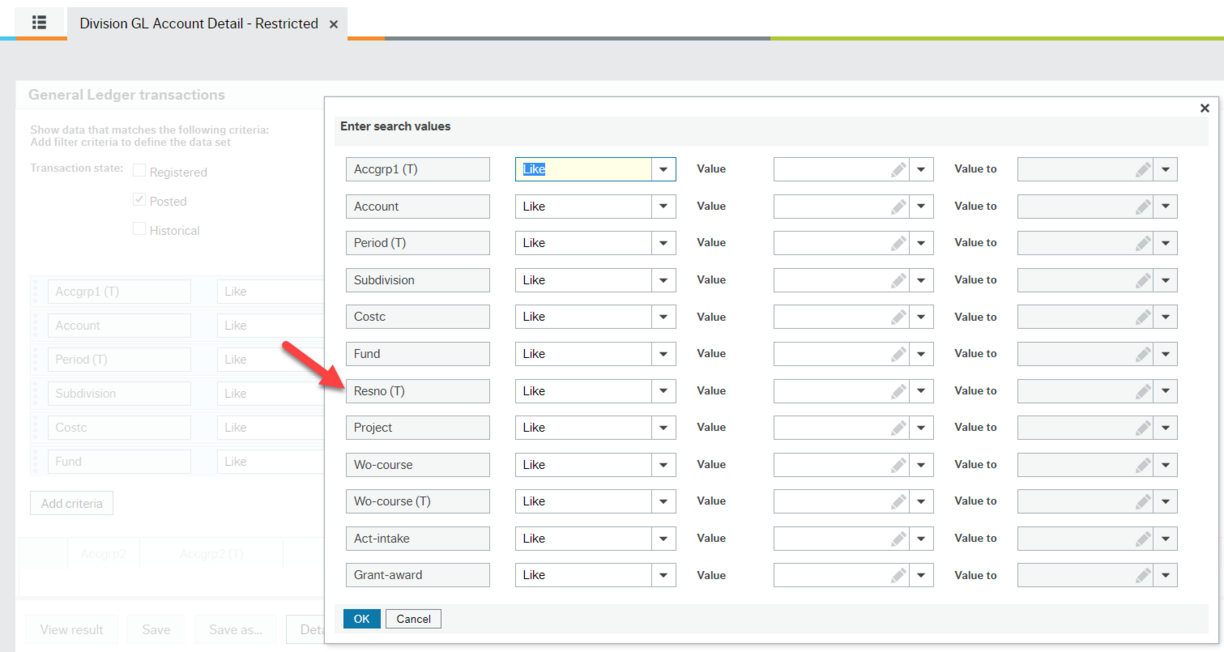
This report compares in-year forecast vs budget at the employee level. The in-year forecast is represented by actuals as of last pay period + payroll commitments for each individual. A variance is calculated, indicating a positive where annual forecast is less than budget, or negative where salaries are higher than budget.
Your access to the Labour Variance report depends on your approved access; "Division" or "Expanded."
Division access
Data defaults to reflect only data for the division your position is in. You will see the report under the Division Restricted User Reports > Labour Variance - Division.
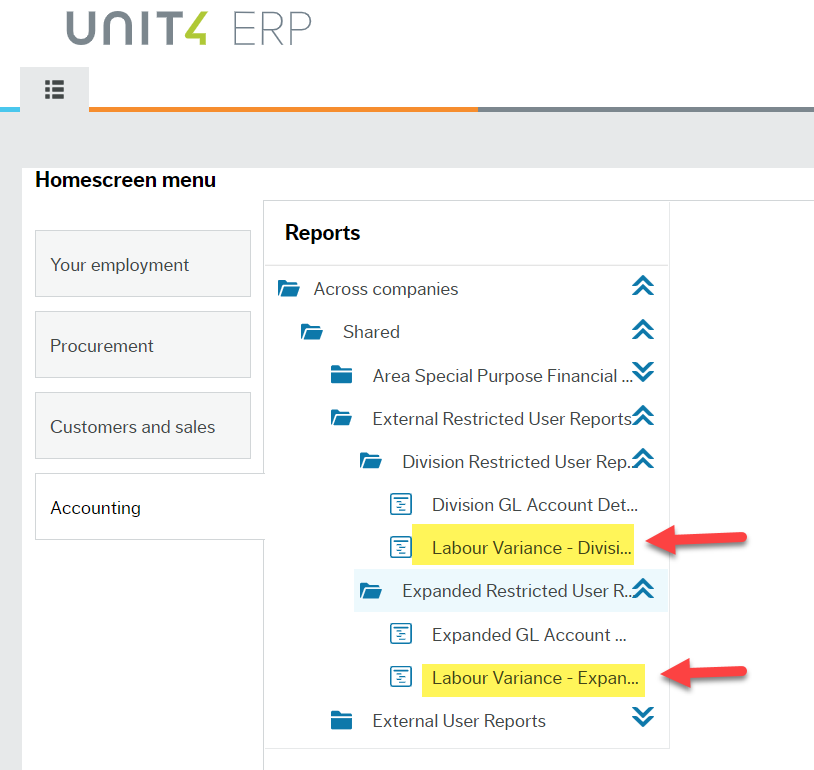
In the Enter search values window a Division user can choose a Subdivision if required. They can also choose from Work Order or Resource ID (ResNo) to further narrow down criteria as required. Enter information in desired fields and then click Ok to view the result.
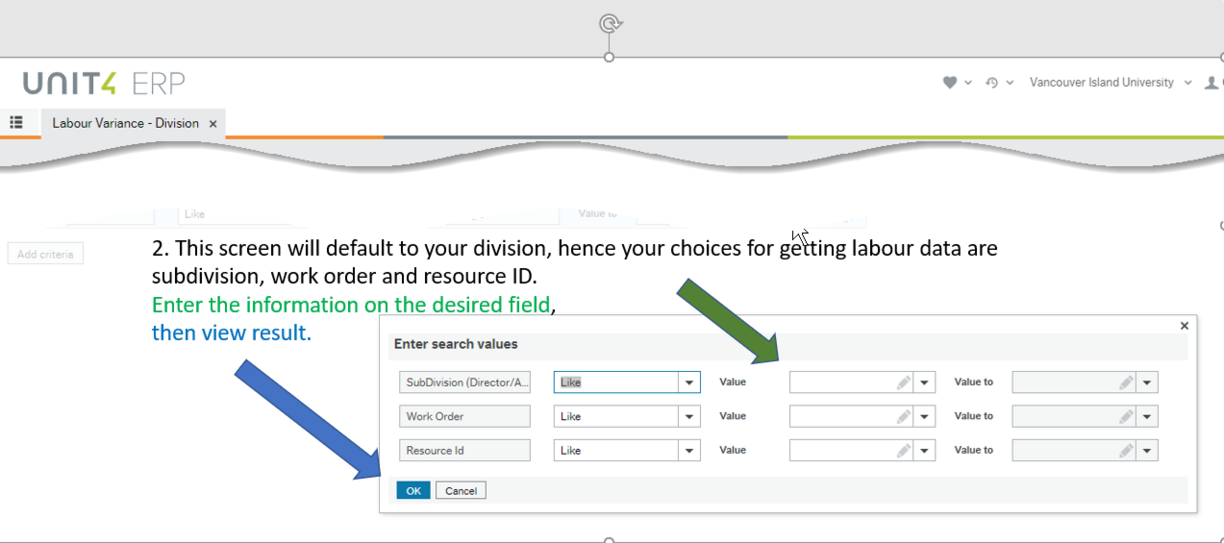
Expanded access
If you have "Expanded" access you will see the report in Expanded Restricted User Reports > Labour Variance - Expanded.
As with other "Expanded" reports, the user must enter a division or subdivision in the Enter search values window to avoid running a report for the whole institution.
They can also choose from Work Order or Resource ID (ResNo) to further narrow down criteria as required.
Labour Variance report example
This example is for the budget office:
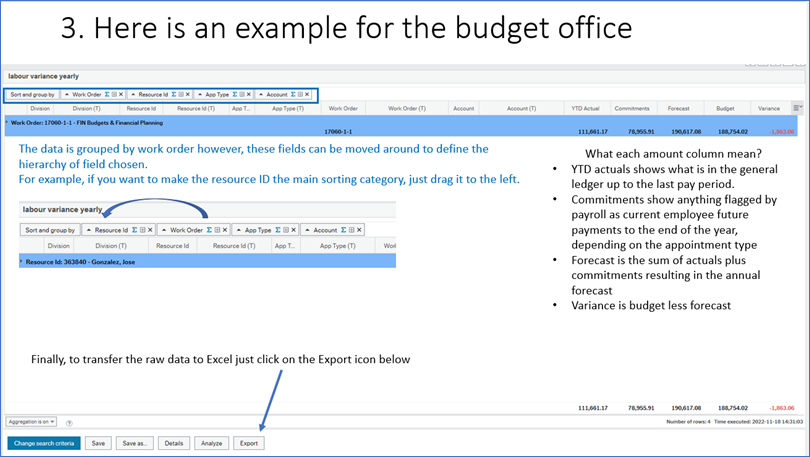
Short topic instruction videos
FRS to FIS - a different type of system
FRS to FIS - a different type of system - video transcript.txt
Financial report aims
Key changes in FIS reports
Types of FIS report access
New Activity/Intake code
Object to account code mapping
What an Income Statement is
Work Order string explained
Work Order - Active List options
Using the Chart of Accounts
Prepaid expenses
Explore Work Order - Active List
General Ledger and Balance Sheet accounts
General Ledger and Balance Sheet accounts - video transcript.txt
Search Values in GL Account Enquiry - Details
Search values in GL Account Enquiry - Details - video transcript.txt
Using Like, In List and Starts with in GL reports
Using Like, In List and Starts with in GL reports - video transcript.txt
Transaction number hyperlink for details
Transaction number hyperlink for details - video transcript.txt
Export GL (and other) reports
Running an Income Statement report
Specialty Training Videos
You can speed up videos (try 1.25 or 1.5 under settings) and turn on closed captions for more efficiency.
Dig deeper into using the Analyzer tool for a GL Account Enquiry - Detail report in the video below.
Approximate topic times
- 0-2 mins - reports folders in Employee Portal explained (Division, Expanded, Restricted)
- 2:00 - running a GL Detail report
- 5:02 - the aurora.viu.ca training page including a shortcut to Financial Reports training page
- 6:02 - the Analyzer Cheat Sheet and how to match the Analyzer output exactly to an Inc Stmt using GL Detail data
- 8:50 - reference to the Deferred Revenue explanation document (2000 series of accounts) now under Cheat Sheets also
- 10:20 - the Analyzer form and how to set it up
- 17:40 - month end closing times on Cheat Sheet (so you get a complete month of data)
- 20:40 - Export button at top right (under video panel in this video)
- 25:00 - ways to experiment yourself
- 25:50 - different chart options
- 26:45 - discussion of how to show trends and comparisons by year
- 35:00 - discover more possibilities using the Analyzer
- 39:00 - using "In List" to tweak the accounts in the report
- 42:00 - note that Jun 2021 (Period 202203) includes April, May and June of 2021
- 43:00 - using the Filter button and customizing for comparisons
You can speed up videos (try 1.25 or 1.5 under settings) and turn on closed captions for more efficiency. It's only 17 minutes for a deep dive.
Use the Sort and Group By Function Cheat Sheet as a reference.
Highlights from a "Sort and group by" training session where we dug into the various ways to sort and organize the same set of data.
You can speed up videos (try 1.25 or 1.5 under settings) and turn on closed captions for more efficiency. Only 30 minutes for a deep dive.
Use the Enter Search Values Window Cheat Sheet as a reference.
Get as specific as you need to using the criteria in this window to improve report effectiveness.
Approximate topic times
- 0-3:45 mins - training page for Quick Link, Cheat Sheet and getting to the GL Account Enquiry-Details reports via different folders (Division, Expanded, Restricted)
- 3:49 - how to use the text (T) fields
- 4:30 - Accgrp1 using space bar to pull different accounts into your report at once
- 8:50 - Account to create a report for any Account
- 9:20 - Wo-course and Wo-course (T) differences (numeric and alpha/text) are very important
- 12:33 - Period (T) is crucial to understand so you get the correct data. This is not the same as Period which is already hard-coded in the background as >=202203 for Jun 2021 data
- 15:53 - use Division or Sub-Division to focus your data, especially for Expanded access users!
- 17:00 - Costc, Fund and Project are rarely needed
- 18:05 - become an expert at using Like, In List and Contains operators
- 19:30 - do not use Between (or similar) for Period (T)!
- 20:33 - how and when to use In List (for more than one or less than all)
- 23:20 - Reload grid is a magic button to save you time!
- 24:00 - choose Closed and Apply for Period (T) and In List
- 25:00 - the Contains 2023 nuances such as 202300 (for carry forwards from last year)
- 27:00 - use only one of the Wo-course options at a time
Troubleshooting
All employees should see the Accounting menu tab on the left and the folder Area Special Purpose Financial Reports under Shared which is under Across companies:
If this or any other sub-menu item is missing, please email AURORA_help@viu.ca with the following information:
- In the Subject line of the email include “Menu Access” followed by the name of the Menu you are expecting to have access to
E.g. Menu Access – Accounting Provide a description of the issue – what the issue is, what you should be able to do or see, etc. E.g. I can't see the All Areas - Aged AR report.
Currently there is one person per budget division area assigned access to view the External User Reports folder with these three reports: GL Account Enquiry - Details, GL Account Enquiry - Summary and Inc Stmt Budget & Actual
Not all users will have the ability to save or change a report. If you feel you are missing this access, email AURORA_help@viu.ca with the following information:
- What you want to be able to do
- Why you feel this is necessary
- Who requires this information in your area (who is the report data for)?
You may get error messages if the amount of data you are asking for is too big so refine your request to narrow down the amount of data:
Running reports with multiple value selections such as multiple Work Orders can take a lot of time to process so please be patient or consider a few smaller reports or be very selective in what you ask to run a report for. You may see a warning or error message if your report is too large and it may 'time out' so choose a smaller data set. There may also be other reports in the queue. Software can only technically do one thing at a time so if there are multiple report requests the system will produce them in order of request.
Check status:
For Income Statements there will be one of three words under Status:
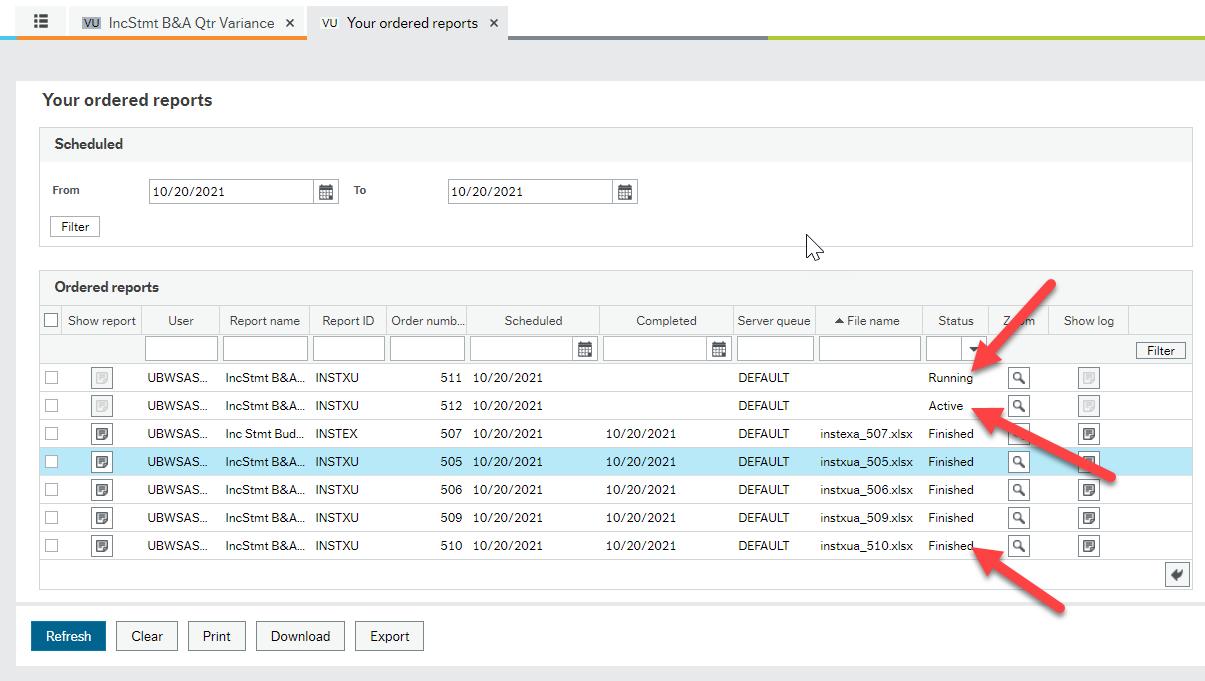
Active - the report is in the queue and will be run soon
Running - the report is in the process of being produced
Finished - the report is ready to view
You may not see a file name until the file has been produced. Be sure the status is Finished.
Click the Refresh button every few minutes to push the screen to refresh the status of the data.
User error:
If you have asked for data that doesn't exist (i.e. a typo in the Work Order number), you will not see anything in the "File name" column of the "Your ordered reports" window.
After the report has Finished, it may pop down to the bottom of the list so be sure you are opening the correct numbered report! Reports that were Active and Running in the image below are now Finished, but in a different order.
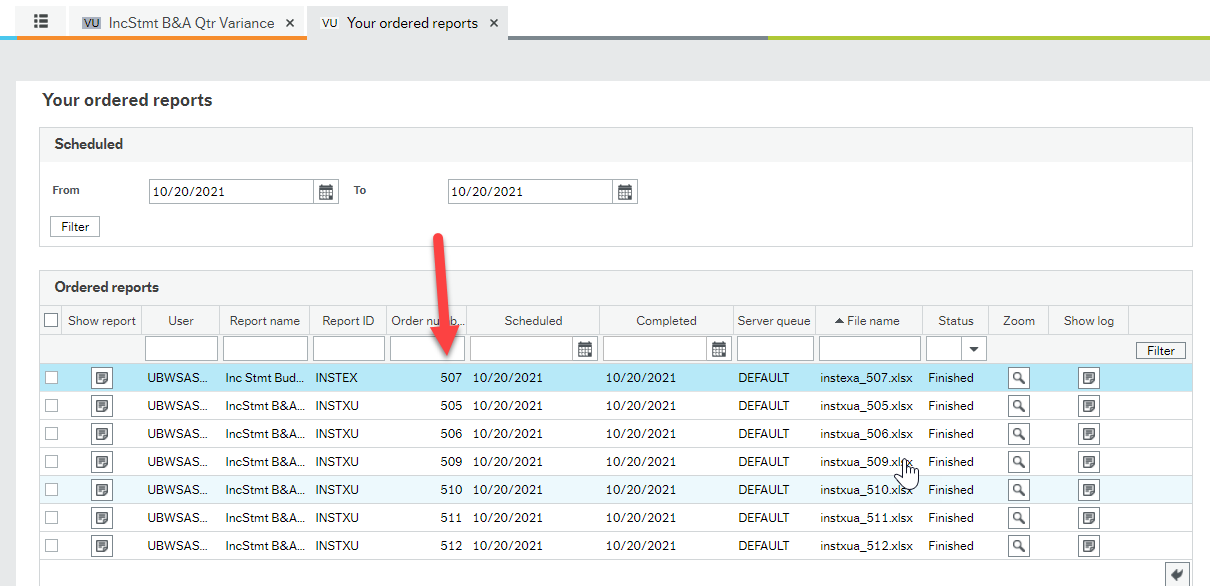
Investigate:
You can also click on the icon in the Zoom column (beside Status) so see what you asked for as there may have been an error in your entry. Click on the "zoom in" icon to open a window to see what parameters you asked for. This is important to determine if you made an entry error in your query.
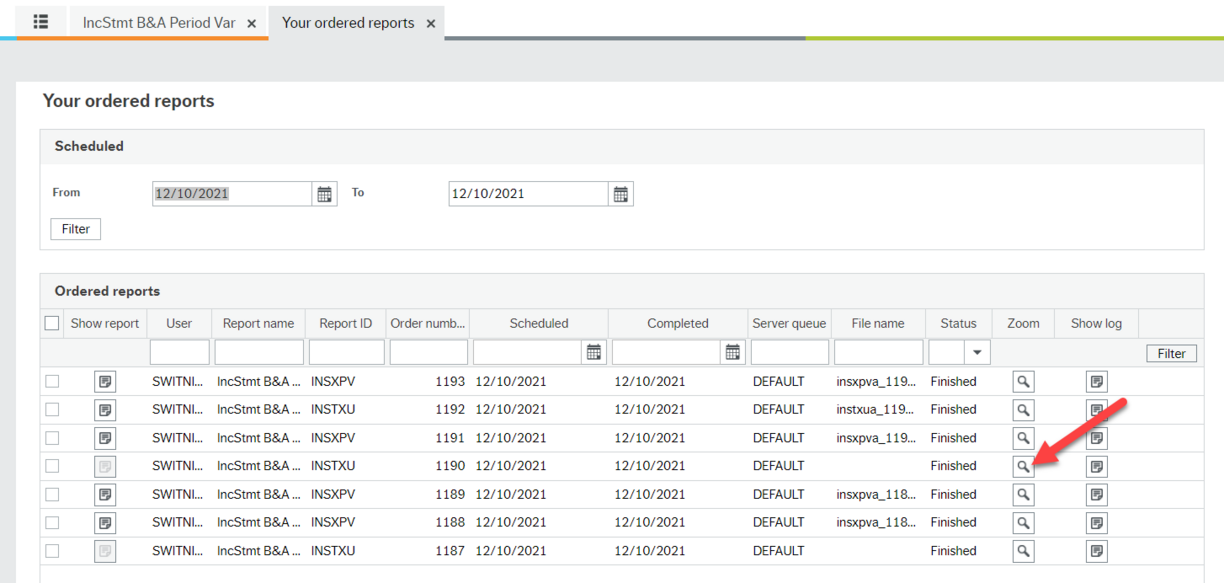
In this case, the zoom window opens and I see that I should have entered 100 as the Division and not the Branch.
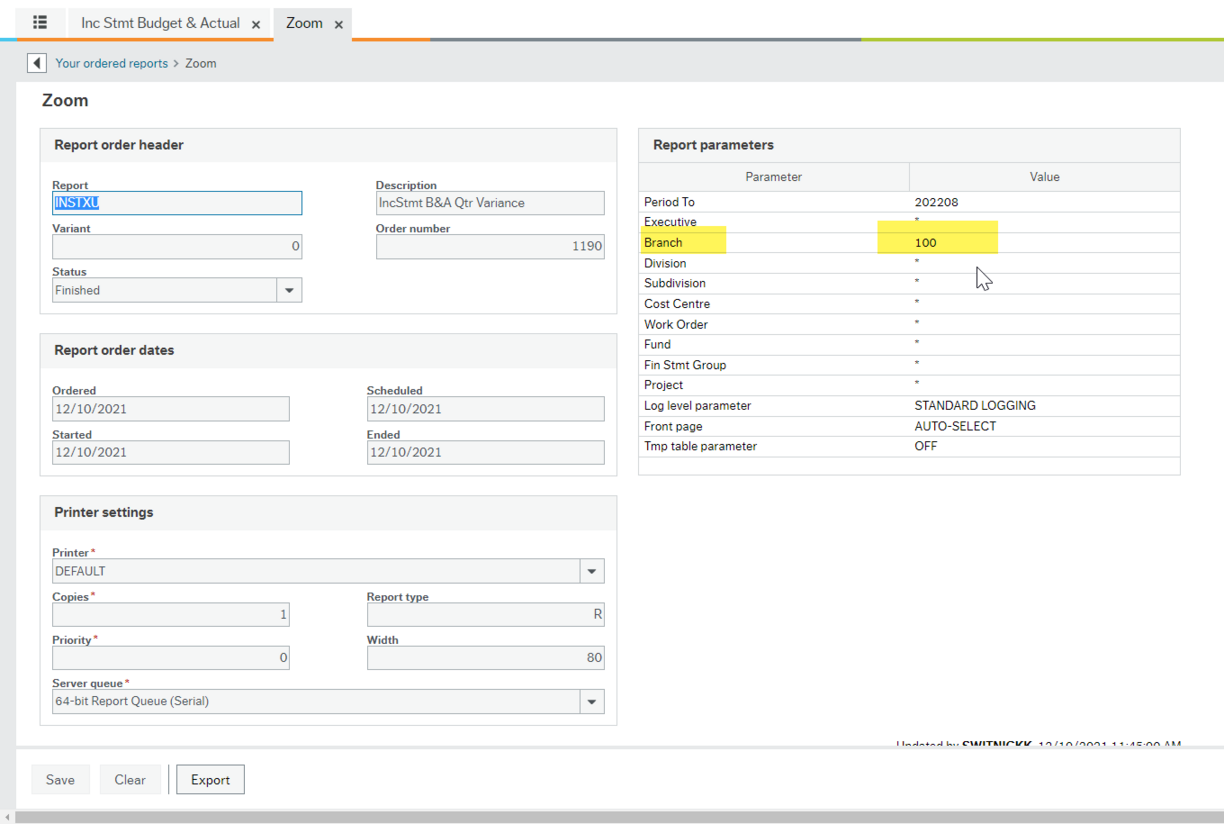
In some cases you may find that you run a report that you know should have some entries, but it returns as empty with no data in it. In this case you could run a GL Account Enquiry - Detail report to see if there are any entries in the balance sheet accounts such as the 1000 series (Assets) or 2000 series (Liabilities) which may include a deferred revenue amount.
You may also have entries that cancel each other out or come to a net balance of zero. If you have zero as a net balance the Inc Stmt will not produce anything for you to see. The GL report will show you the details.
This tip is especially helpful when you have a more complicated set of criteria for a report. You can use the refresh or "Reload grid" button to reload the Search Values window to see what you need to correct. Thanks to Alison Todd for the tip!
Reload grid to retry your search values for a GL Enquiry report - video transcript.txt
Archive: training sessions
This session will help you learn more about Financial reports. It is a combination of FIS and Excel training and provides details to give you a better understanding of the Finance area. The first half of this session recording below shows you:
- A walk through of FIS: Division to Work Order hierarchy & Chart of Accounts
- 1:10 Why we need financial reports
- 4:25 Fixed Work Order structure
- 11:20 What the Work Order numbers represent
- Available reports and financial statements available to different user groups
- 13:59 How to produce a Chart of Accounts
- 20:08 How to view the Work Order - Active List
- How to extract reports & view transactions
- 25:43 GL Account Enquiry Summary
- 34:28 The Inc Stmt reports
The next half (starts at 48:30) shows you how to blend the reports into a package. You can watch in detail how to recreate the combined spreadsheet you have been receiving from the Budget Office monthly. Going forward these packages will only be made available to you quarterly. These instructions will allow you to create them on your own if you wish so you can learn how to:
- Build reports from transaction extracts
- Combine reports
- Summarize/view your data with use of Pivot Tables & slicers
There are two reports needed to create this package that you don't currently have access to. If you wish to create this package for your area, please email BudgetOffice@viu.ca to request them.
Slides used in the presentation
How to extract data and build custom reports Nov 18, 2021 - video transcript.txt
This session covered:
- background on where we are with financial reporting
- where we are headed going forward
- overview of the Introduction to Financial Reports PDF
- current reports available to all VIU employees
- overview of Financial reports training page (this one)
- discussion about External User Reports
This session covered:
- reminder of previous session details
- tip to download reports during off hours if possible to speed things up and manipulate them later
- when the next reports are coming out - soon!
- new Intro to Financial Reports sessions coming in March
- prepare by going over the information on this page!
- practice with the reports you have access to now
- Analyzer tab instructions are coming so you can view visuals for your data
- discussion of the various reports parameters and operators and how to use them - see above for detailed instructions!
- the different External User Reports
- the difference with FRS and FIS procedures
- Inc Stmt reports show totals - GL Account Enquiry - Details shows the details (for now until next phase where Inc Stmt reports will have drill down options)
- explanation of Work Order string of numbers
- future report access
- folder naming and allocation discussion
- vendor reports and report priorities
- salaries information reports and preparing for yearend payroll adjustments
- Jose discussed the upcoming plans for individual sessions
- P-card email from Procurement clarification coming
Slides to go with session.
Slides to go with the session.
Introduction to Financial Reports Mar 16, 2022 - video transcript.txt
This is a rough recording of an in person session held on Nanaimo campus for those who couldn't attend in person:
Zoom session recording Jan 24, 2023