
- For questions on time code eligibility contact Payroll@viu.ca.
- Contact ITHelp@viu.ca if you have trouble accessing the Timesheets activity.
- Contact a Tech Champion in your area for general Timesheet activity support.
You must be an active employee to see menus/data after you log in to Employee Portal.
All employees (other than BCGEU) are to be submitting online Timesheets. This does not apply in unusual situations such as:
- snow removal
- on call premium pay
- one or two day casual appointments
Click on Timesheets under "Your activities" in the Employee Portal to submit timesheets.
DO NOT submit an online timesheet for any time submitted on paper!
Continue to adhere to Payroll's timesheet submission schedule as outlined on VIU Payroll. In most weeks, they are due each Thursday by 3pm and must be approved/confirmed by 10 pm.
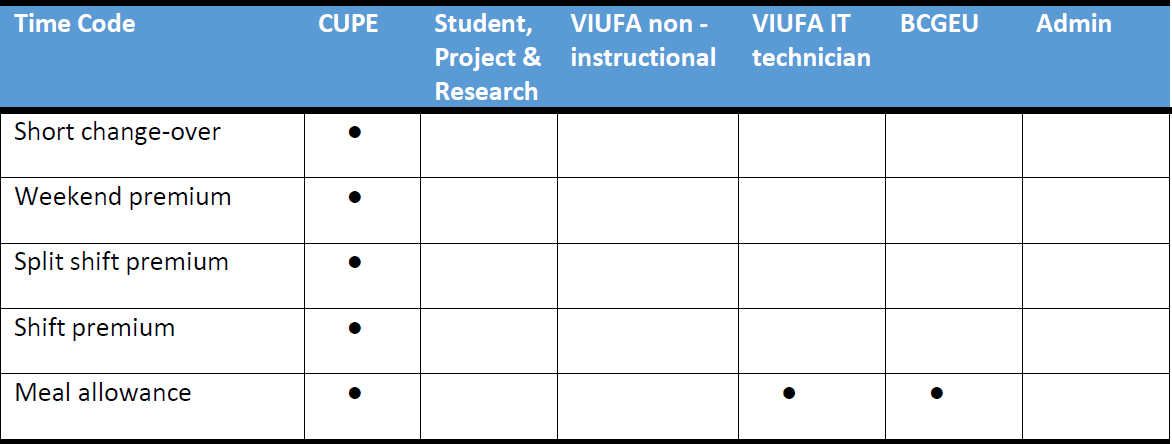
Employees enter these types of hours:

Payroll clerks will add these premiums:
Submitting a timesheet
Click here to download a Timesheets cheat sheet showing an overview of the information and steps required to submit a timesheet.
You can only submit one timesheet per week so be sure to enter all of your hours for all of your positions and work orders and the system will forward them to the correct confirmer automatically!
Overall, the process to submit a timesheet is simple - just enter the following information:
- The appropriate time code (see Time Code cheat sheet)
- The work order number and activity code for your position
- Description is the work order your hours are charged to
- Your position number
- The hours per day
- Open the Time entry window via the magnifying class icon to enter start and end times for each row if premiums to be applied
- Set the status on the main screen to Ready and click Save
Sometimes things aren't always that simple so here are more details.
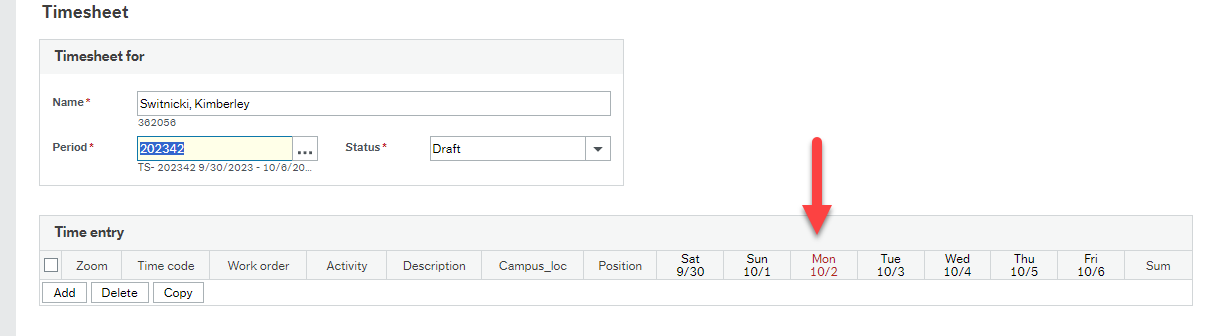
When you open the Timesheets activity the system will automatically:
- Populate the name field with your name
- Set the Period field to the current week, and
- Set the status of the timesheet to Draft
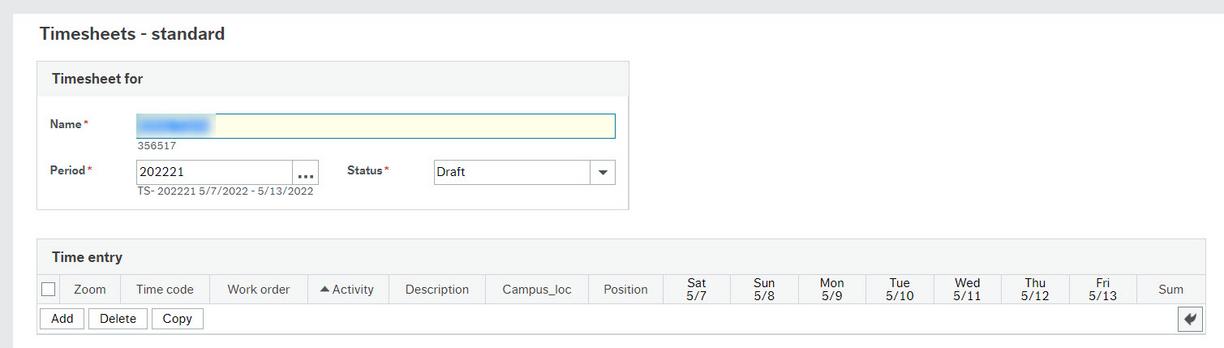
To enter hours on your timesheet, click Add at the bottom of the Time entry section. This adds a blank row on the timesheet and you can add as many rows as you need.
Enter the following for each row:
- Time code
- Work order number
- Activity code
- Position
- Hours worked for each day for that time code
As with other modules in the Employee Portal, it is best practice to tab from field to field to enter information, making sure you tab one more time to lock in your entry in the final field.
If you have only one position and one type of hours to enter (such as REGCUPE) you can do it all in one row. However, you need to add a new row every time you need to enter hours for:
- A different time code
- A different position
- A different work order
- More than one shift for the same position on the same day
You can add additional rows by clicking the Add button at the bottom of that section.
If you are scheduled to work on Friday, enter those hours as expected. Any changes to those hours can be made by emailing Payroll.
If you have one position, the position field will automatically default to that position number. If you have multiple positions, be sure to select the appropriate position from the dropdown menu.
If you have to change a work order on your timesheet, you'll have to delete the work order and activity code and then enter the correct information. Do not delete the description field in your online timesheet. This information is required so your confirmer knows which work order your hours will be charged to. You can add text to the end of the description, but do not delete it!
If you work a shift that runs over two separate days (for example, 10pm Monday night to 6am Tuesday morning), you have to enter those hours on two different days (for example, 10pm to 11:59pm Monday - overriding the total hours to 2.0 - and 12am to 6am Tuesday).
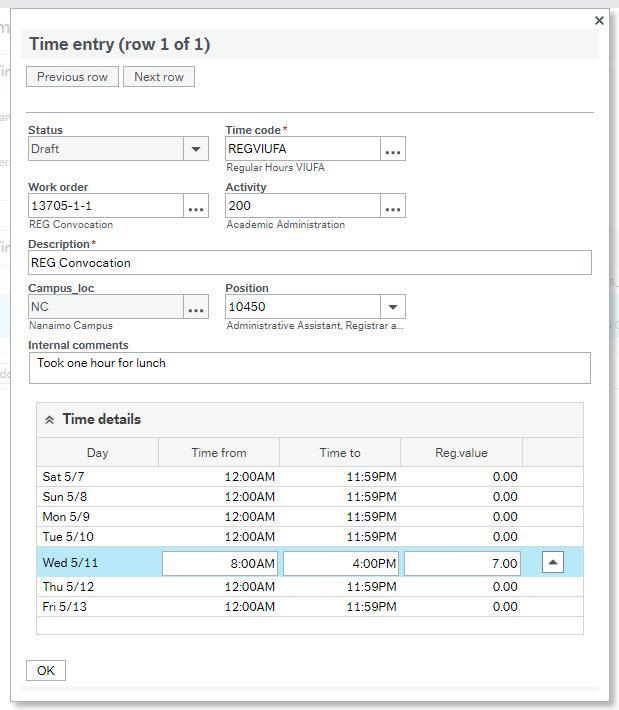
Once you have entered the required information on the timesheet row, open the Time entry window to enter the start and end times:
- Click on the magnifying glass icon in the Zoom column
- When the Time entry window opens, enter the start and end times for each day you worked in the Time details section
- To compensate for unpaid lunch breaks, or to enter the accurate number of hours worked, you must override the total hours worked
- You can use the Internal comments field to enter information about the hours worked
- Click OK
You can enter information in the Time entry window for each row on your timesheet. Close this window when you are finished entering information.
If you do not enter hours in this window it will be assumed that you worked during regular working hours and no premiums will be applied by payroll.
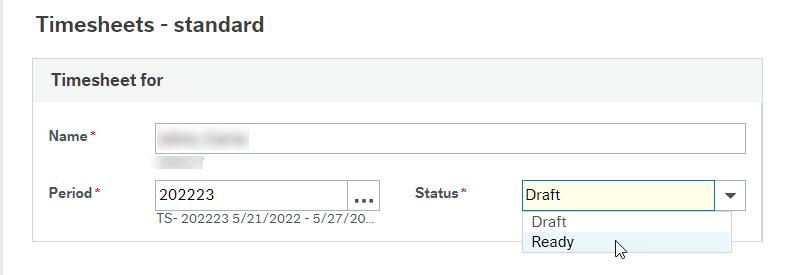
If you would like to save a draft of your timesheet and submit it at a later date, keep the status on the main screen as Draft, then click Save. You'll be able to find it later by coming back to the Timesheets activity and typing in the correct week in the Period field, such as 202351.
When you want to send the timesheet to your confirmer for approval, change the status on the main screen to Ready, then click Save and it will be submitted to your confirmer!
If you've submitted a timesheet after the deadline, which is typically Thursday at 3pm, your timesheet will be held back in the system for two days while normal payroll procedures are continuing. You will also receive an Alert in the Employee Portal. After two days the timesheet will be released into workflow and sent to your manager or timesheet hours confirmer for approval.
If you submit your timesheet after the deadline, there is a chance that you will not get paid for this timesheet until the following payday.
If your timesheet needs to be processed right away, have your manager contact Payroll for your options. If this is the second week of a pay period they may suggest you submit a paper timesheet. If so, you will still need to zero out the hours for the late online timesheet so you don't submit the hours twice. See instructions under Edit, delete, clear or copy timesheet section below.
You can show that you've taken an unpaid lunch in two ways.
The simplest is to record the number of hours you should be paid for in that day's column. If you work 8am to 4pm (8 hours) and take a one hour lunch then you work a total of 7 hours. Just enter 7 for that date.
If you think payroll or your supervisor need to know the specific time you started and ended your shift, such as for overtime or if there are premiums for shift work or weekend pay, then enter the start and end times in the Time entry window.
- Click on the magnifying glass icon in the Zoom column on the appropriate row
- When the Time entry window opens, enter the start and end times for each day in the Time details section without entering a space between the hour and the AM or PM (for example, "8:00AM" and not "8:00 AM")
- Override the total hours worked to compensate for an unpaid lunch break
- Click OK

Note that as soon as you click on a time the total box will instantly update so make sure you remember or note down what hours you want to enter.
If you need to change the number of hours you worked in a day after adding your start and end times you will have to go back into the Time entry window and change the start and end times to match.
If you work a shift that runs over two separate days (for example, 10pm Monday night to 6am Tuesday morning), you have to enter those hours on two different days (for example, 10pm to 11:59pm Monday - overriding the total hours to 2.0 - and 12am to 6am Tuesday).
If you need to provide any extra information or submit an attachment to your supervisor, make a note in the "Internal comments" section in the Time entry window and then send the attachment by email.
Statutory Holidays (stat) will be highlighted red in the timesheets activity. If you work on a stat you enter your hours worked as REG for your jurisdiction (such as REGCUPE) and payroll will assign the appropriate stat pay for you.
If you work full-time, you will automatically be paid for the stat holiday. If you work part-time payroll will calculate the appropriate stat pay for you. Only enter hours on the stat if you worked on that day!
If you are sick you must inform your manager and your TED so they record your sick hours in the absence module.
If you are paid hourly and are sick on a regularly scheduled work day, enter your sick hours as SICK in your timesheet as well as your other hours worked. The payroll office will determine if you get paid for this time from your sick bank if you have one, or if the day qualifies under the Employment Standards Act. See the HR page Frequently Asked Questions: Employment Standards Sick Leave for more information.
VIUFA instructors do not fill out timesheets so do not submit sick time on a timesheet.
Do not submit sick hours on a timesheet if you are on salary since your TED will record your absence and payroll will process your pay accordingly.
If you are on timesheets and you have a vacation bank from which you are taking a vacation day for a regularly scheduled work day, please enter your vacation hours as REG (plus your jurisdiction such as REGCUPE or REGVIUFA). You must also have had your vacation request approved through the Absence module or by email to payroll.
If you have multiple work orders for any single position, be sure to enter the hours accordingly and pro-rate them. You will need to work out with your supervisor, manager or Timesheet hours confirmer the best way to enter your time correctly. This will reduce the need for payroll work order transfer corrections later.
For example:
- if you work 50% on Work Order "A" and 50% on Work Order "B" then you enter 3.5 hours for Work Order "A" and add a new line for 3.5 hours for Work Order "B" for a full 7 hour day
- if you work on a 40% and 60% split and you work 5 hours each day then for Work Order "A" (40%) enter your time as 5 hours on each of Mon and Tues and add a new line for Work Order "B" (60%) and enter 5 hours on Wed, Thurs, and Fri
These are simple examples so work out with your area the approach they prefer. A sample is shown in the video near the top of the Timesheets main training page.
Do not delete the description field in your online timesheet. This information is required so your confirmer knows which work order your hours will be charged to. You can add text to the end of the description, but do not delete it!
You can submit a timesheet for the current week or the previous week through the online timesheet activity.
To submit a timesheet for a previous week:
- Open the Timesheets activity
- Change the Period field to the appropriate week by changing the last number to the one previous (Timesheet period 202342 you change to 202343)
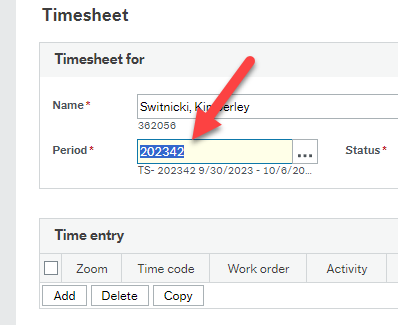
- Enter your information as per the instructions
- Click Save
If you've submitted a timesheet after the deadline, which is typically Thursday at 3pm, your timesheet will be held back in the system for two days while normal payroll procedures are continuing. After this time, the timesheet will be released and sent to your manager or timesheet hours confirmer for approval.
If you submit your timesheet after the deadline, there is a chance that you will not get paid for this timesheet until the following payday.
If there is an urgent reason that your timesheet needs to be processed as soon as possible, have your manager contact Payroll for your options.
To submit a timesheet for hours worked two weeks previous and earlier, use the fillable timesheet form or a paper timesheet and send it to payroll@viu.ca and be sure to include approval from your manager or supervisor.
Do not add any hours to a different day or week other than the actual day you worked! This is very important for determining correct stat day calculations (so you get the stat pay you should), for EI hours (in case you ever file a claim), and for other governmental reporting. If you missed entering any hours, send the details (including work order) to your supervisor by email and have them forward their approval to payroll@viu.ca.
If you have multiple positions or work for more than one area in a given week, you still enter a single timesheet for the week. See the video near the top of the Timesheets main training page.
You simply add a new line for every different position, time code or work order. The system will route the appropriate lines of work to the correct Timesheet hours confirmer to confirm the hours based on the position information set-up in your appointment. This means only one timesheet to submit!
You enter overtime using the OT time code and payroll will determine what the rate of pay should be. To do this you need to be sure to enter the start and end times of your shift for the overtime hours only!
If you are salaried and you work overtime, Payroll will know your regular hours and will pay you the appropriate pay rate.
If you are hourly you will have (or should have) entered your REG hours on another line on that timesheet.
For example, you work from 8-8 on a single day. You enter your REG hours and put 7 in the column for hours worked (for your shift from 8 to 4) and then you add a new line for time code OT. Enter 4 hours on the same day in this new line. You also need to click the magnifying glass icon in the Zoom column at the start of that OT line item to open the Time entry window. Then you enter your Time from and Time to and be sure it says 4 hours in the total column and then click ok. That's it!
If you need to submit an attachment to your supervisor, make a note in the "Internal comments" section in the Time entry window and then send the attachment by email.
If you'd like to simply provide any extra information you can make a note in the "Internal comments" section in the Time entry window.
Also, the description field in the main timesheet entry screen defaults to the title of the work order you select. You can override this to provide more information about your work or the project or leave it as is.
To record the start and end times may be useful for not only payroll to verify any premiums you should be paid, but also gives your supervisor information about your schedule. Remember to override the total if you take a lunch break. So if you work 8am to 4pm (8 hours) and take a one hour lunch then you work a total of 7 hours. Just enter 7 on that date.
Enter your start and end times in the "Time entry window"
- Click on the magnifying glass icon in the Zoom column on the appropriate row

- When the Time entry window opens, enter the start and end times for each day in the Time details section without entering a space between the hour and the AM or PM (for example, "8:00AM" and not "8:00 AM")
- Override the total hours worked to compensate for an unpaid lunch break if necessary
- Click OK
Note that as soon as you click on a time the total box will instantly update so make sure you remember or note down what hours you want to enter if you had any breaks in your day.
If you need to change the number of hours you worked in a day after adding your start and end times you will have to go back into the Time entry window and change the start and end times to match.
If you work a shift that runs over two separate days (for example, 10pm Monday night to 6am Tuesday morning), you have to enter those hours on two different days (for example, 10pm to 11:59pm Monday - overriding the total hours to 2.0 - and 12am to 6am Tuesday).
If you need to provide any extra information or submit an attachment to your supervisor, make a note in the "Internal comments" section right above the "Time details" area in the Time entry window and then send the attachment by email.
Finance is not currently using the activity code (though will in the future) so just choose whichever default activity code populates when you hit the space bar in the Activity code field.

The timesheet activity will always default to open on the current Period or timesheet week. To change it you simply type over the number in the Period field to the week you want :
Edit, delete, clear or copy your timesheet
You can edit a timesheet until it's been approved and the status is changed to Closed. As long as it says Ready for the status you can edit it since it has not yet been approved.
You can only submit one timesheet per week so be sure to enter all of your hours for all of your positions and work orders and the system will forward them to the correct confirmer automatically!
To change the timesheet week or Period in the Timesheet activity, just change the last digit(s) of the Period:
To make a change to your timesheet, go into the Timesheets activity screen, make the appropriate change to the timesheet and click Save.
You can also edit a timesheet once it has been rejected and you are sent a task notification to correct something. In that case you can do the edit in the "Task management" screen.
If you have to correct a work order on your timesheet you have to delete the work order and the activity code and then enter the correct information.
Do not delete the line or you may get an error in the system, just correct the data.
If you need to change the number of hours you worked, you may have to go into the Time entry window (if you had done this originally) by clicking on the magnifying glass, and change the start and end times to match the new hours.
If you need to make a change to an already approved timesheet:
- Email your manager or timesheet hours confirmer with the following information
- The dates, time codes, work order, position, and hours of what was submitted on the timesheet
- The dates, time codes, work order, position, and hours of what is actually correct
- Your manager or timesheet hours confirmer then approves the change and copies the email to Payroll
However, hours submitted will still show as what you originally entered on that timesheet even after Payroll has edited them. You can refer to your pay slip or the My Timesheet Hours Paid report for an accurate display of the hours you are paid for each pay day.
Timesheets cannot be deleted entirely, but the data on them may be edited or removed if necessary. It all depends on the status of the timesheet
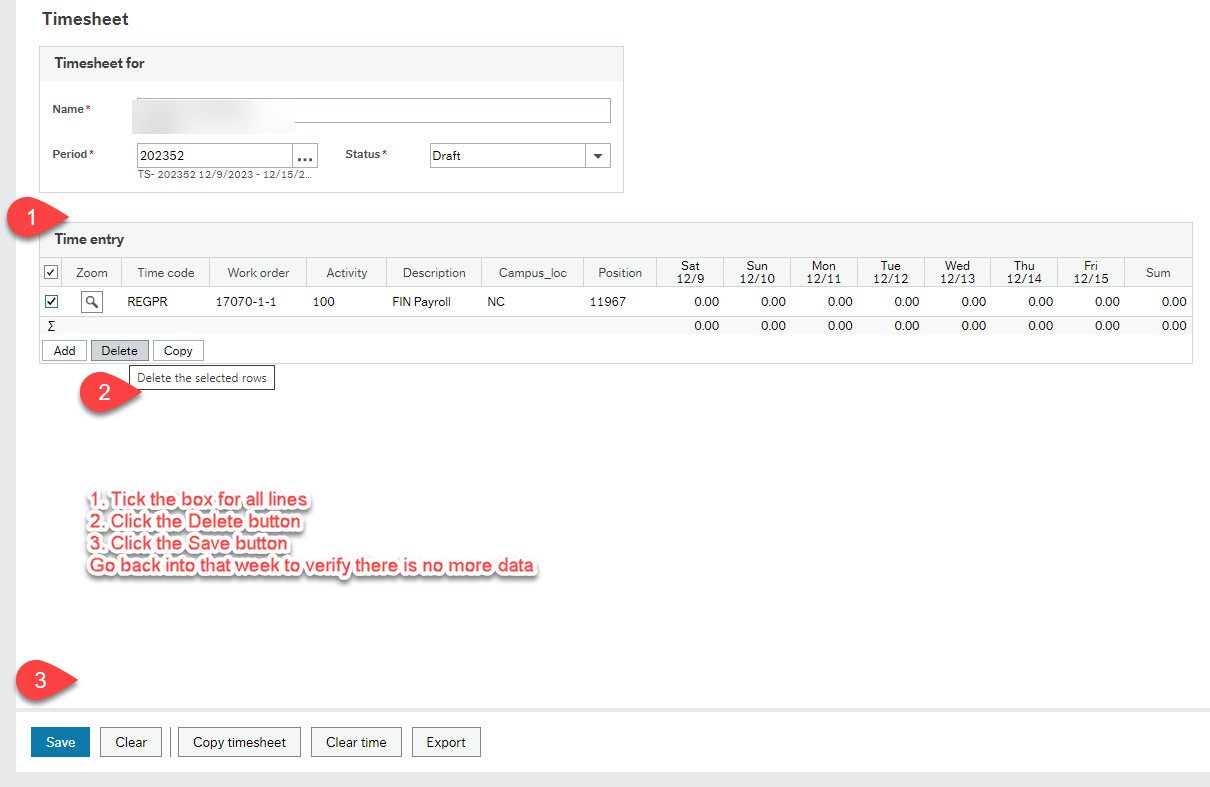
If the timesheet's status is "Draft" you can delete the rows in a timesheet. To delete all of them:
- Click on the small box at the start of each row
- Click on Delete button just below that
- Click Save and all entries will be deleted.
If the timesheet's status is Ready and the timesheet has been saved, you cannot delete the entry but you can edit the rows in a timesheet:
- Click on the row that you wish to edit
- Make the appropriate changes
- Click Save
It may look like you can delete the row and save the changes, but the system will not allow this action to happen or you will get an error.
If the timesheet's status is "Ready" and the timesheet was submitted in error, you will have to zero out the hours submitted:
- Click on the row that you wish to edit
- Change all the hours to 0.00
- In the description field, change the text to read "Submitted in error; this is supposed to be zero hours."
- Click Save
If the timesheet's status is "Closed" this means it has been approved. To delete the hours on a timesheet once it's been approved:
- Email your manager or timesheet hours confirmer with the following information
- The dates, time codes, work order, position, and hours that you submitted on the timesheet
- A statement confirming that the hours are incorrect and should be deleted
- Your manager or timesheet hours confirmer then approves the change and copies the email to Payroll
If your timesheet is rejected you'll receive a notification in the Employee Portal with the subject, "Timesheet Alert: Immediate action required" and you can click this Alert to see more details. You will also receive emails every hour reminding you to make corrections. These automated emails go to your VIU employee email address with the subject, "Timesheet Alert: Immediate action required," but you will have to log into the Employee Portal to make changes to the timesheet.
Note: If you do not correct the item before cutoff, the timesheet will be late and will be kept in the holding zone for two days before popping back out into workflow to be approved by your supervisor.
To see the details of the rejection or make changes to the timesheet, you have 2 options.
1) click on the timesheet in your Task manager. To get to your Task management screen click on the check mark icon. The number in orange shows you how many tasks you have:

You can make changes to the timesheet right in the Task management screen and resubmit it to your manager. If you have an incorrect number of hours, adjust them. If you have an incorrect Work Order, adjust it after deleting it entirely (including activity code) and then enter the correct one. Be sure to tab after making any entry!
You will not be able to delete the timesheet. If the timesheet was submitted in error, you will have to zero out the hours:
- Click on the row that you wish to edit
- Change all the hours to 0.00
- In the description field, change the text to read "Submitted in error; this is supposed to be zero hours."
- Click Save
or
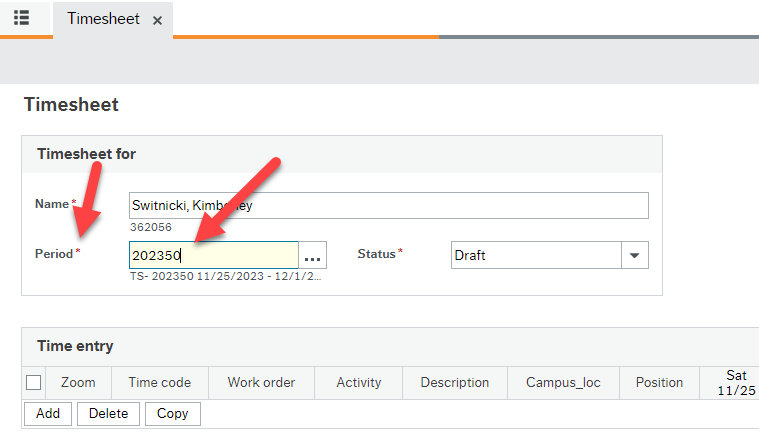
2) Open the Timesheet activity. This is where you originally entered the hours. The Period will default to the current week, say 202405. You just type over it to the week you want to correct, say 202404, and hit the tab key to populate the 202404 week. Then you can make any changes such as adding the start and end times. Click Save again and it will go to your supervisor to approve.
If this is a timesheet correction for a week older than the current one, the timesheet may be kept in the holding zone for 2 days before it pops back out into the workflow to be approved. If you receive an error that says this Period is now closed, reach out to payroll to open it for you or make other arrangements.
In some case you will be asked to make any hours you entered into an online timesheet say zero. This is because once a timesheet has been set to a status of Ready and Saved, it enters workflow and goes to your supervisor for approval. If you have submitted a paper timesheet for some reason for these hours, we don't want them going to payroll twice. Since we can't just delete a timesheet you already submitted, we ask you to go into the Timesheet activity, change the Period to the one where you need to zero out the hours and then make all hours zero. Then when you Save it, your supervisor can make a comment and approve the 'zero hours' and it will go to payroll for processing. A note should go to payroll about he zero hours timesheet or these instructions to zero out your timesheet may have come from payroll and they will be expecting it.
If the timesheet's status is "Ready" and the timesheet was submitted in error (or a paper one was submitted) and you have been asked to 'zero out' the hours submitted:
- Click on the row that you wish to edit
- Change all hours to 0.00
- In the work order description field, change the text to read "Submitted in error; this is supposed to be zero hours."
- Click Save
You may also be able to zero out your online timesheet hours in your Task management window.
You can copy a timesheet from a previous timesheet period by opening that timesheet (choose the correct timesheet period you want to copy) and click the Copy timesheet button. Then either keep the same data if it is correct still or click the Clear time button and then enter your fresh and correct hours while keeping your time code, position and work order.
If the timesheet is still in Status of Draft, and you won't be submitting it, please delete, the data.
Since you have not yet made the status “Ready” you can still either delete an online timesheet if you do not need it or you can submit it for approval. If you are planning to submit this timesheet, please set it to status of Ready and click Save to submit for approval.
To Delete it: go into the correct Period by typing over the default period (if it isn't the default you want to delete). Tick the box for each line, click the Delete button and click Save. The system will pop you back to the default week after you save it so it is best practice to go back into that week to be sure the data is all gone.
If you are in the process of submitting your timesheet and you just want to start all over, click the Clear button at the bottom of the timesheet. This will remove all of the details of your entries.
If you want to keep the basic information, such as your position and the work order, then click on the Clear time button and just the hours will be removed. The you can make fresh time entries.
Salaried employees - part or fulltime
If you work on an additional day than your regular schedule, use the Additional hours timecode for your jurisdiction. Start typing "additional" in the time code field and the proper code should populate automatically. If it doesn't, contact Payroll. Please also look over the Time Code cheat sheet.
If you'd like to provide a note to your supervisor for these extra hours, enter it in the "Internal comments" section in the Time entry window. See instructions for that window below.
Also, the description field in the main timesheet entry screen defaults to the title of the work order you select. You can add text to the end of that description or override it to provide clarity about your work or the project.
Entering your start and end times may be useful for not only payroll to verify any premiums you should be paid, but also gives your supervisor information about your schedule. Remember to override the total if you take a lunch break. So if you work 8am to 4pm (8 hours) and take a one hour lunch then you work a total of 7 hours. Just enter 7 on that date.
Enter your start and end times in the "Time entry window"
- Click on the magnifying glass icon in the Zoom column on the appropriate row
- When the Time entry window opens, enter the start and end times for each day in the Time details section without entering a space between the hour and the AM or PM (for example, "8:00AM" and not "8:00 AM")
- Override the total hours worked to compensate for an unpaid lunch break if necessary
- Click OK
Note that as soon as you click on a time the total box will instantly update so make sure you remember or note down what hours you want to enter if you had any breaks in your day.
If you need to change the number of hours you worked in a day after adding your start and end times you will have to go back into the Time entry window and change the start and end times to match.
If you work a shift that runs over two separate days (for example, 10pm Monday night to 6am Tuesday morning), you have to enter those hours on two different days (for example, 10pm to 11:59pm Monday - overriding the total hours to 2.0 - and 12am to 6am Tuesday).
To record the start and end times may be useful for not only payroll to verify any premiums you should be paid, but also gives your supervisor information about your schedule. Remember to override the total if you take a lunch break. So if you work 8am to 4pm (8 hours) and take a one hour lunch then you work a total of 7 hours. Just enter 7 on that date.
Enter your start and end times in the "Time entry window"
- Click on the magnifying glass icon in the Zoom column on the appropriate row
- When the Time entry window opens, enter the start and end times for each day in the Time details section without entering a space between the hour and the AM or PM (for example, "8:00AM" and not "8:00 AM")
- Override the total hours worked to compensate for an unpaid lunch break if necessary
- Click OK
Note that as soon as you click on a time the total box will instantly update so make sure you remember or note down what hours you want to enter if you had any breaks in your day.
If you need to change the number of hours you worked in a day after adding your start and end times you will have to go back into the Time entry window and change the start and end times to match.
If you work a shift that runs over two separate days (for example, 10pm Monday night to 6am Tuesday morning), you have to enter those hours on two different days (for example, 10pm to 11:59pm Monday - overriding the total hours to 2.0 - and 12am to 6am Tuesday).
If you need to provide extra information to your supervisor, make a note in the "Internal comments" section right above the "Time details" area in the Time entry window.
If your regularly scheduled hours get changed for a week, use the Regular hours time code. Start typing "Regular" in the time code field and the proper code should populate automatically. If it doesn't, contact Payroll. Please also look over the Time Code cheat sheet.
You should also add a note for your supervisor and payroll explaining these hours. Either email them, including payroll, or enter it in the "Internal comments" section in the Time entry window. See instructions for that window below.
Also, the description field in the main timesheet entry screen defaults to the title of the work order you select. You can add text to the end of that description or override it to provide clarity about your work or the project.
- Click on the magnifying glass icon in the Zoom column on the appropriate row
- When the Time entry window opens, enter the comment in the Internal comments section or add it to the Description
- Click OK
Please submit and online timesheet if you work anything other than your standard shift so the payroll clerks know which premiums to apply for you. Also include your start and end times so it is clear for them. See "How do I enter my start and end times?" above.
Go back to main Timesheets training page.