For extra assistance contact HR@viu.ca, Payroll@viu.ca or a Tech Champion in your area.
You must be an active employee to see menus or data after you log in.
See menu under "Employee training" for all categories of training materials. We continuously update as we progress through system implementation and updates.
See Self-assessments for onboarding tools to help your team with Employee Portal training, including a Jeopardy game for HR/Payroll.
Payroll
You can only access this information while you are a currently active employee so print your payslips before your position ends.
Once logged into HRIS click on Personnel information. Then click on the little paperclip icon in the top right corner.

Pause and wait for the documents to load. Then you will see something like this:

Your payslip PDF (red icon) should be visible right away. If not, click on the folder that says Payslips 2020 and choose which payslip you want to see. Double click the PDF icon and it will open for you to print or view. Scroll up to the top of the PDF window to see the print icon. Click on it to print your payslip.

If you have trouble printing your payslip, try using Chrome as your browser. If you still have issues email payroll@viu.ca for assistance.
Alternate option
Click on the Action dropdown box:

Then choose Print.

Note:
1 - If you have more than one payslip, you can click on the Payslips folder for the current year and then you will see all of the payslips in that folder if it doesn't automatically open to that view.

2 - You can also scroll through your payslips if you have more than one in the folder by clicking the arrows when you have one open
It will look something like this:

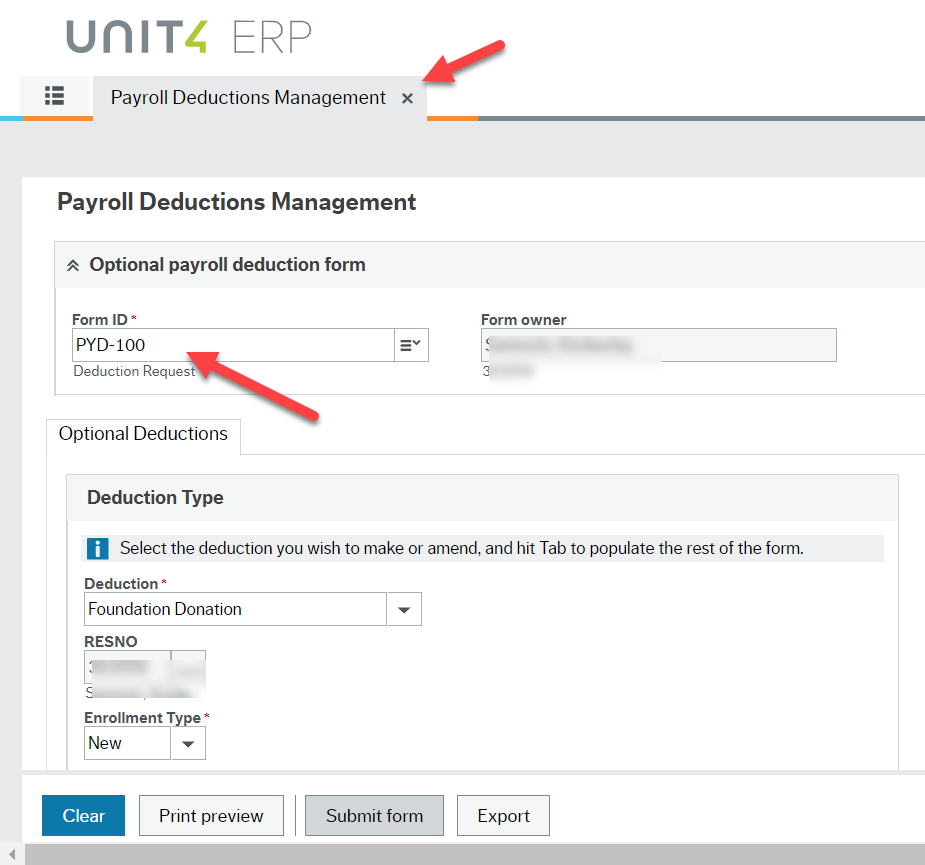
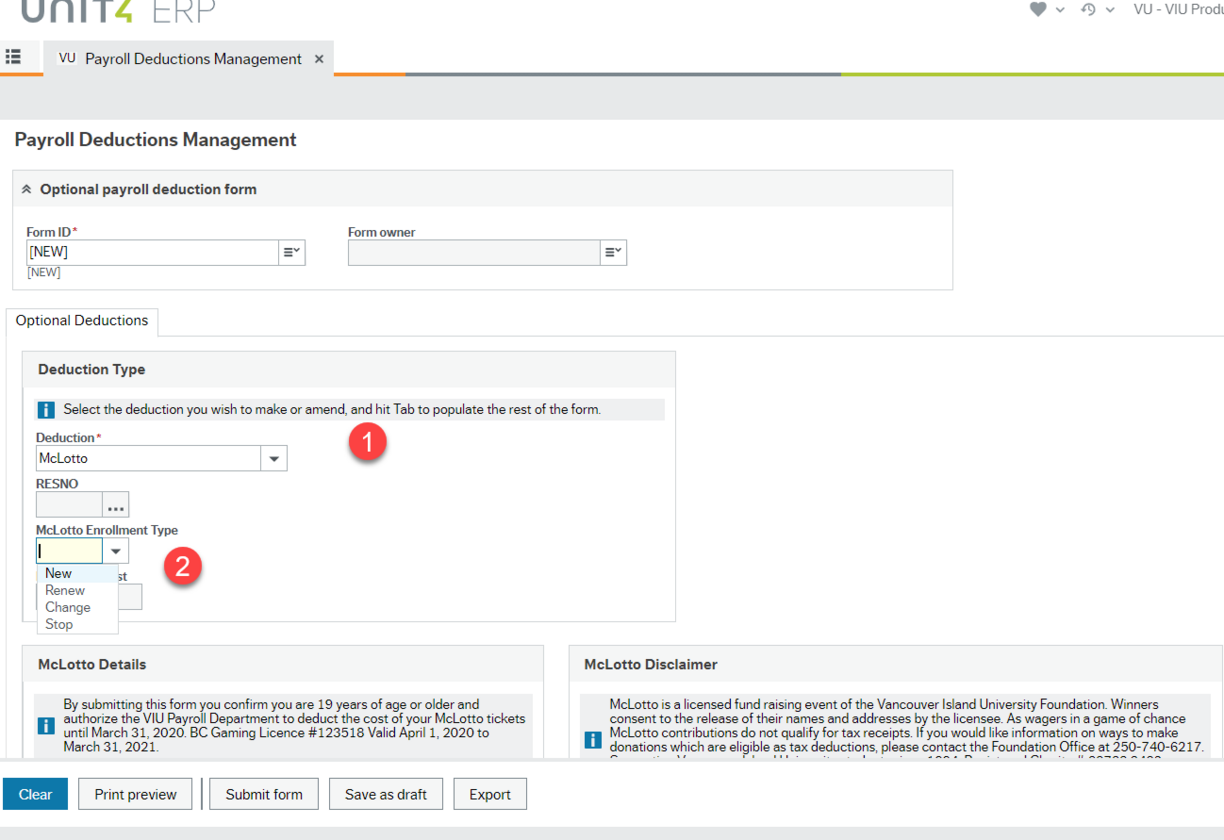
Sign on to HRIS, go to Payroll Deductions Management under Your employment. Ignore the Form ID section unless you have previously saved drafts - see below under Draft option.
1) Choose Foundation under Deduction Type.

Be sure to hit the tab key once you have chosen from the dropdown lists so that the next fields will populate and open for you.
2) Choose enrollment type
Be sure to hit tab as you work your way though all sections. The tab key opens up further actions for you.
3) Choose deduction type
Have your information ready. Check for options for Foundation donations.
4) Choose deduction amount
5) Choose where you want your donation to go

If you decide don't want to do this deduction, simply close this tab and don't save your changes. If you hit the clear button this form will lock and you will need to close the tab to start over.
Once you have entered your choices, click "Submit form", then a green "Success!" dialogue box will pop up letting you know this form will go to payroll for approval and set-up. You can note down the number for your future reference from the Success dialogue box and hit OK.
This deduction will be set up and finalized by the payroll clerk - submitting this form does not automatically set up the deduction.

Your Form ID will now appear in the Form-ID field. Then you're done! You can close the Payroll Deductions Management window by clicking the x in the top right corner of the tab.
Draft option: If you chose the "Save as draft button" earlier a new box will pop up letting you know the draft is saved and it will give you the form number (Form ID).
Once you are ready to continue with your draft, open up the Payroll Deductions Management window. To retrieve your draft form hit the space bar when you are in the Form ID field. This will bring up a list of forms awaiting approval and ones in a draft state. Click on the proper form number for your draft and hit tab. This will populate all of the fields in the form. Make any adjustments and then click Submit form to submit it to payroll for them to set up.

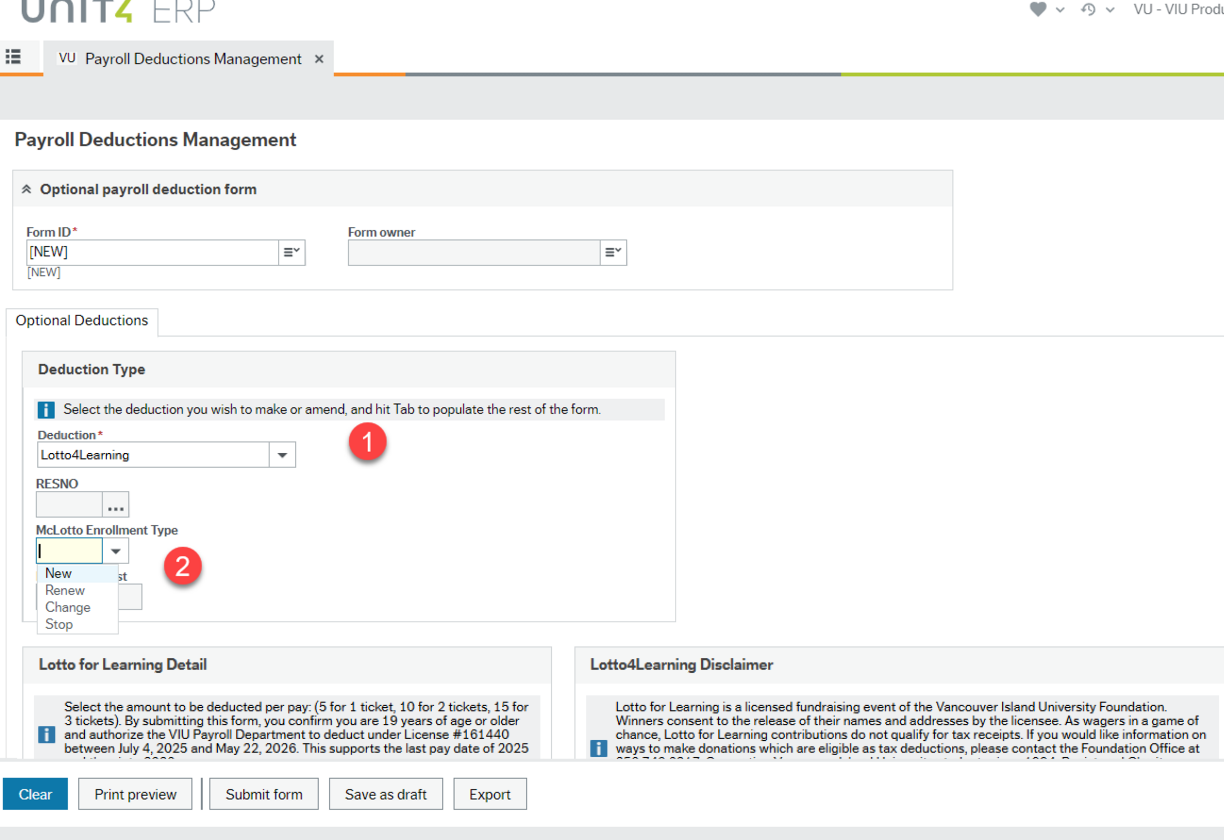
After signing on to HRIS, go to Payroll Deductions Management under Your employment. Ignore the Form ID section (unless you have previously saved drafts-see below under Draft option).
Be sure to hit tab as you work your way through all selections. The tab key opens up further actions for you.
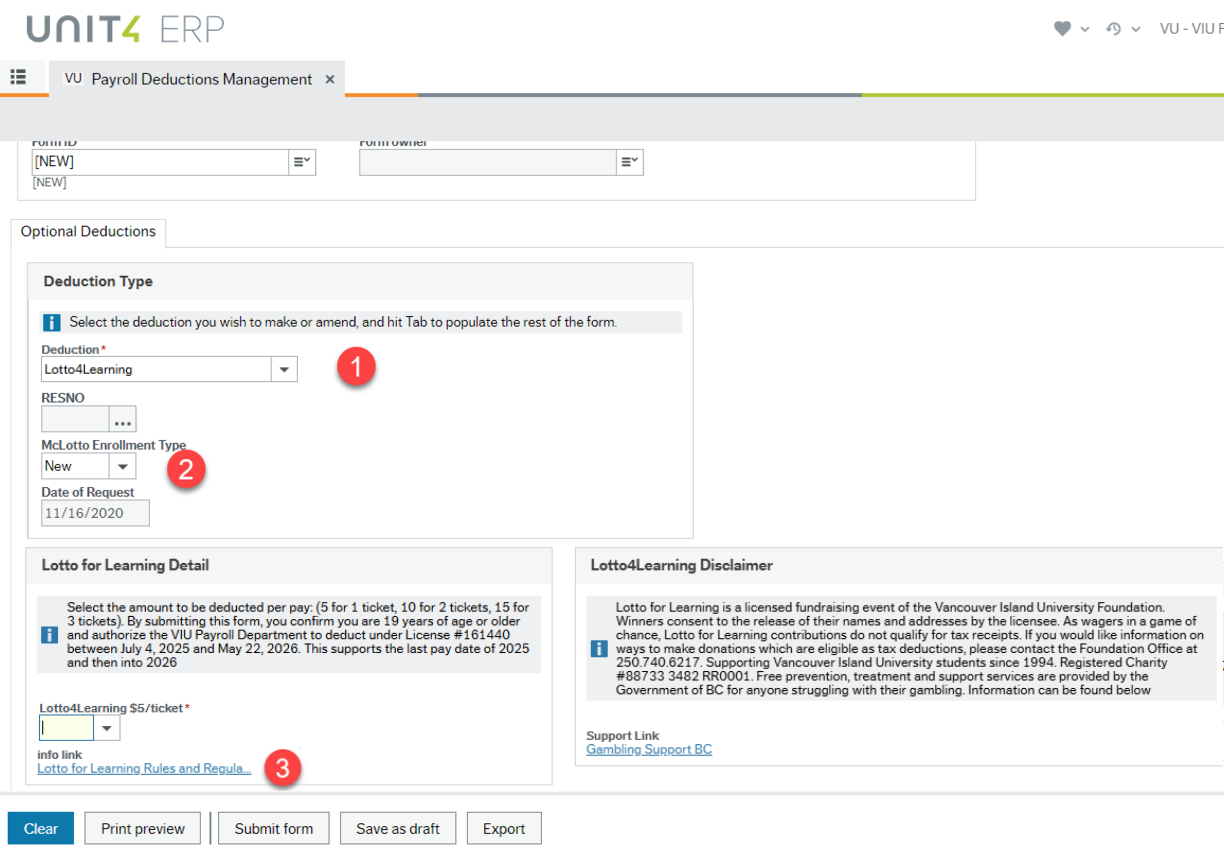
1) Choose Lotto4Learning under Deduction Type.
Be sure to hit the tab key once you have chosen from the dropdown lists so that the next fields will open for you.
2) Choose which Lotto4Learning Enrollment type
New: you are creating a new deduction
Renew: you are renewing a previous year's deduction
Change: you are changing an existing deduction to a different amount
*Stop: you are discontinuing a current deduction
3) After you hit tab a new section opens where you enter the amount
Once you have entered your choice from the dropdown list (from 1 to 20 tickets at $5 each) click "Submit form," then a green "Success!" dialogue box will pop up letting you know that this form will go to payroll for approval and set-up.
* If you select Stop, no amount box will be available so simply click the Submit form button.
Do not hit the clear button since that will lock this form and you will need to close the tab to start over.
Draft option: If you chose the "Save as draft button" earlier a new box will pop up letting you know the draft is saved and it will give you the form number (Form ID).
Once you are ready to continue with your draft, open up the Payroll Deductions Management window. To retrieve your draft form hit the space bar when you are in the Form ID field. This will bring up a list of forms awaiting approval and ones in a draft state. Click on the proper form number for your draft and hit tab. This will populate all of the fields in the form. Make any adjustments and then hit Submit form to submit it to payroll for them to set up.
After signing on to HRIS, go to Payroll Deductions Management under Your employment. Ignore the Form ID section.
Be sure to hit tab as you work your way through all selections. The tab key opens up further actions for you.
1) Choose Milner Gardens Membership under Deduction Type.
Be sure to hit the tab key once you have chosen from the dropdown lists so that the next fields will open for you.
2) Choose Household or Individual under Milner Gardens Details
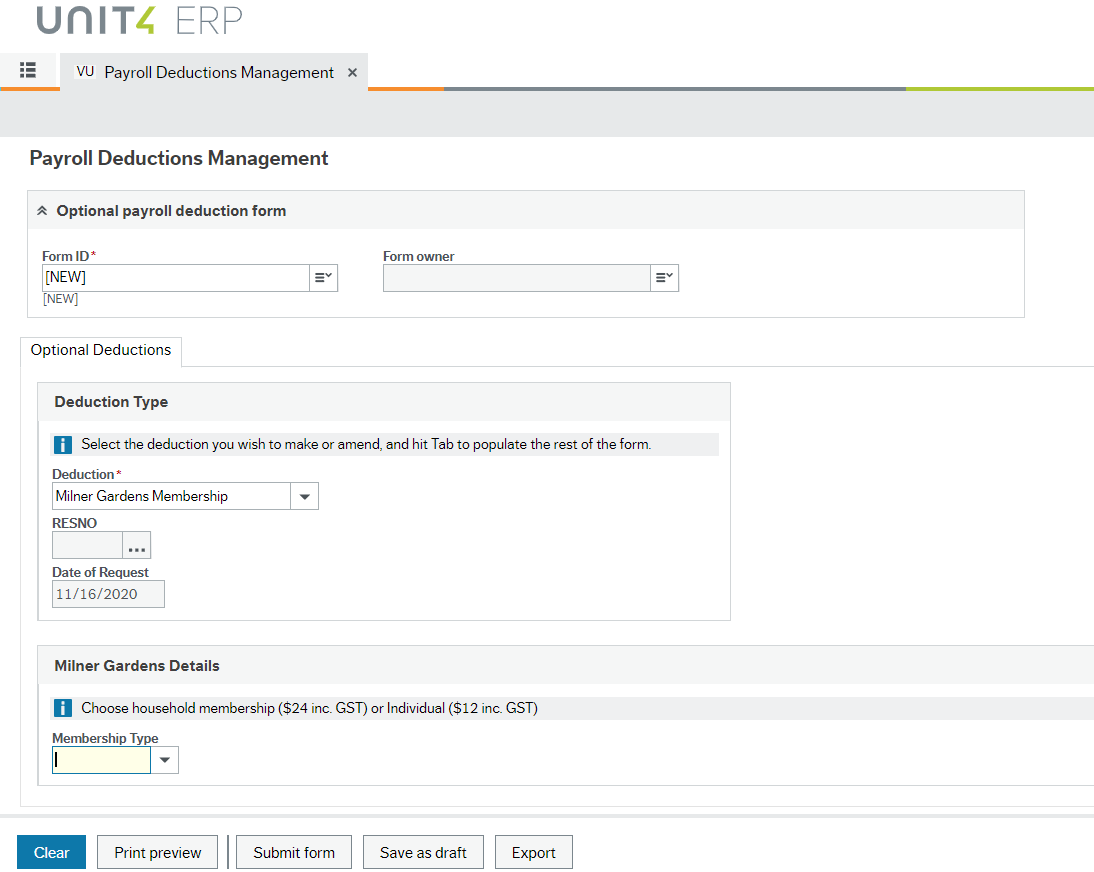
Once you have selected your choice click "Submit form", then a green "Success!" dialogue box will pop up letting you know that this form will go to payroll for approval and set-up.
*** If you decide don't want to do this deduction, simply close this tab and don't save your changes.
If you hit the clear button this form will lock and you will need to close the tab to start over.
After signing on to HRIS, go to Payroll Deductions Management under Your Employment

Ignore the Form ID section (unless you have previously saved drafts-see below under Draft option). Once open, go to Optional Deductions tab and choose United Way (be sure to hit the tab key once you have chosen from the dropdown lists).
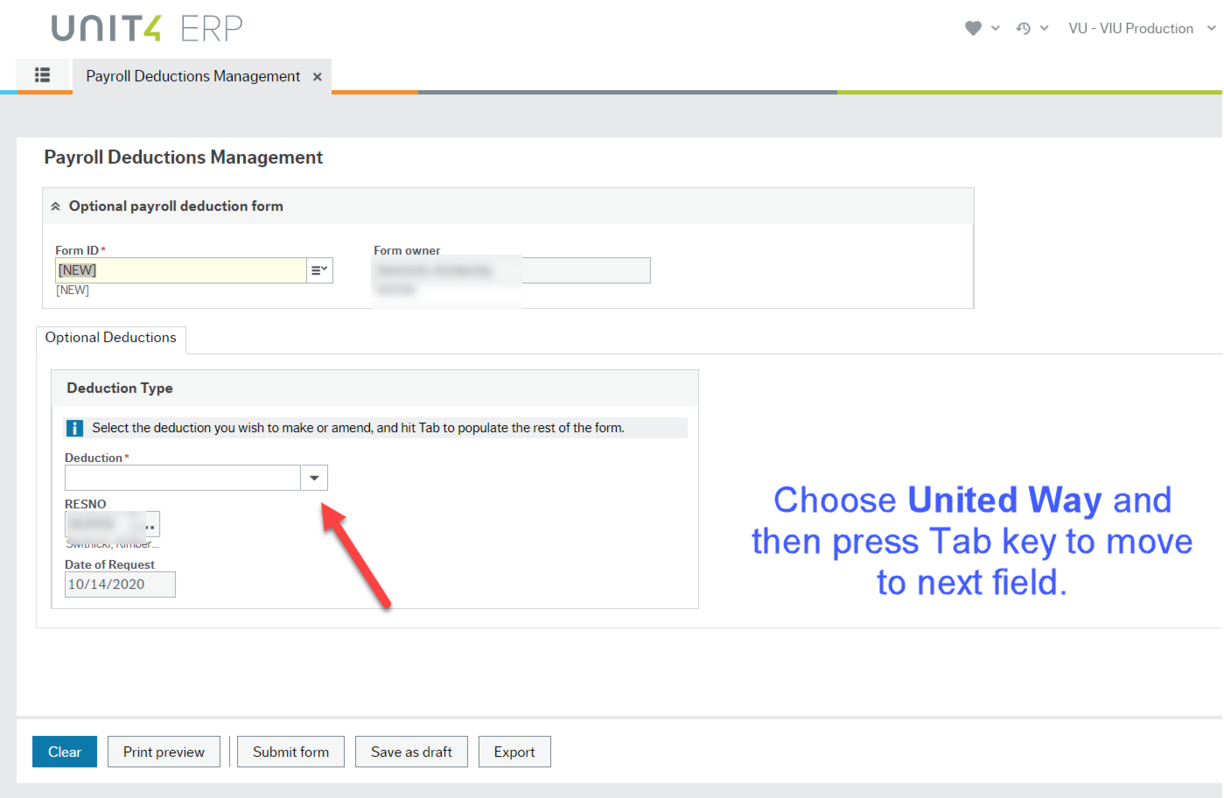
Be sure to hit tab as you work your way through all selections. The tab key opens up further actions for you. In this case it opens Enrollment Type:
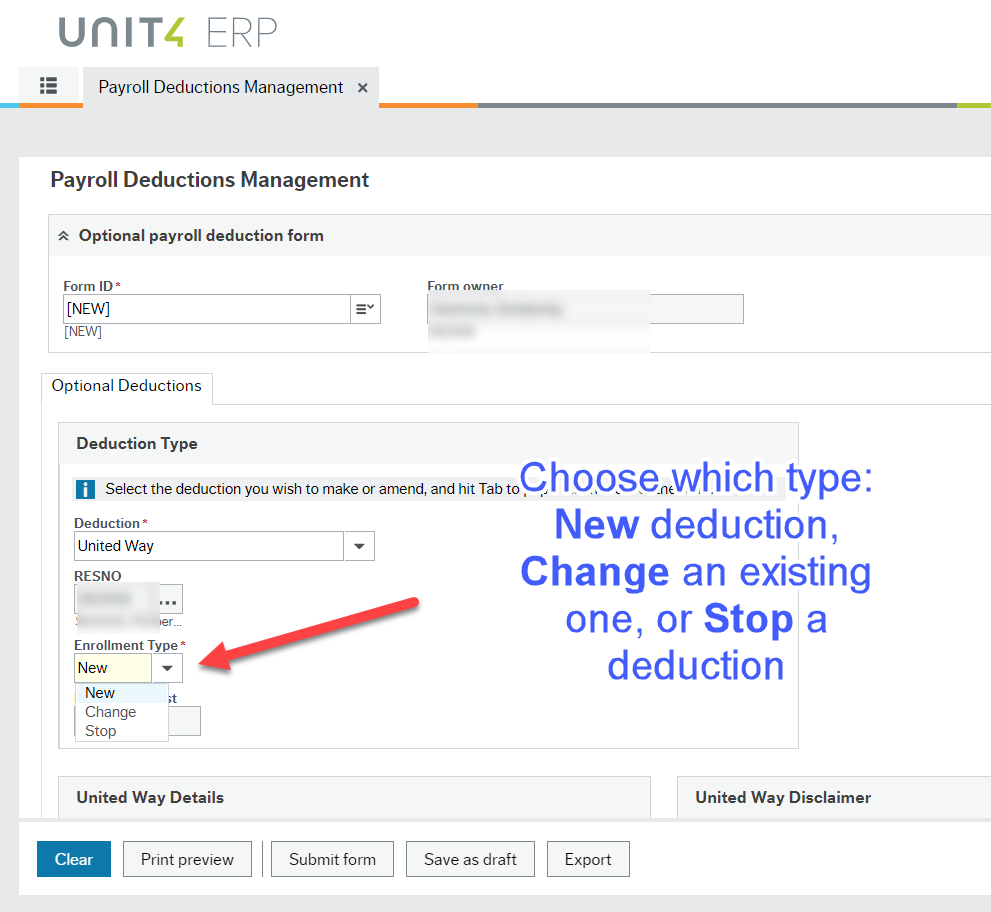
Choose your type of enrollment and then hit tab key to accept your selection and open the next section. In this case it is United Way Details.
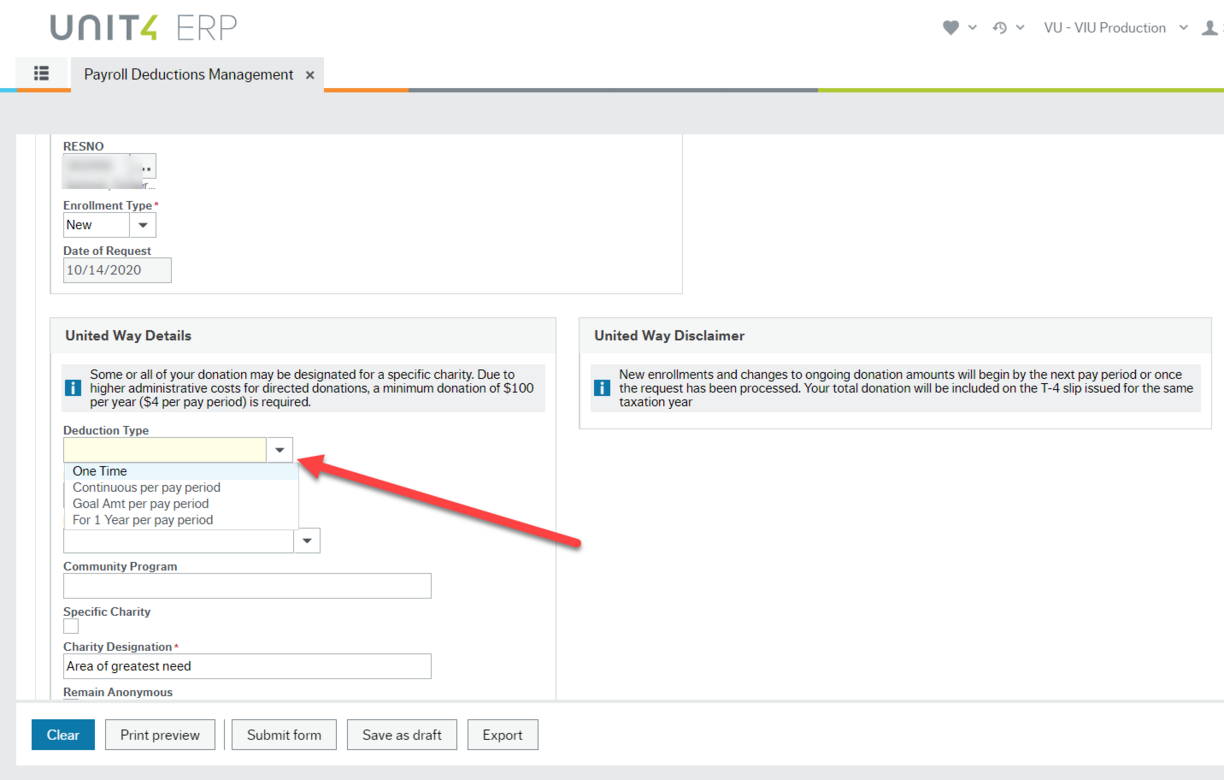
Choose the type of deduction you want from the dropdown list and remember to tab your way through the rest of the form. The next field will be Amount. Enter the amount you want deducted depending on the type you chose above and continue by tabbing through the form.

Enter the Community Program of your choice. The default is to go to the area of greatest need.
Once you have entered your choices, you can click the "Save as draft button" on the bottom of the screen or simply close this tab and do not save your changes. Do not hit the clear button since that will lock this form and you will need to close the tab to start over.
When you click "Submit form", then a green "Success!" dialogue box will pop up letting you know that this form will go to payroll for approval and set-up.
Draft option: If you chose the "Save as draft button" earlier a new box will pop up letting you know the draft is saved and it will give you the form number (Form ID).
Once you are ready to continue with your draft, open up the Payroll Deductions Management window. To retrieve your draft form hit the space bar when you are in the Form ID field. This will bring up a list of forms awaiting approval and ones in a draft state. Click on the proper form number for your draft and click tab. This will populate all of the fields in the form. Make any adjustments and then hit Submit form to submit it to payroll for them to set up.
After signing on to the Employee Portal go to "Payroll Deductions Management" under "Your employment."
Drafts: If you hit the spacebar in the Form ID field you will see a list of your forms that you either "Saved as Draft" or have not yet been approved by payroll. You can choose a form and click the tab key to view it. If you choose a form that you previously "Saved as Draft" you can modify and/or submit to payroll for approval and set-up by choosing "Submit form." Or close this window by clicking the x in the top right corner.
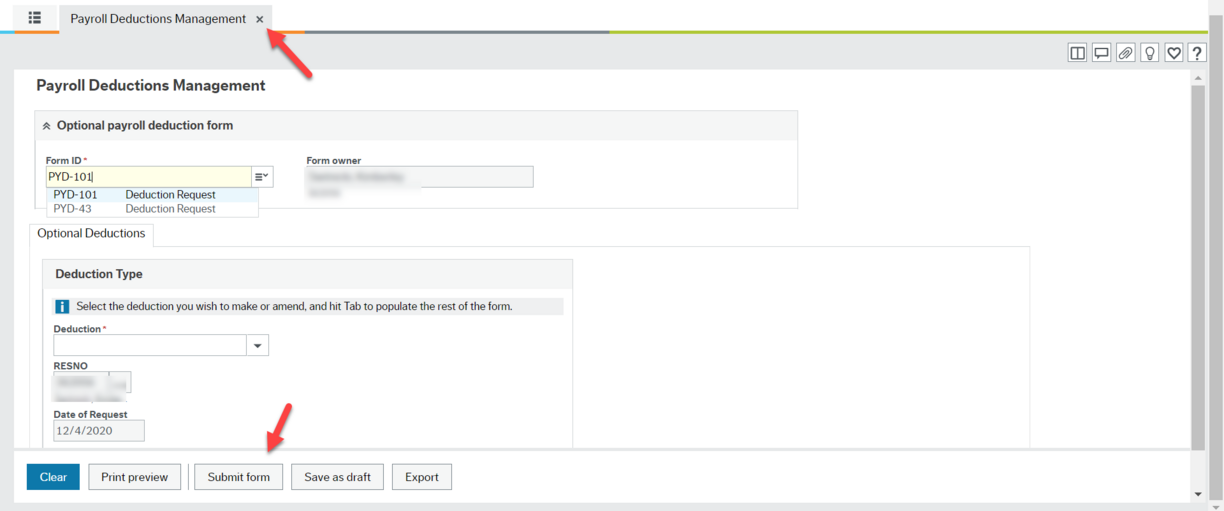
Current: You can also use the Form ID field to look up your current active deductions. To see all of your draft and active forms click on the dropdown menu for this field and chose the magnifying glass icon that says "Field help."
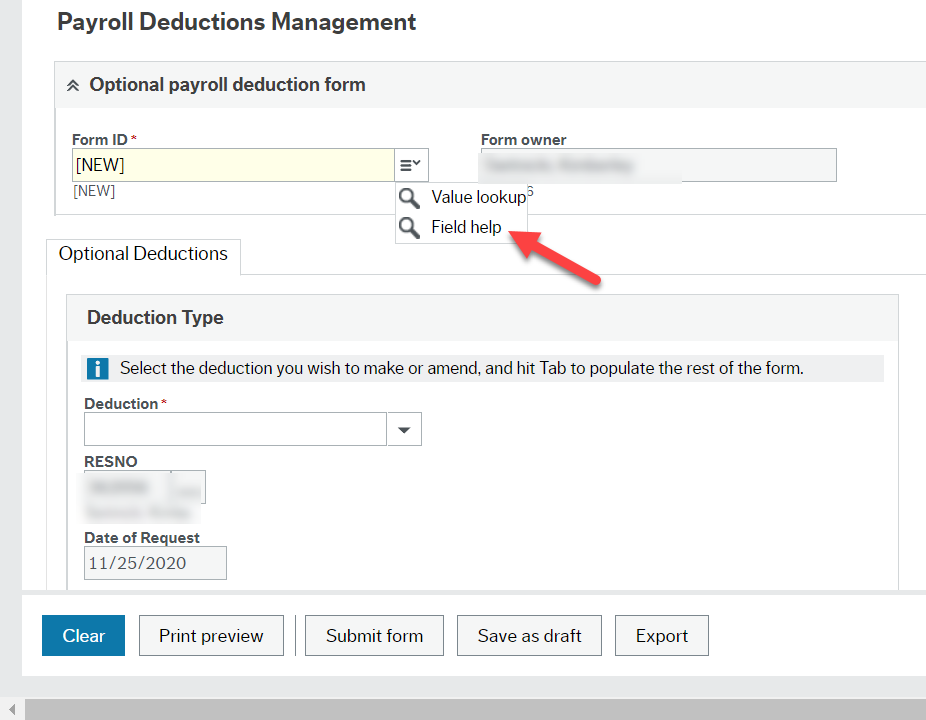
This brings up a Value lookup window. Click the Search button (leave all fields blank).
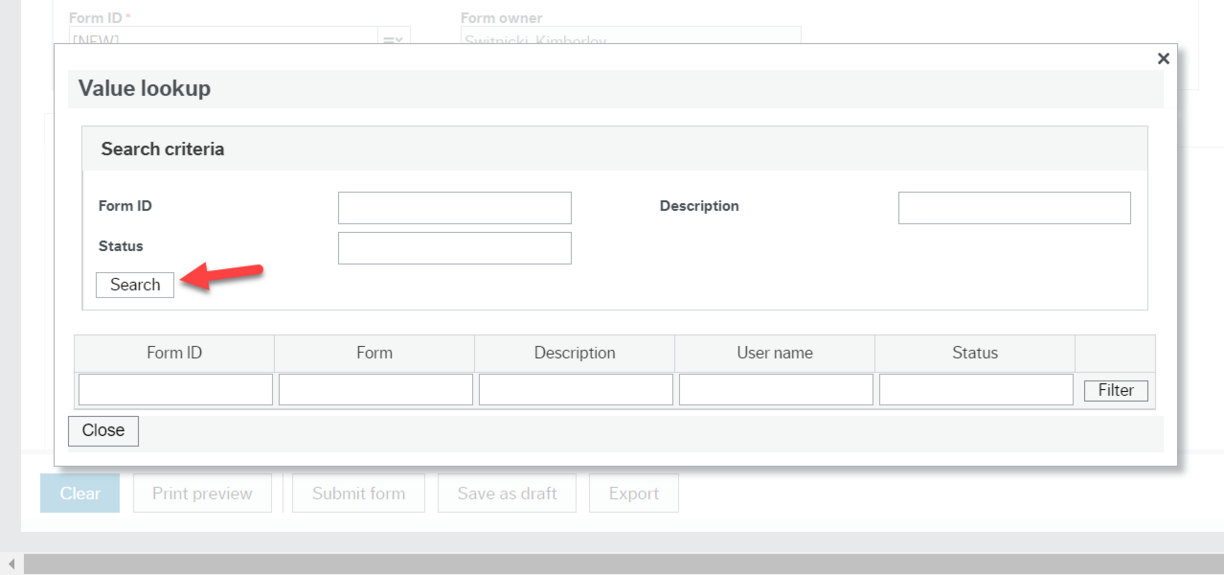
A list of your Draft and Active forms appears.
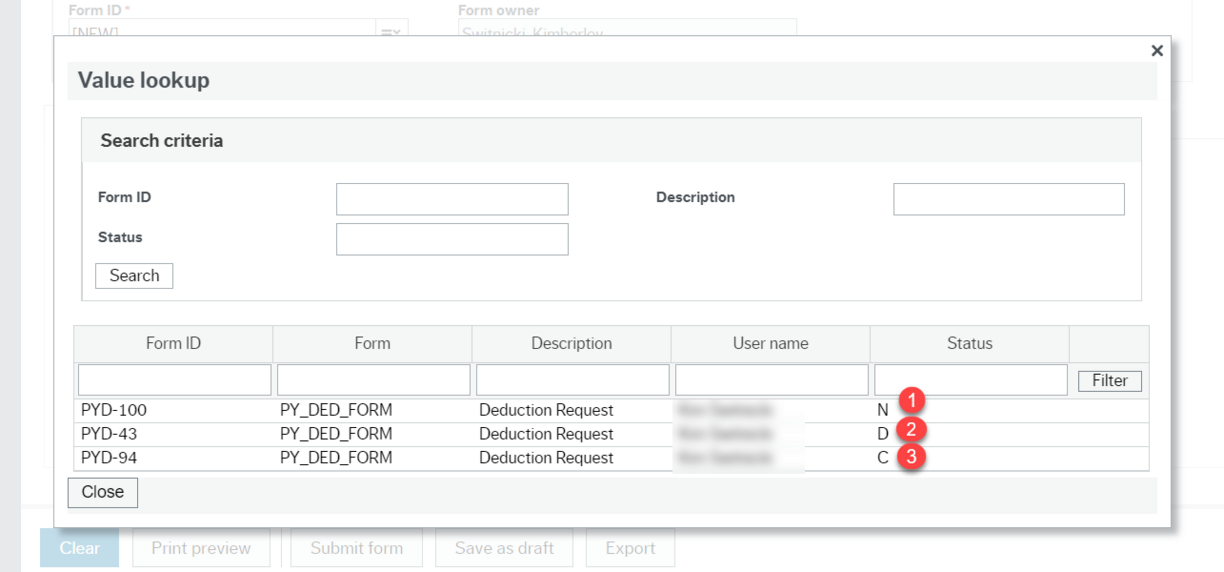
1. N - ignore these forms since they are in process with payroll
2. D - is for your draft forms
3. C - is for closed forms that are for active deductions
Choose any C form and it will open for you automatically with the complete details. You can print or view it.
Please do not resubmit N forms.
Drafts are the only forms that can be submitted - see above for details.
A ProPass is a permanent bus pass purchased by employees through payroll deductions. ProPass is valid for travel throughout the Nanaimo Regional Transit System.
To obtain a ProPass fill out this form and submit it to the payroll department. A temporary pass may be available from the payroll office once you hand in your application.
There may be a few earnings categories that are rarely used that have been missed during VIU's transition to the new payroll system. If you see an item on your payslip under "Earnings" that reflects the dollars only and you believe it should also show the number of corresponding hours, please email payroll@viu.ca to investigate. We appreciate your eagle eyes to help us continually improve our systems!
As an example, someone noted that this overtime code didn't show the hours:

It was corrected for the next pay so future payslips show the dollars as well as the hours. Thanks for spotting it for us!

Since StarGarden was retired at the end of June 2020, our amazing ES team wrote a program to provide employees with continuing access to their StarGarden payslip data. Everyone with a current VIU computer account can access our VIUWEB portal. Go to VIU Apps-> Pre-2020 Pay Slips

The program will show a user a grid similar to the one in StarGarden. Clicking on the “slip” link on the right side of the window by each pay date opens a PDF of your payslip.

The data is StarGarden data and the slip is a copy of the new payslip modified to hold StarGarden data.
Or you can open the correct section of VIUWEB directly.
2020
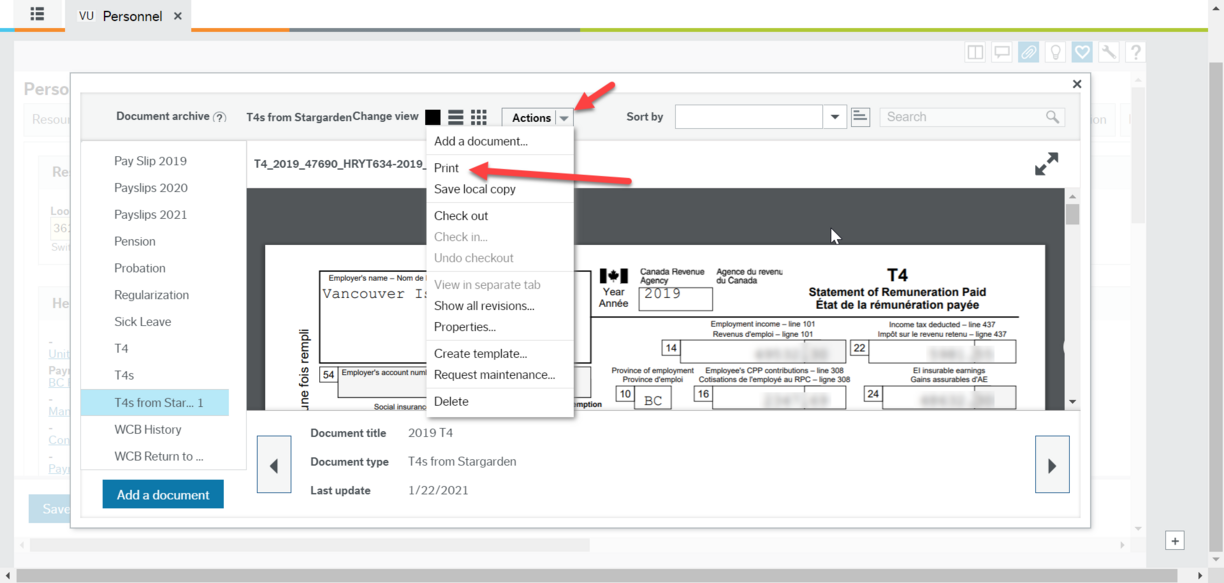
For 2020 T4s you will go into the "Document archive" in the Employee Portal by clicking on the paperclip icon under "Personnel information." Then choose the T4/T4A 2020 folder. If it isn't visible, click on any of the folders on the left side and use the arrow keys on your keyboard to scroll down the list until you find the correct folder. Print by clicking Print from the Action dropdown menu right above the viewing pane. See image below.
If you no longer have an active position at VIU your T4 slip will be mailed to your last address on file by Feb 26, 2021. Please always keep your address current. See HR section below for instructions on how to update your address.
You may have multiple slips if you had positions in multiple jurisdictions.
2019
2019 T4s were available in StarGarden before access ended on June 30, 2020. The 2019 T4s are now available in the Employee Portal in the document archive. Click on "Personnel information" to open it and click the paperclip icon in the top right. Wait for it to load the "Document archive." You may need to scroll down to find the folder that says T4s from StarGarden. If it isn't visible, click on any of the folders and use your arrow keys on the keyboard to scroll down the list until you find the correct folder. Double click on the 2019 T4 icon to open it. Print by clicking Print from the Action dropdown menu right above the viewing pane.
An email comes from Payroll in January of each year letting you know that it is time to submit updated TD1 forms if you have a claim that is different than the basic claim. The TD1 forms (both Federal and Provincial are required) are on the payroll website under Forms on the menu. They are to be filled out, signed and submitted to Payroll. If you are claiming only the basic deduction then you do not need to submit a new form. This deduction can be changed or updated at any time during the year by submitting a new TD1 form.
To check your setup, there is a new Report in the Employee Portal: My Personal Tax Credits. Access it by signing on and looking under Reports and clicking on the Shared folder.
Once open, click on the blue line that says Year: Current and the details will expand for you. The "Date to" for the current year will always say 12/31/2099. You can clearly see here if you have set up Extra Tax to come off each pay period. This has to be reactivated each year by submitting new forms to Payroll. You can also see if you are claiming amounts other than the basic credit.
The previous years' information is in the section that you can expand by clicking on the blue line that says Year: Historical.
Payroll - reports
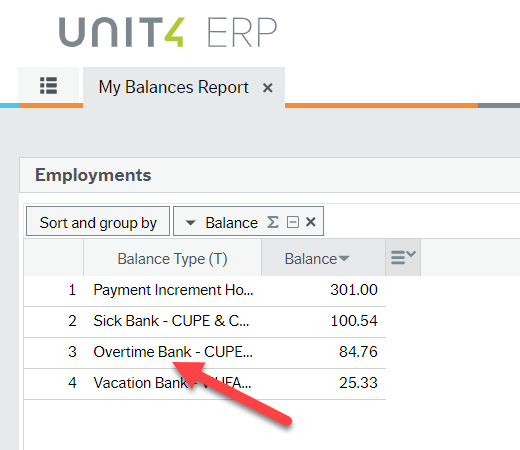
All employees can see their accrual and other balances on the My Balances Reports. From the Home Screen go to the Reports heading click on Shared to open your Reports. Choose My Balances Report Dollars or Hours:
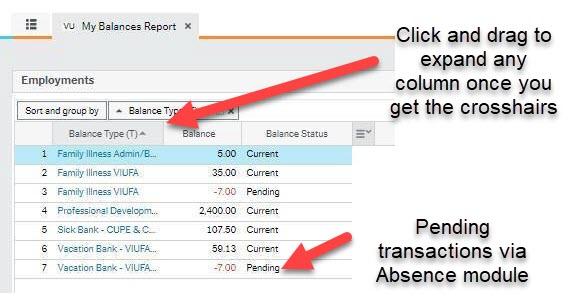
You can expand the Balance Type column so you can see the full description of the item.
You will also see the Balance Status column. The descriptions mean:
a. Current = your current balance as of today
b. Pending = transactions that will affect your balance sometime in the future. These are transactions you have sent via the Absences module that haven’t occurred yet.
The Dollars report includes the following items as applicable to your jurisdiction:
- Professional Development Funds (For ProD hours, please reach out to your department/manager for your balance.)
- Computer loan
- Payroll advance
The Hours report includes the following items as applicable to your jurisdiction:
- Sick time
- Family Illness
- Overtime
- Vacation (includes non-instructional VIUFA)
Balances will be shown for each jurisdiction/union affiliation where you have had a current balance in that calendar year. If you have a zero balance, the item will not show up on the report. If you have multiple positions within the same jurisdiction you may see what looks like a duplicate amount. However, the system is showing you the total balance for that jurisdiction so if you have 2 CUPE positions, they will each show as each having the identical total balance.
For clarification details on these numbers you can look at other reports such as the My Vacation Transactions Report or My Special Leave Transactions. For PD fund details see My VIUFA PD Transactions report.
* VIUFA employees with non-instructional positions can see their vacation accrual balance on their payslips. Employees with both instructional and non-instructional will only see their non-instructional balances on their payslips and on their My Vacation Report.
Employees other than *VIUFA can see their current vacation accrual balances on the bottom of their payslips. All employees can see their balances on their My Balances report.
All employees who accrue vacation (instead of getting it paid out on each cheque) can see their vacation accruals and vacation days taken on their My [affiliation] Vacation Transactions report. From the home screen go to the Reports heading click on Shared to open your reports. Choose the report corresponding to your jurisdiction or union affiliation (ADMIN, BCGEU, CUPE, PROJECT or VIUFA) such as My BCGEU Vacation Transactions:

Vacation entries (if received by the payroll team in a timely way) will generally be up to date as of the previous pay period.
If you see a negative entry for vacation added or a positive number for vacation taken this has been an adjusting entry. If you have queries about your report, please email your payroll clerk.
* The balances for VIUFA employees who have both an instructional and non-instructional position will see only their non-instructional vacation accrual on the report.
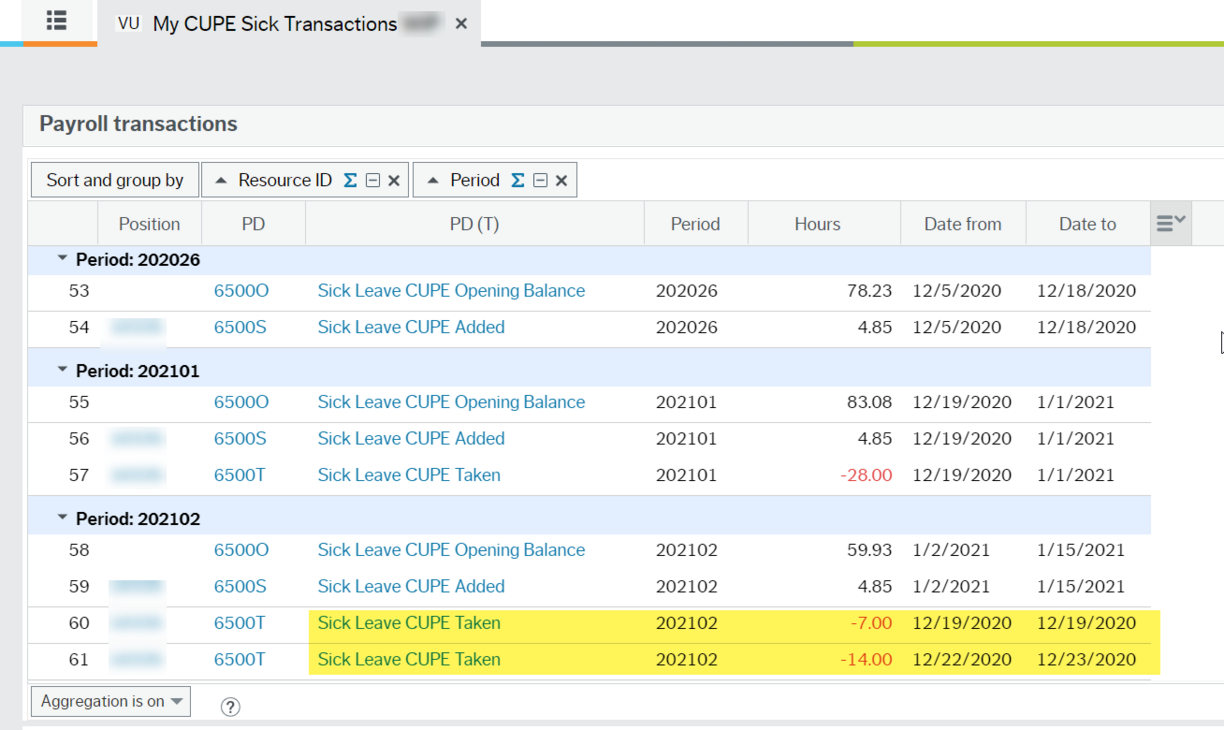
A new report called My CUPE Sick Transactions is now available for CUPE employees to see the sick days they have earned and taken. The CUPE sick bank balance will always show on CUPE employee payslips as well as in the My Balances Report for CUPE employees.
The report is accessible with all other reports under Reports and Shared. Once it opens click on the blue bar for which year you want to see.
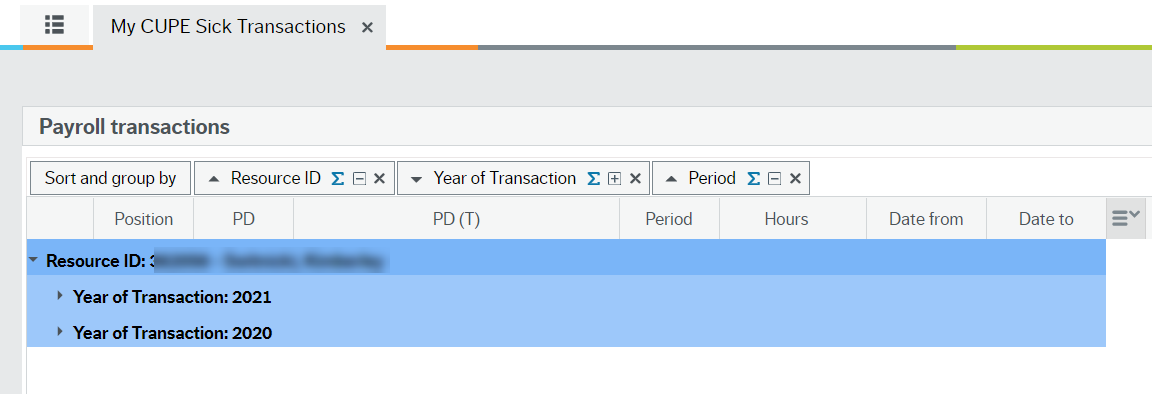
It will show the opening balance for each pay period as well as what was accrued and what was taken in that pay period. The highlight below shows you where to see the sick hours taken:
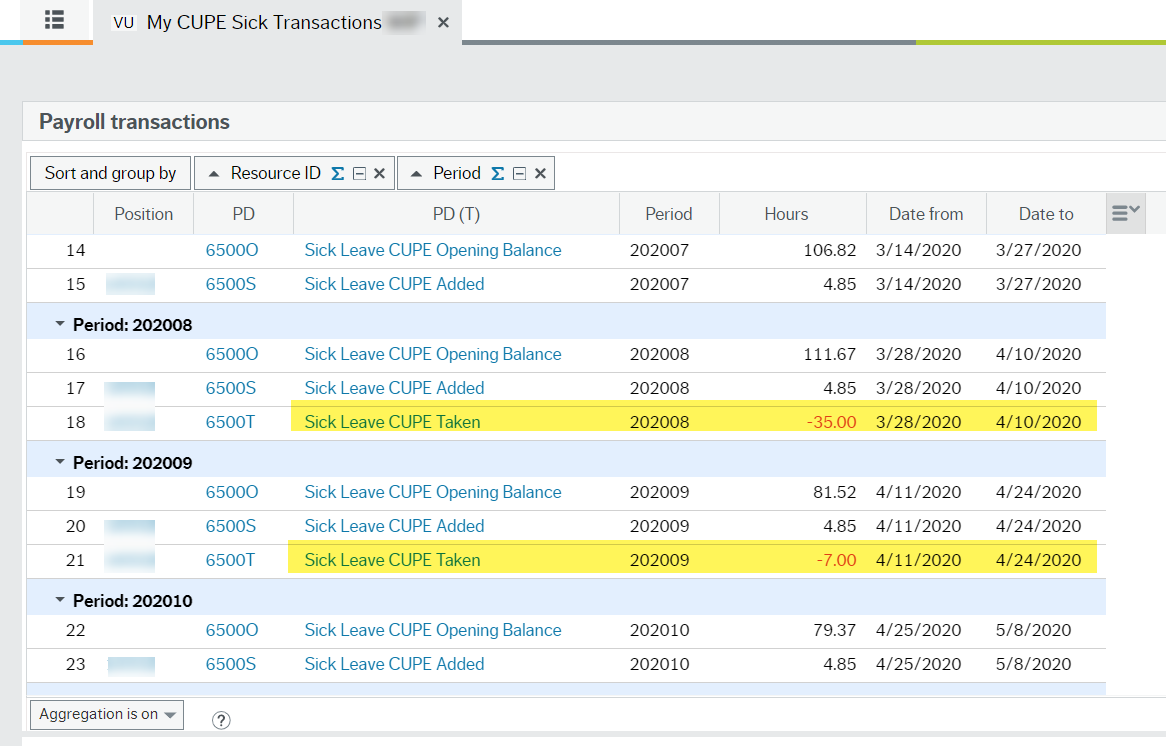
Beginning in 2021 the report will also show the exact dates of sick time taken, not just the pay period. This includes time deducted for Family Illness and Medical Appointments.
CUPE and BCGEU employees can now also see their Sick Bank Balances split out into two separate reports to make it clearer for those employees with positions in both groups.
As before, ADMIN and VIUFA positions do not have a sick bank so no balances are available.
For those employees who accrue overtime hours, such as CUPE, you can see the details of these hours accrued and taken in the My Overtime Transactions report.
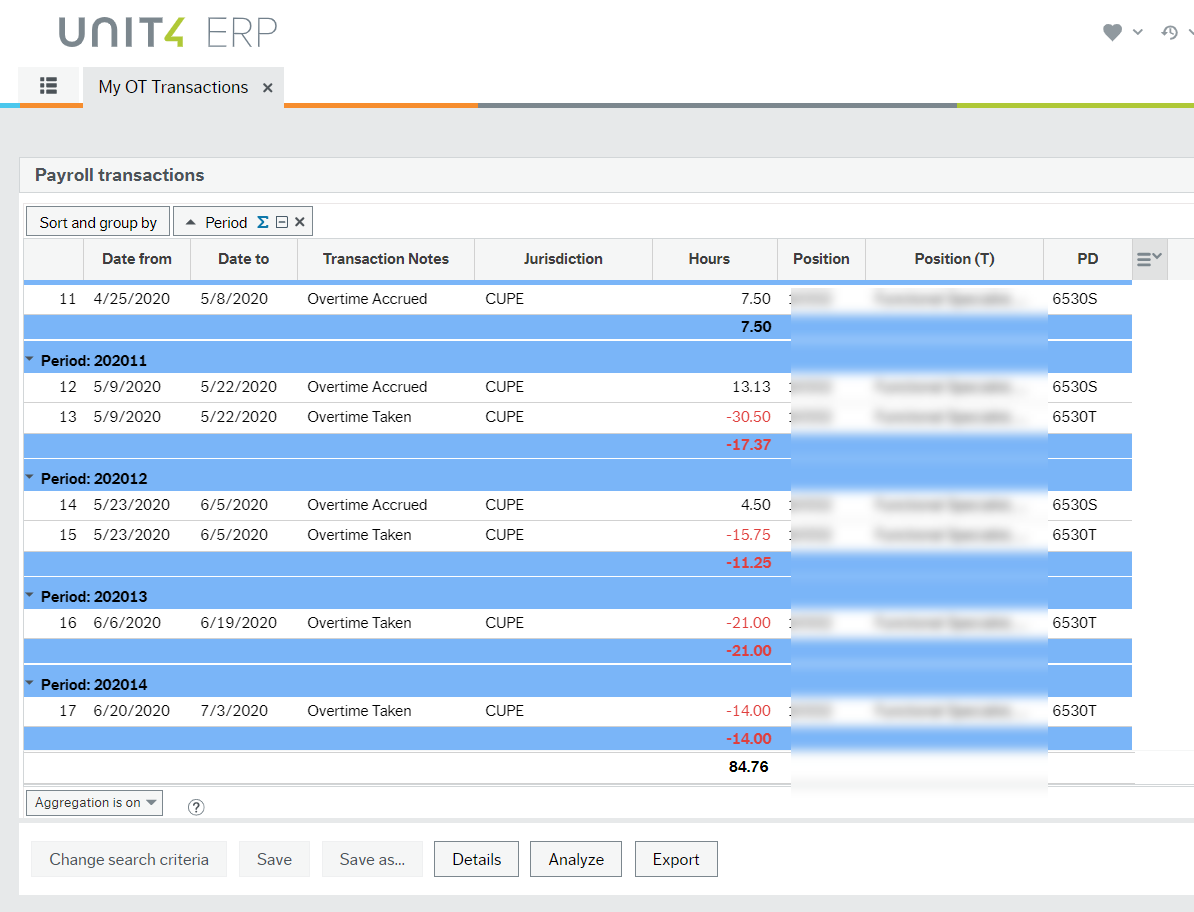
You can also see the total balance you have in your Overtime accrued bank on your My Balances report.
From the Home Screen go to the Reports heading click on Shared to open your Reports. Choose the report called My OT Transactions to view.
The OT hours will be up to date as long as the paper timesheets (or emailed via Supervisor approval) are received by the pay period cutoff.
If you have queries about your report, please email your payroll clerk.
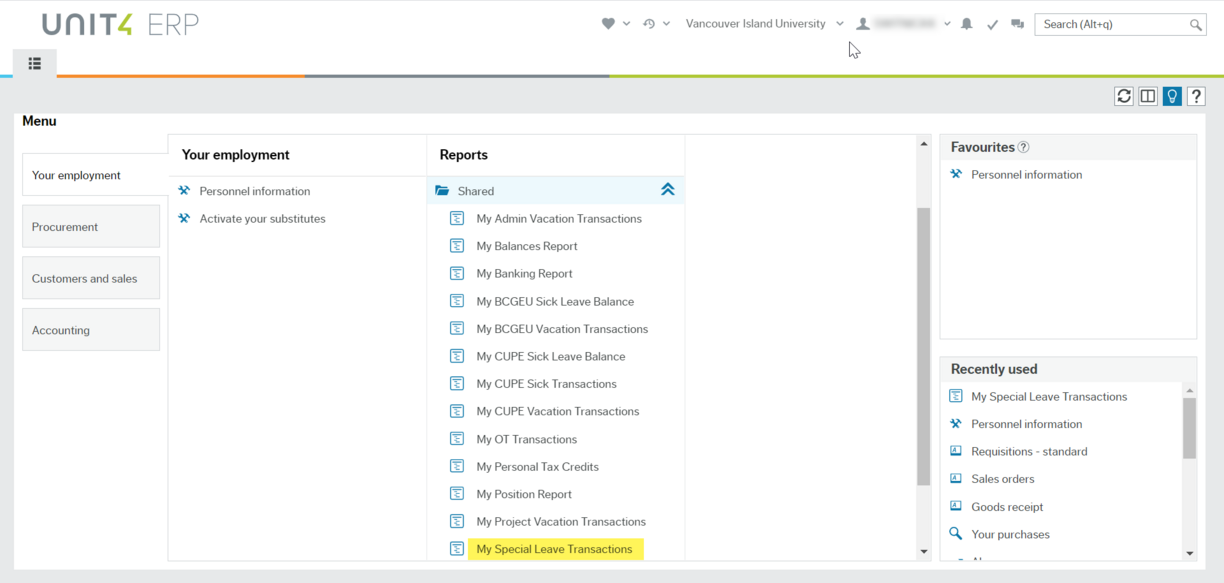
For those employees who take Special Leave you can now see the details of these transactions in your My Special Leave Transactions Report.
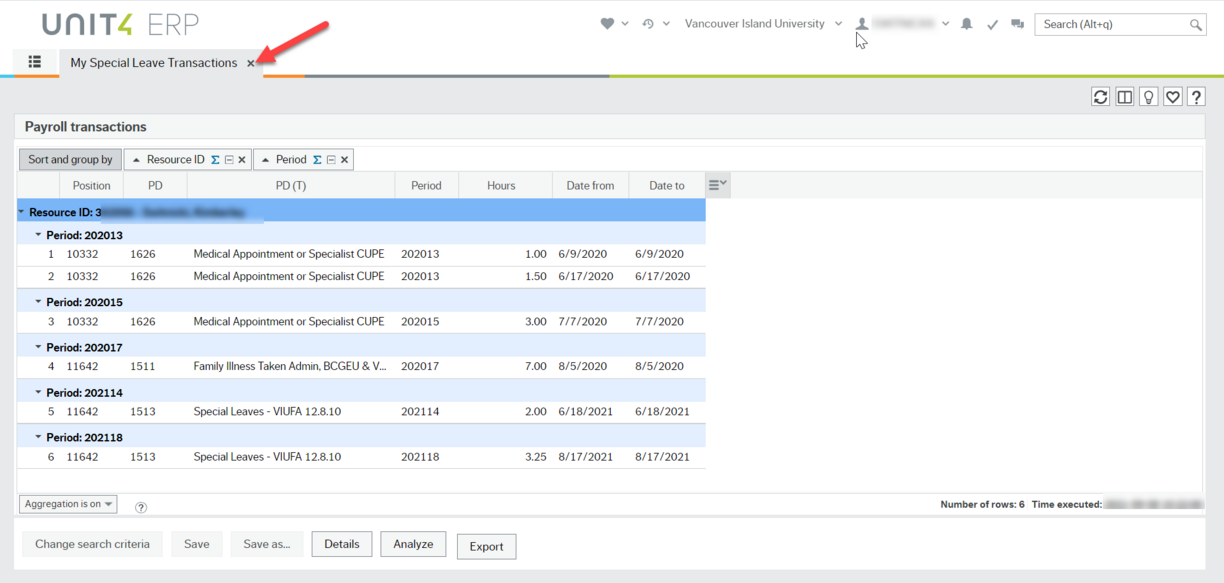
You can also see the balances you have remaining in various Special Leave banks on your My Balances Report Hours. See your collective agreement for details on these accrued/allowed banks.
From the home screen go to the Reports heading click on Shared to open your reports. Choose the report called My Special Leave Transactions to view.
The transactions will be up to date as long as the special leave absence has been approved and processed by the pay period cutoff.
If you have queries about your report, please email your payroll clerk.
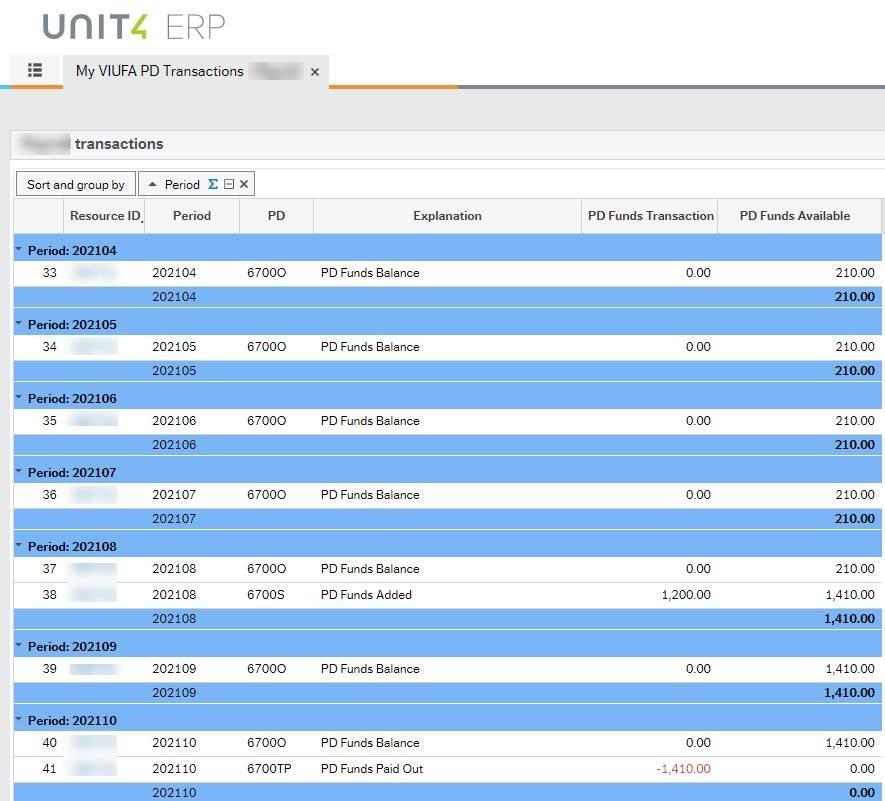
You can find your current (and pending) Balances on the My Balances Report Dollars. See above for details. For ProD hours, please reach out to your department/manager for your balance.
For transaction details look at the My VIUFA PD Transactions report. It looks similar to this:
Once you log onto HRIS, go to Reports and then under the Shared folder you can open your My Banking Report to verify the banking information is correct (to open the report - just click on it). If any portion is incorrect, please contact your payroll clerk.

Note you can have a dollar value or percentage deposited into a different bank account. The payroll office can assist you with this.
Human Resources - HR
After signing on to the HRIS you find items in your personal record by clicking on the Personnel information tab under Your employment.

Here you will find 3 at least tabs across the top:

1) Resource tab (the one you see automatically) which contains:
- Your start date or Date from
- Your birthdate
- Your SIN (Social Insurance Number)
- Your Resource ID (your new employee reference number with the first digit 0 replaced by a 3)
- Your Legacy employee number (former employee number) You may need to scroll down to see this
See this video about why your employee number has changed.
2) Contact information tab contains your address details. You can also enter emergency contact information. You can change your address in this window by clicking on your address so the line becomes highlighted in blue. This populates the section below titled "Address details". Update the information here and click the save button at the bottom left. Be sure to click it until you get the green Success box! This will bring you back to the main personnel window and your address will be updated.
When updating your "Home E-mail" please ensure it does not end with "viu.ca" since that is strictly for your main "E-mail" address.
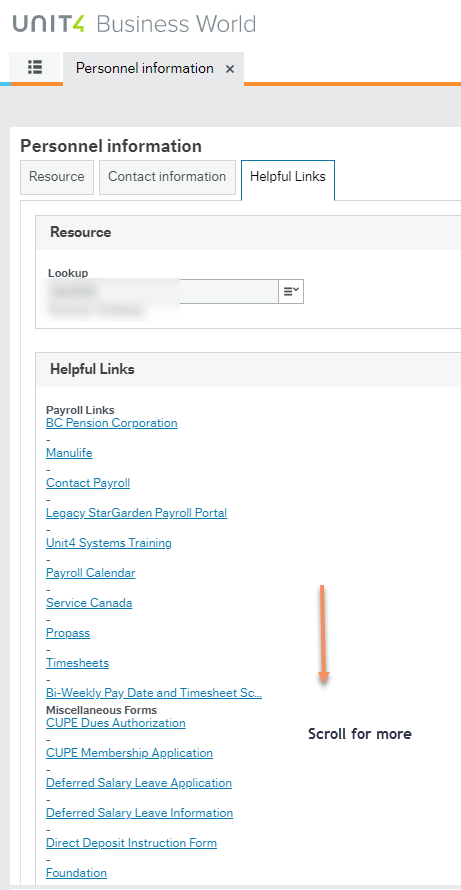
3) Helpful Links provides a listing of various resources you may find useful. You may need to scroll all the way up to see this item if you have been exploring.
Documents stored in HRIS
- Click on the paperclip icon in the top right corner when you are anywhere in the Personnel information tab

This will open the Document archive window so you can view your payslips that are in the Payslips 2020 folder. Future T4 slips will also be available here as well as other related HR/Payroll documentation.

We recommend using the Chrome browser if you have trouble viewing or printing your payslip PDF.
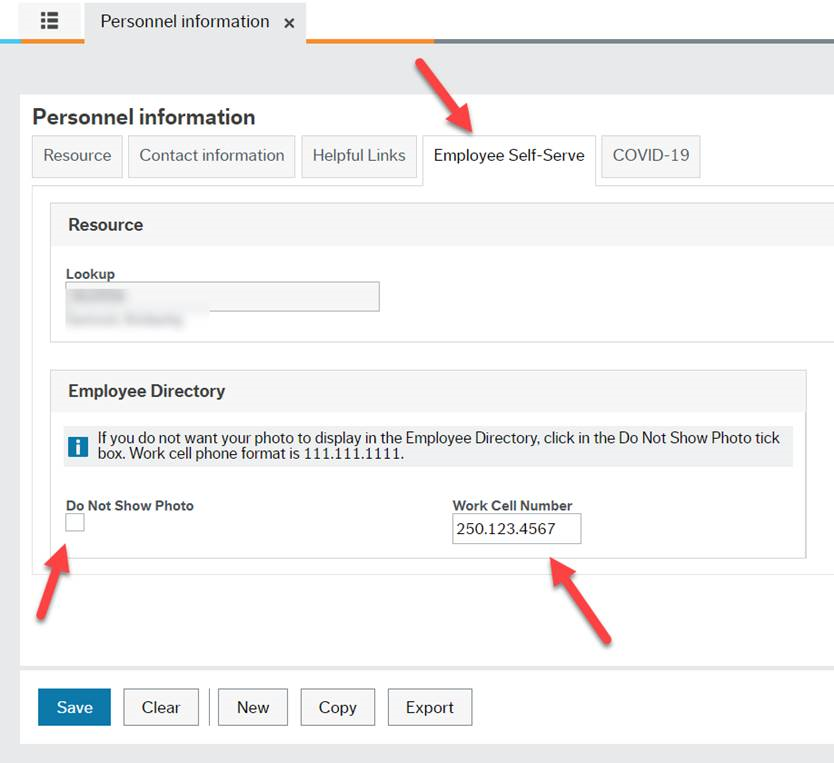
You can use the Employee Self-Serve tab in your Personnel information window for two tasks. You can elect not to have your photo appear in the employee directory and you can add in your work cell phone number. Please only use this field for a cell phone you use for work at VIU.
If you notice an error in any item under the Resource tab in your Personnel information please contact HR@viu.ca to correct.
Please check to ensure your address in the Contact information tab is current. If it is incorrect, see below.

Please note that it is now your responsibility to update your pension corporation (College Pension Plan or Municipal Pension Plan), MSP, Manulife (VIU's benefits provider) and anyone else who may need your address to contact you.
You can change your address in this window by clicking on your address so the line becomes highlighted in blue.

This populates the section below titled Address details. Open it by clicking on the down arrows if it does not open.

Once it is open you can change the information. To update the address line permanently click the save button at the bottom left.

Wait for the green Success box. Say ok and this will bring you back to the main Personnel window and your address will be updated!
Do not click Add to add a new address - you must only have one address on file in the system.
When updating your "Home E-mail" please ensure it does not end with "viu.ca" since that is strictly for your main "E-mail" address.
Please contact HR with any questions concerning your benefits.
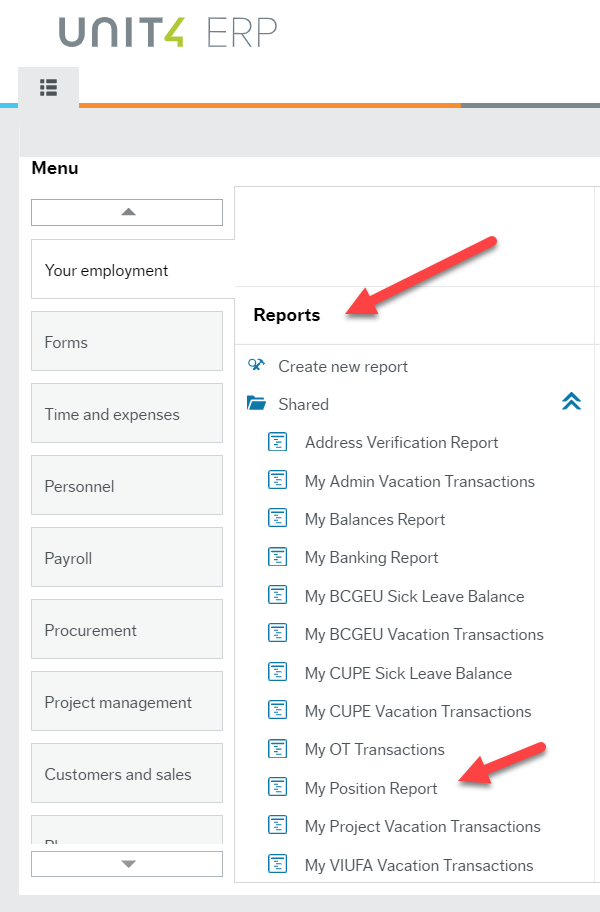
The My Positions Report is under Reports and then Shared. It shows you all of your VIU positions since Dec 21, 2019 onward.
We no longer need appointment forms mailed out since you can see the details of your appointment in this report.
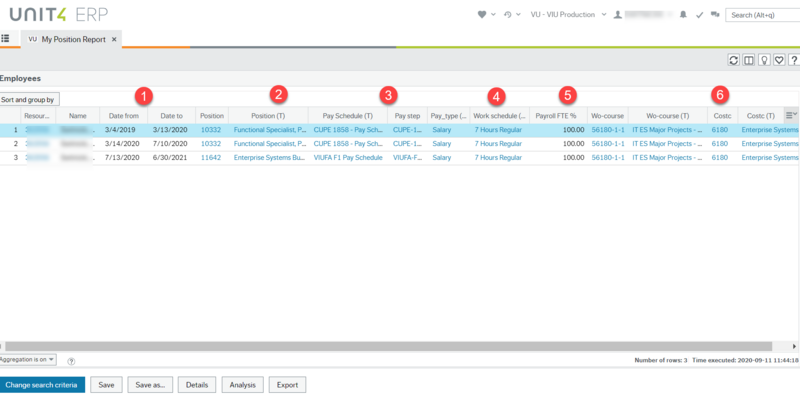
You can see your:
- Start and end dates
- Position number
- Job title
- Pay schedule (you can look up your pay band and step rate in your collective agreement or contract)
- Pay type (hourly or salary)
- Work schedule (please inform your supervisor and HR if it is incorrect since errors cause delays in processing absences)
- FTE % (full-time equivalent such as 50% for a half time role)
- Work order name and number
- Cost centre
You can also rearrange these columns or widen or shorten them though the changes you make will not be saved when you view the report again. You can also export the report to Excel if you want to massage the data further.
- Your start and end dates are for each new position or for each appointment change (i.e. pay rate change or extension) after Dec 21, 2019 even if it is for the same position
- Position title and number are for the specific position and not specific to you alone necessarily
- Pay schedule and pay step help you find your pay rate based on the collective agreement and pay grids established for your jurisdiction.
- Work schedule shows you the short form details of your schedule and should be accurate. If this is incorrect please contact your supervisor or HR to have it corrected. This can affect your pay, your seniority, your benefits and/or your absences being processed correctly.
- Payroll FTE % shows you how much of a full-time percentage you work. So 50.00 means you work half time.
- Costc is the cost centre your wages will be allocated to for the budget in your department.
Please contact HR directly for assistance with Appointment Form creation or any training related issue. Your HR Assistant can provide training support for creating appointments. See the HR Areas of Responsibility page to find your areas assistant.
Correct. With the implementation of this new cloud- based system there is no need to mail out appointment forms. Pertinent details for new positions will continue to be in your offer letter. In HRIS your My Position Report (under Reports/Shared) provides details such as:
- the position hire date
- job title
- position number
- pay schedule
- pay type (hourly or salary)
- work schedule
- FTE %
- work order name and number
- cost centre
This information is available for all positions in place on January 2020 and subsequently. If your require any information related to your position, please contact Payroll or HR directly.
For training assistance with the Recruit module go to the HR training page for the Recruit module.
There is no interface currently between the Recruit module and HRIS so if you use Recruit you still need to login to it separately.
Stipends do not appear on the My Positions Report, however HR is working on a separate report that will show them and we appreciate your patience! Some areas are tracking those on a spreadsheet until this report is created.
Union seniority lists are posted as per the BCGEU, CUPE, and VIUFA Collective Agreements. Visit Union Seniority to view the most recent lists. If you have any further questions, please contact Human Resources at ER@viu.ca.
Helpful Links provides a listing of various resources you may find useful. You may need to scroll all the way up to see this item if you have been exploring. Go to "Personnel information" and click on the 3rd tab at the top called Helpful Links for a variety of relevant and useful information for employees:
HR, Payroll and Finance are incorporating automated notifications into daily system processes. These notifications are for events that occur in the system and they are sent through the Employee Portal system directly to an individual or a group. An event typically involves a data change such as an updated record or new record added. The system continually checks for events and when an event occurs, it automatically generates and sends out the notification to the appropriate person(s). This notification will come via either an email to the employee or as an Employee Portal system Alert. See more on the Orientation page about Alerts.
Either type of notification may require action on your part or it may just provide you with information about a change in the system that applies to you.
Examples:
- an email sent to an employee reminding them of an expiring First Aid certification
- a notice to a manager of an upcoming employee evaluation
Email Notification
If you receive an email with this subject line, it is not spam; it is a notification from HR: Subject: HR – Unit4 – (subject of notification)
Alert notification
A system Alert notification will show up in the Employee Portal as seen below (the bell icon). As we start to roll-out alerts, you will be encouraged to login to the portal regularly (daily or weekly) to view these in-system notifications.

Stay tuned for more information on these notifications as they get rolled out.
As announced on August 25, VIU is introducing a vaccine self-declaration program for students and employees to support the wellness and mental health of our community and a safe campus environment.
We are requesting that all employees and students declare their vaccination status by October 1, 2021. If you are vaccinated and choose to declare this, that is the only step you need to take. If you are unvaccinated or choose not to disclose your status you may receive, through a direct email, more information about rapid testing or other secondary health and safety measures you may be asked to take.
Action for employees:
To declare your vaccination status, please take the following steps:
- Sign on to the Employee Portal using your VIU employee credentials. (If you are unable to sign onto the Employee Portal to complete this self-declaration, please contact ithelp@viu.ca to assist with the process. For those without a computer, please use the computers available on our campuses.)
- Click on the “Personnel information” activity.
- Choose the COVID-19 tab.
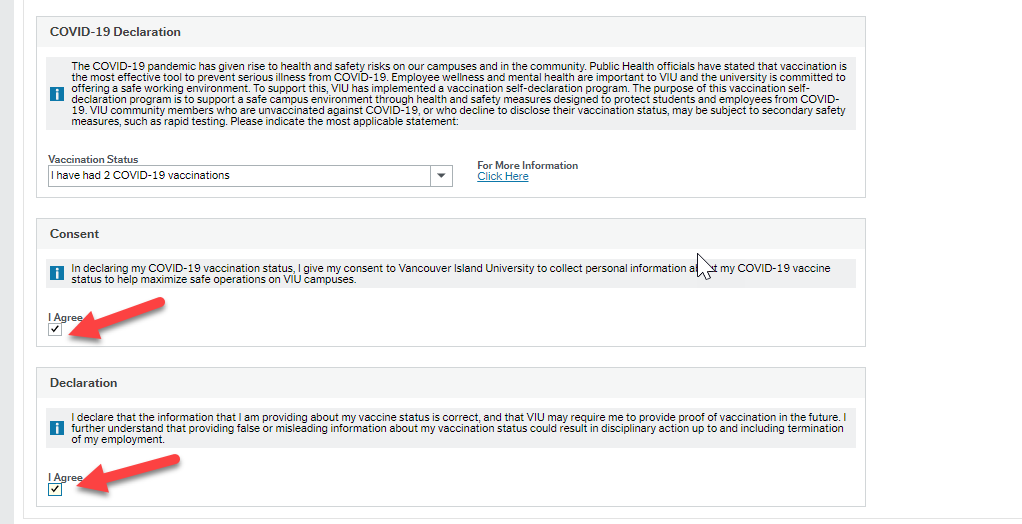
- Read the COVID-19 Declaration. (If you prefer, you can click the link under For More Information to read the Self-Declaration and Acknowledgements on the VIU website.)
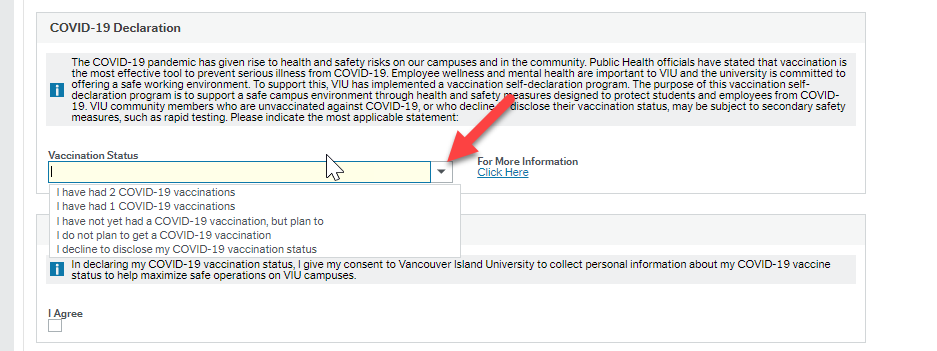
- Choose your response from the dropdown menu: (If you have or need a human rights accommodation, please choose “I do not plan to get a COVID-19 vaccination” and contact your Human Resources Advisor.)
- Please check both (2) boxes to provide a complete declaration. If you do not, you will receive an automated email reminder to complete this step.
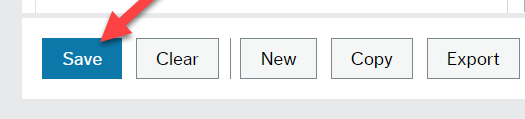
- Click on Save (you may need to hit Save twice) and then OK in the Success pop-up box to record your vaccination declaration.
If your COVID-19 vaccination status changes, simply go back into the COVID-19 tab in your Personnel Record and select the appropriate response from the Vaccination Status dropdown list. Confirm both boxes are still checked and click on Save and then OK to update your vaccination declaration.
Steps with screenshots:
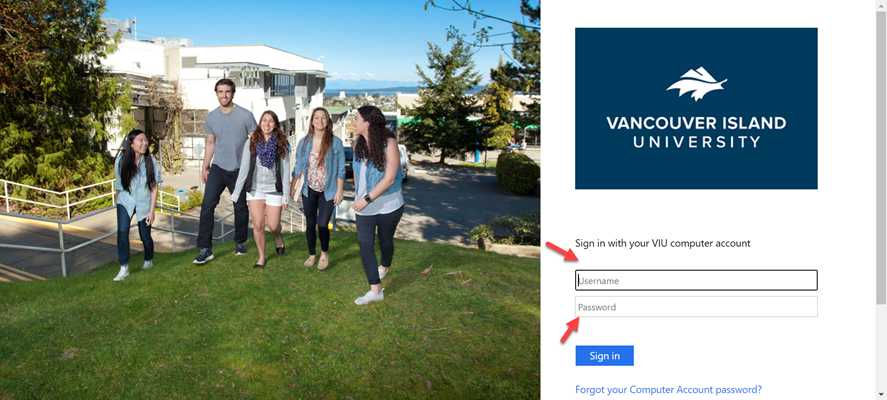
Step 1: Sign on to the Employee Portal using your VIU employee credentials.
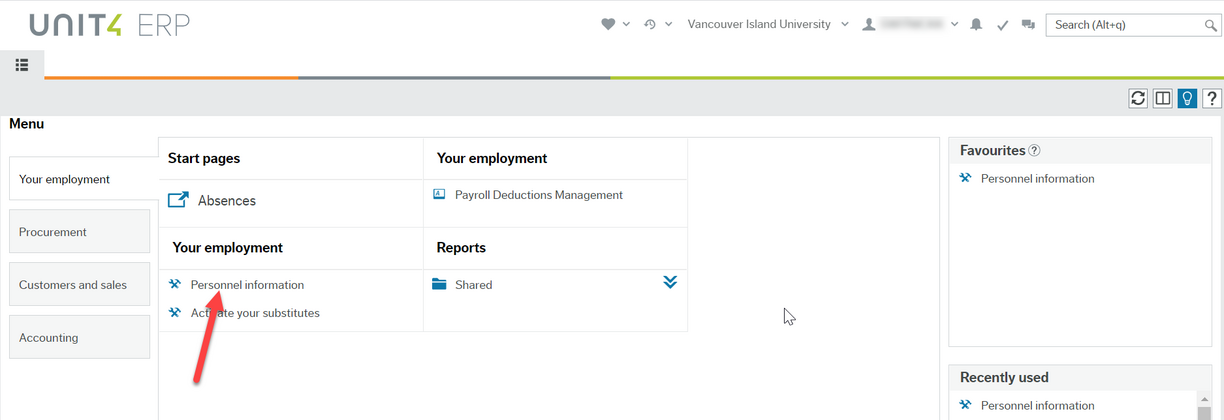
Step 2: Click on the “Personnel information” activity.
Step 3: Choose the COVID-19 tab

Step 4: Read the COVID-19 Declaration. If you prefer, you can click the link under "For More Information" to read the Self-Declaration and Acknowledgements on the VIU website.
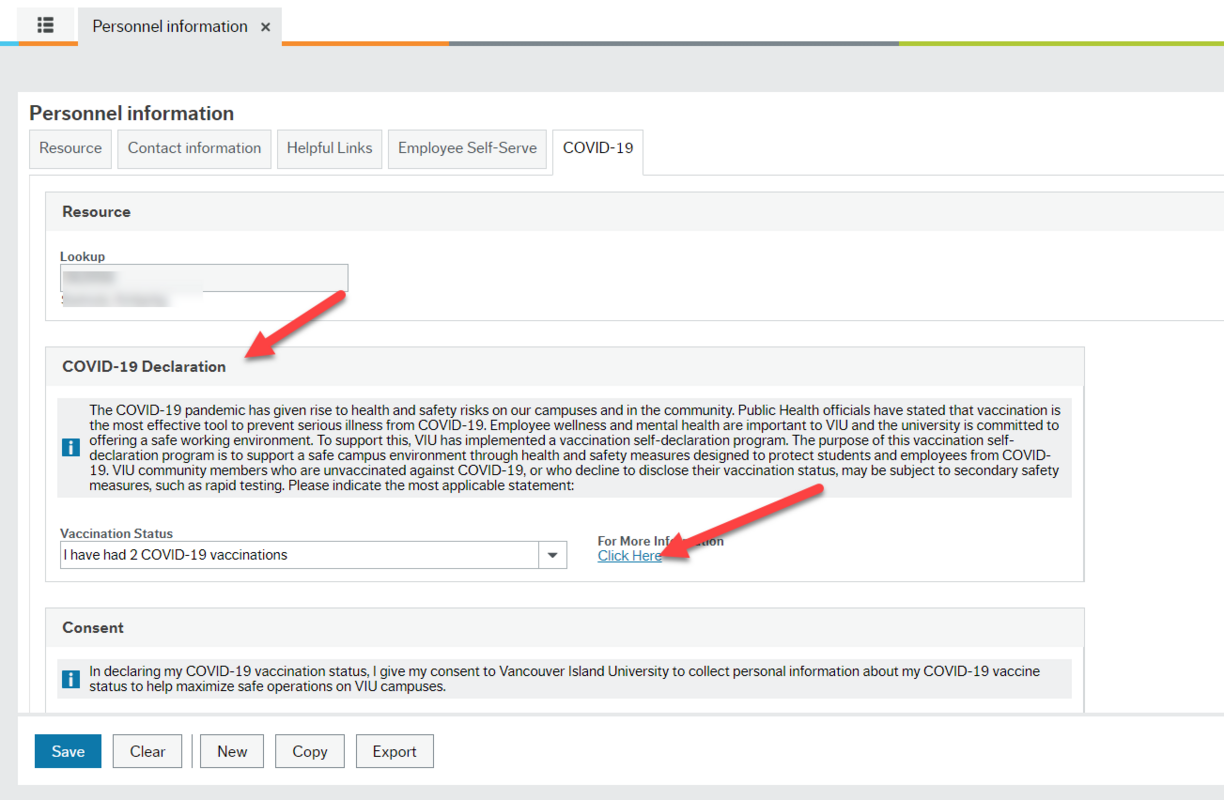
Step 5: Choose your response from the dropdown menu:
Step 6: Please check both (2) boxes to provide a complete declaration. If you do not, you will receive an automated email reminder to complete this step.
Step 7: Click on Save (you may need to click Save twice) and then OK in the Success pop-up box to record your vaccination declaration.