
For extra assistance contact HR@viu.ca or a Tech Champion in your area.
You must be an active employee to see menus or data after you log in.
See menu under "Employee training" for all categories of training materials. We continuously update as we progress through system implementation and updates.
Before taking further training, complete Basic skills checklist and Quiz. Be sure to download "With your changes" to save! Scroll down for Basic skills training videos.
Use this handy Onboarding cheat sheet and check out the Self-assessments page for onboarding tools to help your team with training.
Employee orientation
The Employee Portal (formerly referred to as UBW) is a cloud-based, integrated software system.
The video below announces the go-live date of January 2020 and also outlines expectations from that time. Note this was made prior to the vendor's name change of UBW to ERP. VIU now calls the entire system the Employee Portal.
Payroll update fall 2019 - video transcript.txt
The following video explains what Project AURORA is and the acronyms that were used prior to summer 2020 such as UBW (now ERP though VIU now calls the entire system the Employee Portal) and U4SM which has been delayed.
Watch video 1 at the bottom of this page on Accessing the Employee Portal. There are many ways to access the Employee Portal to view the Human Resource Information System (HRIS) module:
- You may have received an email with the web link for the Portal.
- It is often accessed by going to VIU’s main website. If you click on Employees at the top of that page the Employee Portal is one of the main options you see.
- If you are at the training website, once you’ve logged in you can access the Employee Portal by clicking on the big blue button at the top of most of those pages (see at the top of this page).
- From the VIU payroll portal on the VIU website there is also access.
- Finally, you can bookmark the Employee Portal using your web browser, but only once you have logged into it – you can’t bookmark the login page.
Here is a short video showing what you see when you sign on to this exciting new system (formerly called UBW) with a taste of how it can be used.
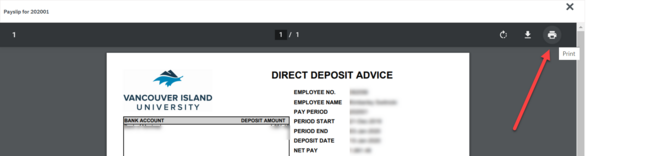
Note: Payslips are viewed by clicking the "paperclip" icon when you are in your Personnel information screen.
What you see in the Employee Portal - video transcript.txt
When you go to the web link, this screen (or one with a similar photo) will appear asking you for your VIU employee credentials. If you don't see this screen you are on an old system page and will need to clear your cache and open a fresh Chrome window:

Use your VIU employee username (or email address) and your existing VIU employee password to log in. Do not use student credentials. The first time you sign on a new screen will appear. Please tick both boxes. (Don't worry if you missed ticking the 2nd box - it may pop up again the next time you login, but if not you should be fine) Then you're in!

If you have trouble logging in, please email IT Help@viu.ca for assistance.
Note for navigating the Portal. The main difference in this system is that you use the tab key to move through fields instead of the enter key. Also, instead of a Home button, click on the menu symbol (shown below) in the top left corner under the Unit4 logo to get back to your "home screen".
See below for what you will see on your home screen or workspace.
Watch video 2 below on Browser, workspace and security. You will remain logged on for 20 minutes with no activity before being automatically logged off. Please log off (or lock your screen) when you leave your computer to maintain security
To logout, click the logout menu item from the dropdown (small 'v' by your name) in the top right corner of your workspace

If you do not log out anyone who has access to your computer will have access to your:
- payroll record
- banking information
- SIN
- birth date
Plus they will gain access to other system areas you may have access to, such as appointment creation, sick time entry, etc.
If you hit the back arrow or button on your browser you may get logged out of the system.
Watch video 2 below on Browser, workspace and security.
VIU provides Single-sign-on service using your VIU credentials to securely access the data in the Employee Portal. Do not give your sign on credentials to anyone or they will have access to your payroll record, your HR record, your banking information as well as access to other system areas you may have access to such as appointment form creation, absence entry, etc. You must sign off if you are leaving your computer to go for coffee, attend a meeting, etc.
To maintain security, non-active VIU employees may be able to sign on to the Employee Portal (while their computer account is still active), but will not have access to data. Only active employees can see data.
Be sure to print your payslips before your position has ended. Contact your payroll clerk if you need information that is unavailable to you after your position has ended.
The system will sign you off automatically after 20 minutes of no activity.
Watch videos 3 and 4 below for more details.
The main difference from what you may be used to is that you use the tab key to move through fields instead of the enter key. Also, instead of a Home button, click on the menu symbol (shown below) in the top left corner under the Unit4 logo to get back to your 'home screen' or 'workspace'.
The main menu on the left (on a non-mobile device) has a vertical list of the modules you have access to. All employees see 'Your employment'. Each item contains its own menu for the activities available. You click on one of these to open that activity or folder to view or perform a task in the main workspace.
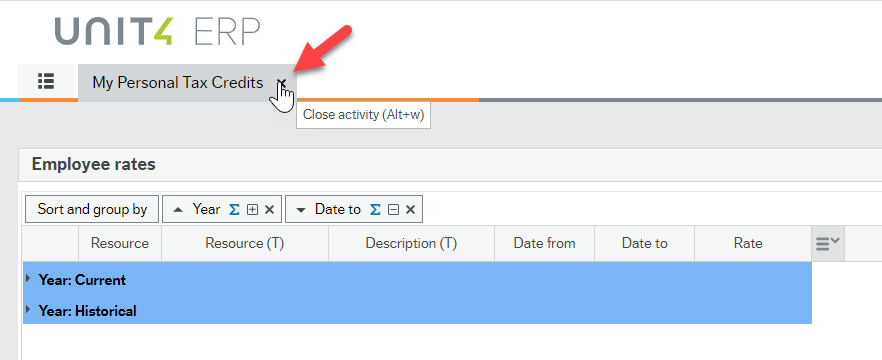
To close an activity, click the X in the top right corner of the activity tab at the top of the window.

You can have a maximum of ten tabs open at once.
If you can't see something at the edges of a page, scroll up or down using the bar on the right side of the window. You can also scroll left or right using the bar along the bottom of the screen.
If you have the browser window smaller than full screen you may see groups of items move around the page dynamically, but they will revert back to the original layout once the screen is maximized. Try playing with your window size to see this Responsive Design in action.
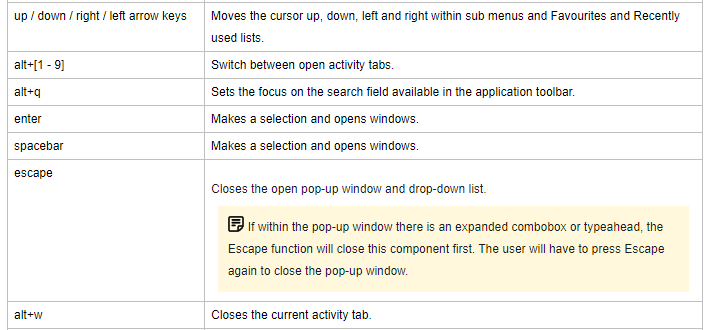
Here are some keyboard shortcuts from the Unit4 help menu (accessed via the ? symbol in the top right):
You can also split the screen to work with 2 activities at a time. Simply click the split icon and the box will turn dark blue and you will have 2 viewing areas to work with.
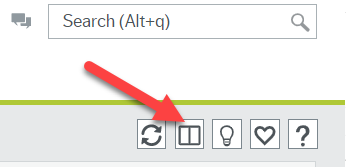
You can resize these windows. Click the split icon again to revert back to a single workspace and the 2 activities you were working on will become separate activity tabs at the top.
There are many ways to add data to the various fields. Watch videos 6 and 7 below for more details.
- Some fields will use the type-ahead feature to automatically fill-in with context-sensitive data options
- In some fields hitting the space bar brings up potential options for you
- Some fields already have a dropdown menu for you to choose from. In this case:
- click the down arrow to open the list
- up and down arrows on your keyboard allow you to move within the list
- hit enter key or mouse click on item to select it in the list
- escape or clicking outside the field will close the field without selecting anything
- once you have made your selection hit the tab key to move to the next field
- Click on the ellipsis beside certain fields to use the "Value lookup" function:
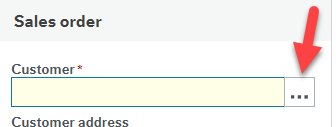
After you click on the ellipsis (3 dots) a Value lookup window opens for you to start typing what you are looking for (such as a Work Order number or supplier name) in the search criteria field.

You can choose to leave it blank and then hit the Search button and the entire list of options for that field will come up. Narrow it down by typing some part of the name to provide a smaller list to choose from.
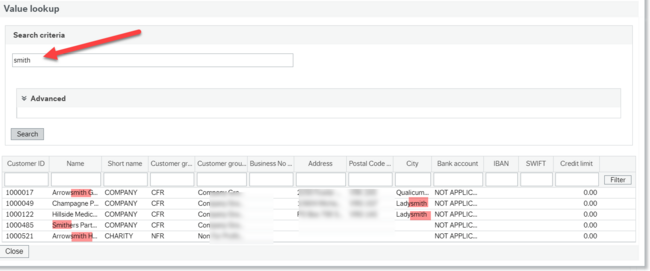
Once you select an item on the list by clicking it , the window will close and that data will now be in the field.
- Fields with grey backgrounds are not editable by you - see below:

- If you are adding or changing information in a screen, be sure you hit Submit or Save. After that a "Success" (or other green dialogue box) pops up. Hit "Ok" button to see that it has accepted your change or addition.

On certain screens, such as reports, when you try to close the window a dialogue box may pop up (see below) warning you of unsaved changes. If you have not made any, hit yes and it will close the window.

Do not hit the back arrow or button on your browser or you will need to sign on again
In Payroll Deductions Management do not hit the Clear button or you will have to close the activity tab and start over since you will not be able to save what you have entered

Watch video 5 below for more details on troubleshooting and see the Troubleshooting flowchart.
- If a red asterisk is beside a field that means it is mandatory and a value must be entered
- If a field is greyed out then you cannot enter a value since it is connected to that value already elsewhere in the system
- When you try to close certain tabs (such as a Reports tab), the system may think you have made changes even though you are simply looking at data, so up will pop a dialogue box that says "Warning: You have unsaved changes in your report. Do you want to continue?" You can hit yes if you are not making changes or no if you need to make changes that need saving
- If you have trouble printing documents from the document viewer (such as for your payslip or T4) use Chrome as your browser and it should work
- If you have many challenges entering data, try using Chrome as your browser. You can also switch to a non-mobile device for best results. Be sure you have Internet access as well!
- If there are some items that are not appearing or changes that have not shown up in the system right away, there are a few tricks you can try.
- Clear your cache (a) go to your name in the top right corner b) click the down arrow c) click on About Unit4 ERP and then...

this screen pops up so you can click on the "Clear the cache" button. Say ok and close this small window.
- Refresh the screen by clicking on this button in the top right corner.

and finally - Logout of the Employee Portal and log back in again. The logout menu item is under your name in the top right corner.
- Clear your cache (a) go to your name in the top right corner b) click the down arrow c) click on About Unit4 ERP and then...
Your workspace, icons and tools
Watch video 2 below on Browser, workspace and security. The following steps will help you become familiar with this cloud-based, integrated system.
Payslips are available in the document portal - simply click on the paperclip icon under "Personnel information."
Go to the Employee Portal to login. Google Chrome is the preferred browser.
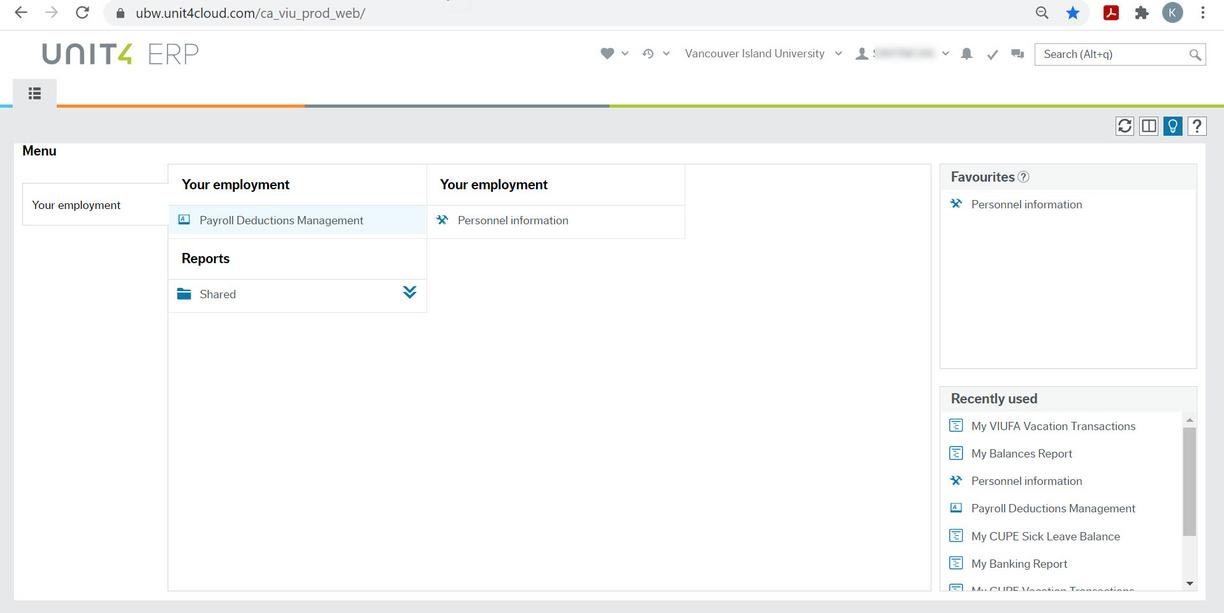
Once you login you see your main 'workspace' and the main menu on the left. You will typically see only one menu item: 'Your employment' where you can view activities related to your employment at VIU. More menu items may be added as functionality is added or as required by your Role at VIU.
More details on these employment activities are on the HR & Payroll page, but some basics follow.
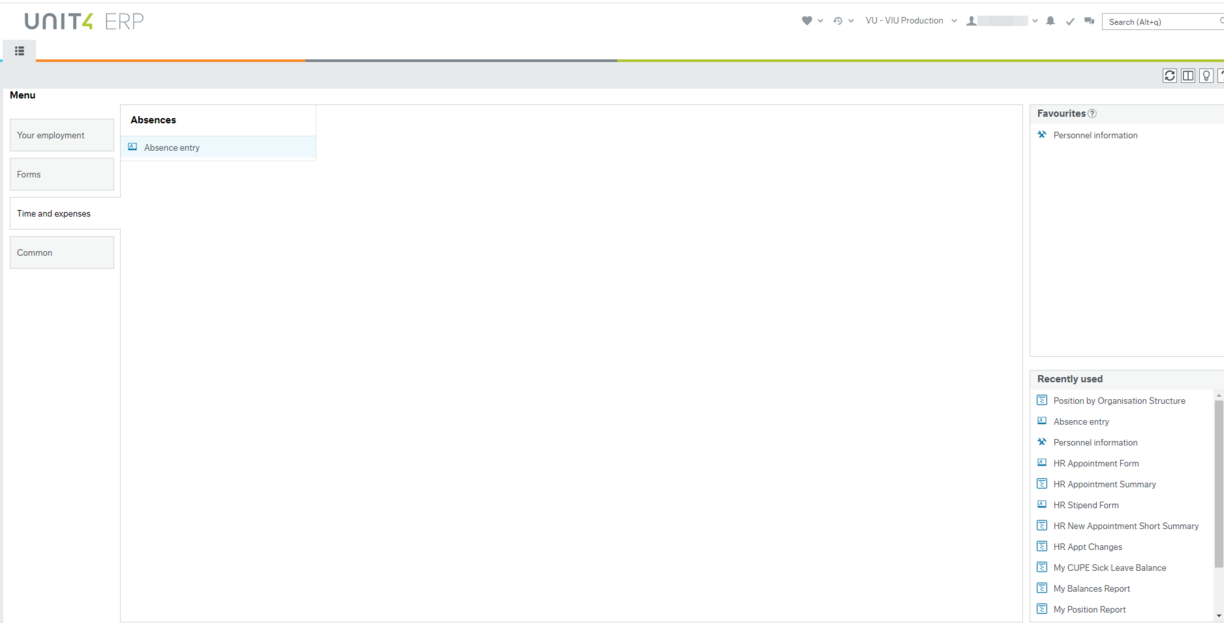
Some employees will have more than one menu item since they use more of the system. Here is a menu example for an employee who also creates appointments and enters sick time for employees in their department:
Open any activity in your workspace clicking on it. A tab will then open at the top of your workspace. Close a tab by clicking the X in the top right corner of the tab. To get back to your main workspace, click on the menu button
In your main workspace you can see:
a) Under Reports click on Shared to open My Shared Reports folder. Verify the following (to open the report - just click on it):
- Your banking information for deposit of your pay
- Check your employment balances
- Your positions (at and subsequent to Dec 21, 2019)
- Your vacation transactions
- My Union Sick Leave Balance (Union = CUPE, VIUFA non-instructional)
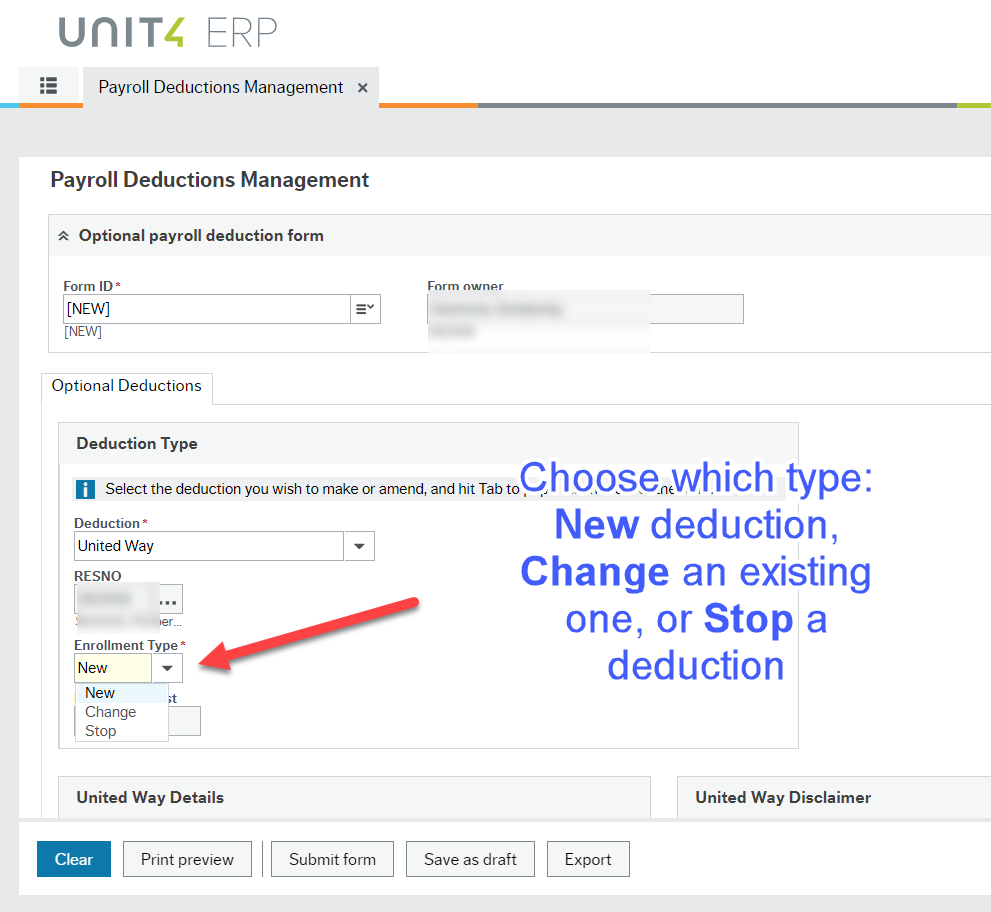
b) Under Your employment heading is Payroll Deductions Management where you can choose from optional items to deduct from your pay (such as Mclotto, United Way, Foundations and Milner Gardens membership)
c) Under the other Your employment heading is Personnel information with your personnel record. You'll find 3 activities:
1) Under the Resource tab (the one you see automatically):
- Your start date or Date from
- Your birthdate
- Your SIN (Social Insurance Number)
- Your Resource ID (your employee reference number (for employees hired before 2019 their previous employee number now has the first digit 0 replaced by a 3)
- Your Legacy Employee Number (former employee number) You may need to scroll down to see this
Your employee number has changed from what it was if you were hired prior to January 2020.
- Click on the paperclip icon in the top right corner when you are anywhere in the Personnel information tab

This will open the Document archive window so you can view your payslips in the Payslips 2020 folder. T4 slips are also be available from this menu.

We recommend using the Chrome browser if you have trouble viewing or printing your payslip or T4 PDF.
2) Under the Contact information tab:
- Your address information
3) Under the Helpful Links
- A listing of various links to resources you may find useful. You may need to scroll all the way up to see this item
Later in 2023 we will phase in (by department) the Timesheet module allowing you to record timesheet hours. For now, continue to use paper timesheets.
For more information on the Absence module to request a vacation or special leave online see the Absence request training page.
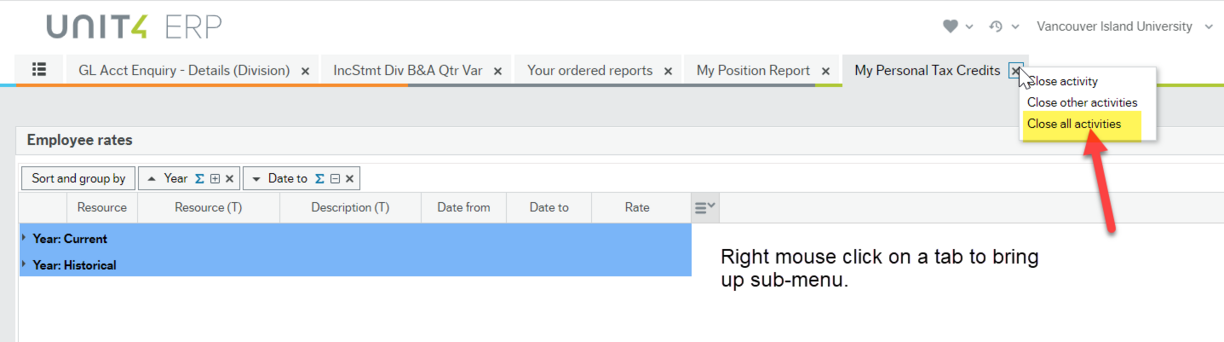
Yes, you can close one at a time, all but the one you have open or all of them at once. To close a single activity tab simply click the X in the top right corner of that tab:
You can choose to close all tabs at once or all tabs other than the one currently open by right-clicking with your mouse on the tab to open up a context-sensitive submenu:
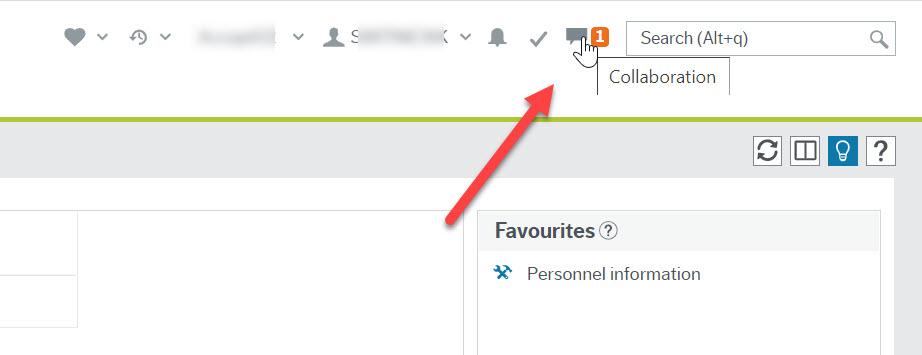
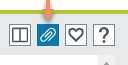
In the main header at the top of your workspace are 3 symbols that allow communications within the system:

- A number in an orange box will appear beside the bell icon if you have an Alert from the system. Click it to see what it says. An example is a reminder that you have requests awaiting your response in your task manager or if an event has been triggered and an email has been sent to you.
- The check mark is for Tasks that need your attention. In the above example there are 113 tasks awaiting attention. They will typically be for approvals coming to you via workflow. See "How do we use the Task feature" below for more details
- This chat icon (quote bubbles) is for Collaboration with your colleagues. You can send messages within the system regarding a specific activity or record in the system and can attach a screen shot or add a link for specific data in the system. Clicking this icon will show you a list of the conversations you have or let you start a new one.
For more detailed instructions on how the tasks and collaboration tools work use the help icon ? and choose Tasks or Collaboration from the main menu in the Help window.
HR, Payroll and Finance are incorporating notifications into daily processes. These notifications are for an event and they're sent through the Employee Portal system directly to an individual or a group. An event typically involves a data change such as an updated record or new record added. The system continually checks for events and when an event occurs, it automatically generates and sends out the notification to the appropriate person(s). This notification will come via either an email to the employee or as an Employee Portal system Alert.
Either type of notification may require action on your part or it may just provide you with information about a change in the system that applies to you.
Examples of notifications:
- an email sent to an employee reminding them of an expiring First Aid certification
- a notice to a manager of an upcoming employee evaluation
Email notification
If you receive an email with this subject line, it is not spam; it is a notification from HR: Subject: HR – Unit4 – (subject of IntellAgent)
Alert notification
A system alert notification would show up in the Employee Portal as seen below. As we start to roll-out these alerts, you will be encouraged to login to the Portal regularly (daily or weekly) to view these in-system alerts.

If you see a number by the bell icon, click it and a message will be displayed for you.
Stay tuned for more information on notifications as they get rolled out.
When you have tasks to complete such as to approve (or reject) a Purchase Order, Sales Order or Absence request you will be notified in the Employee Portal and you can action the item as follows below. Specific details for your particular task will be provided in training material specific to that task.
NOTE: If you are part of a 'group of employees' assigned in a workflow Task (such as IT/Facilities Review) you may see a Task 'disappear' from your task management list if someone else in your workflow group actions it.
This is an example for approving a Purchase Requisition.
At the top right of your screen you will see the “Tasks” area. A checkmark indicates you have tasks and the number of tasks (e.g. 15) are identified in an orange box. Click on checkmark or orange box to open the Your tasks dialogue box.
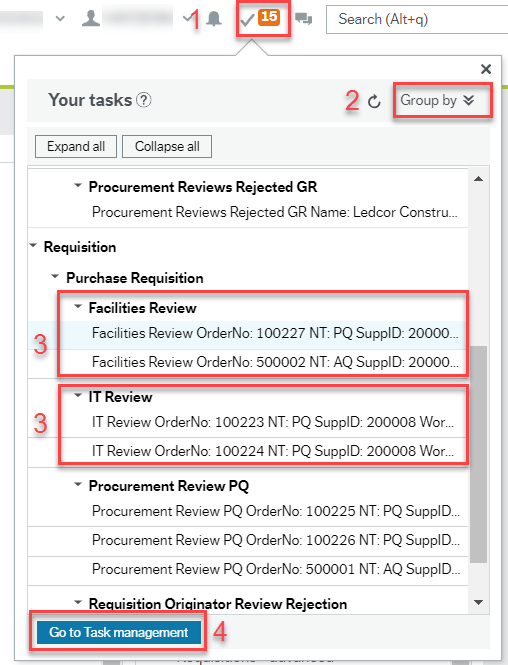
- A list of your tasks appear in the box. You can change how the tasks appear and break them down into groups by clicking on the “Group by” drop down menu. This is helpful if you get tasks from various workflows or different reasons. Choose “Element type” for level 1, “Process” for level 2, and “Step” for level 3.
- You can open a task by clicking on any one of them to open it, however, if you have multiple tasks it is recommended to follow step 4 instead.
Select the blue “Go to Task management” button at the bottom of the list and all of your tasks will appear.
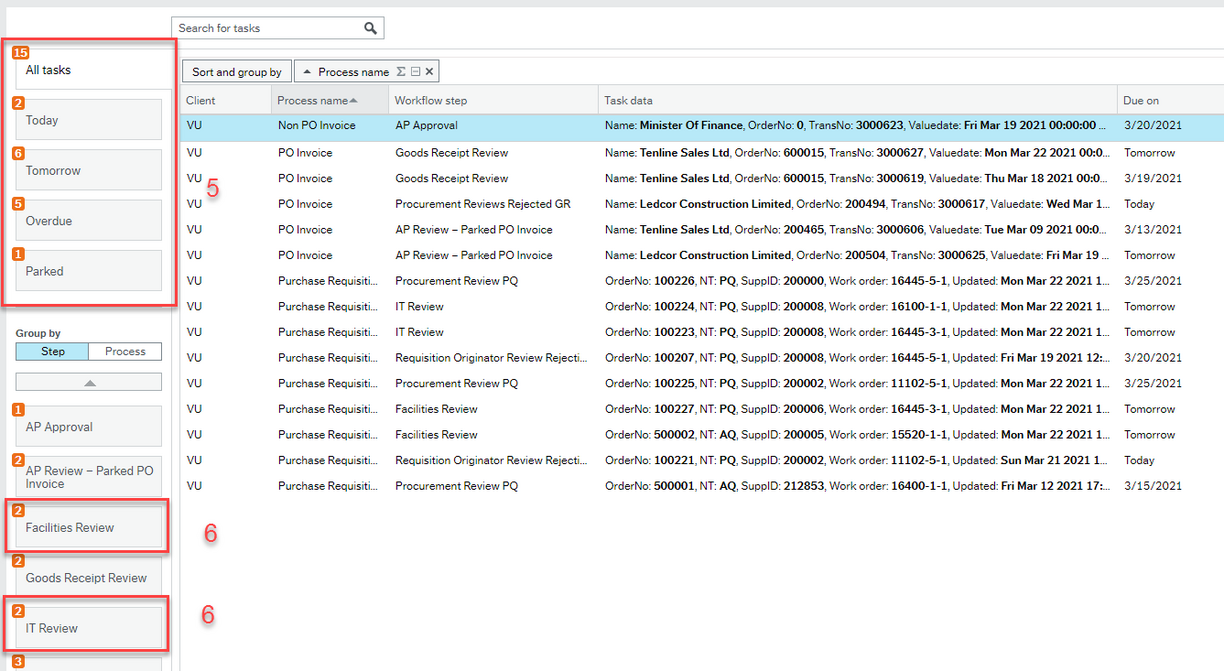
On the top left-hand side of the screen, you will see various folders that summarize “All tasks” (with a number inside an orange box beside each item).
If a due date has been assigned to a task, the folders “Today,” “Tomorrow,” and “Overdue” will populate accordingly. Currently there is a 1 day due date on the “IT Review” and “Facilities review” steps. Any tasks that were parked from other workflow steps would show up in the folder “Parked.” Any “Parked” tasks may still appear in its original folder as well as the “Parked” folder until the task is actioned.
Below that, your tasks will be grouped by type of review required (e.g. Facilities review has 2 tasks, and IT review has 2 tasks).
Note a): Currently all workflow steps appear in the screenshot above as this screenshot was taken from a test environment. Once you have been given access to the system, you will only see the workflow steps that you’ve been assigned to in Task management.
Note b): You can refresh your screens at any time by clicking on the “Refresh” icon which is located in the various screens.

Click on the applicable folder (e.g. IT review) and all of those tasks will appear.

You will see an itemized list of all of your tasks and you can sort and group by any of the column headings (I.e. Process name, Workflow step, Task data, etc.). The columns can be widened so you can see the full description. The Process name will be identified as well as the Workflow step and Task data.
On the first line we can see that it’s a Purchase Requisition that requires IT review and under Task data we see the Requisition No (OrderNo), the type of requisition (“PQ” – which is a standard requisition), supplier ID, Work Order, and the date the requisition entered workflow.
You also see when the task was due:
• “Tomorrow” refers to tasks that were just created and have not reached the 1 day due date;
• “Today” refers to tasks that were created 1 day prior and are now due;
• “Yesterday” refers to all tasks that are overdue by 1 day; and
• An actual date (e.g. 2021-01-29) if the task is overdue by 2 days.
For more details about how to manage a particular task, please see the specific training materials provided for that item.
Access to turn off personal alert notifications is temporarily unavailable. However, it is strongly advised that you do not deactivate personal alert notifications. Notifications are designed to provide meaningful information about tasks that need to be actioned in a timely manner within the system.
Some users may get annoyed by the automatic notifications from the system. Below are the steps to create an Outlook rule that will automatically move these notifications out of your inbox and into another folder of your choosing. This is only for users who spend most of their time already logged into the system so they don’t need emails prompting them to log in and check their tasks.
Instructions:
Create a folder
Select Folder in your Outlook menu and click New Folder.

Pick a name and and location for your folder.
In this case, the folder location will be a subfolder in the Inbox. You may want to name the folder “FIS automatic emails” or something similar that makes sense to you.
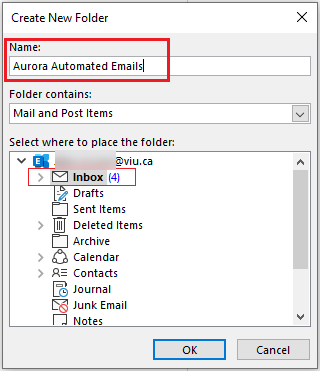
Hit OK.
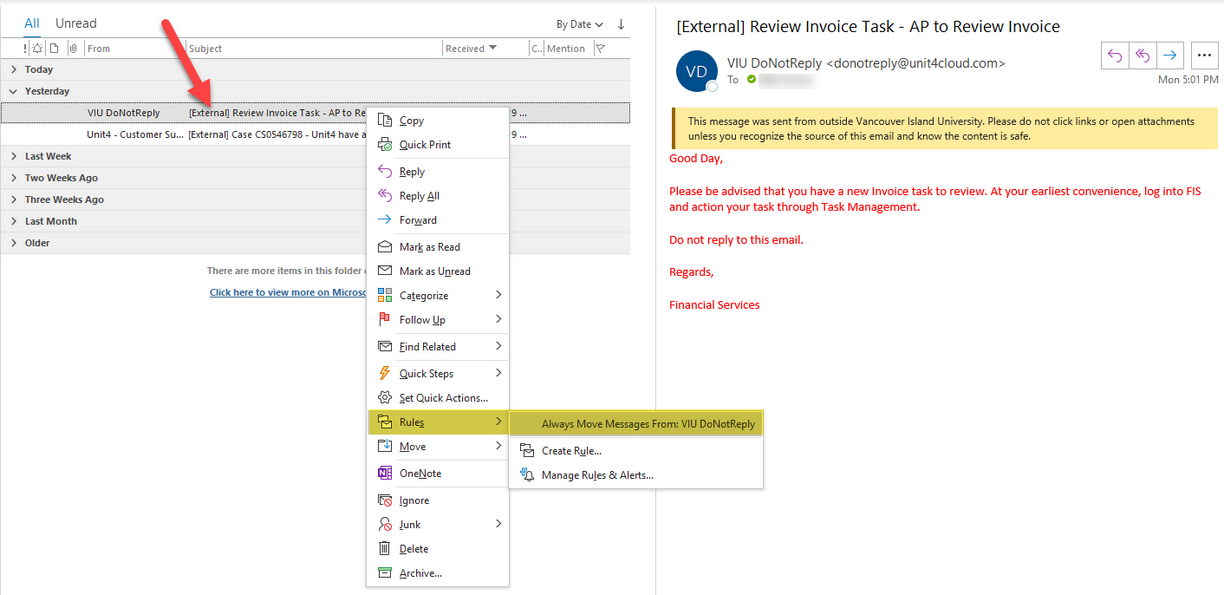
Then you create an Outlook rule to “Always move messages from VIU DoNotReply”
The easiest way to create this rule is to right-click one of the emails from donotreply@unit4cloud.com. Then go to Rules, and select Always move messages from VIU DoNotReply.
Next you have to select a folder for these messages to be automatically moved to. Select the folder you created in step 1.
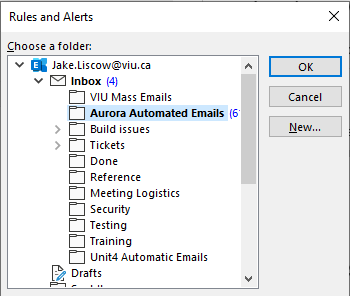
Hit Ok.
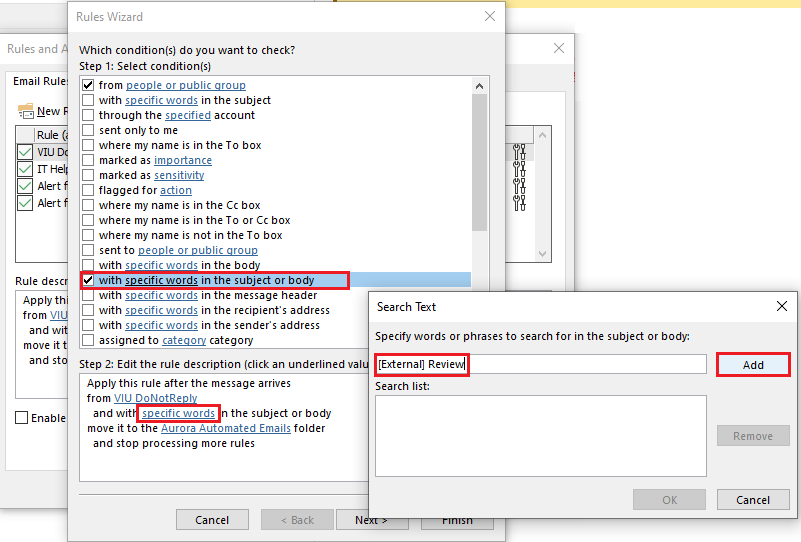
Make the Outlook rule more specific now. Under the Home menu click Rules and then Manage rules & alerts.

This will open the Rules Wizard.In the Rules Wizard, check the box for with specific words in the subject or body. Type [External] Review in the window that pops up and click Add then OK. Click Finish to complete the modification to the rule.
There are times when you want to communicate with a colleague from within the Employee Portal.
General collaboration
If you want to start a chat of a general nature (not related to a record), you simply click on the Collaboration "quote bubbles" icon in the top right of your Portal window and then click the "New conversation" button:
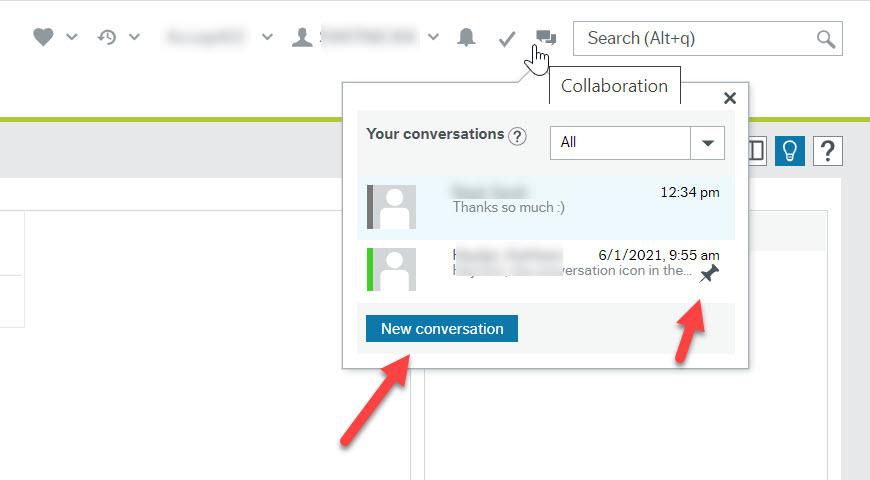
You can see above also that a "pin" icon will appear beside a conversation you have that is "pinned" to a record.
If you have any unviewed chats, you will see a number in an orange box beside a single "quote bubbles" Collaboration icon.
Pinned conversations for activities
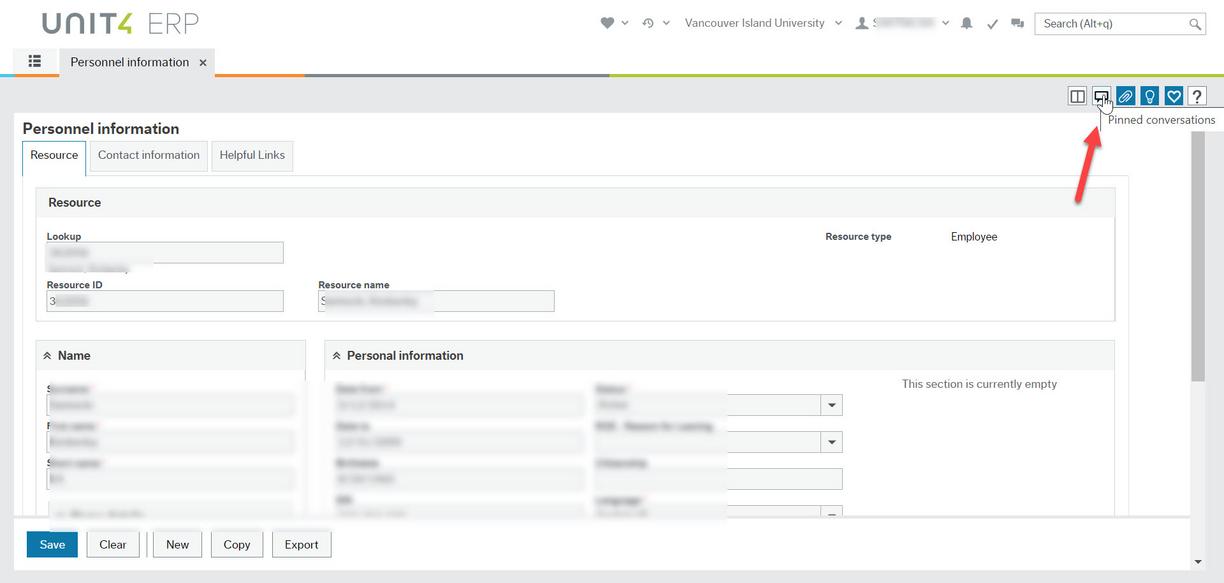
You can also have an in-system conversation about a particular item/record in the Employee Portal such as an Appointment, Purchase Requisition or Sales Order, especially if you want notes to be included with or "pinned" to the record or data in the Portal for future reference purposes. In this case, use the quote bubble icon located lower down in the workspace in the top right corner of the specific activity window for the particular record you wish to attach or "pin" the conversation to. This is using the chat tool for a "pinned conversation:"

The "Pinned conversation" quote bubble icon doesn't appear on your home screen activity since there is no 'record' on your home screen to attach or pin it to. However, if you open your personnel window or an existing Purchase Requisition, for example, you will see this icon on the top right corner. It appears when it is available.
You can start a 'conversation' by sending a short message to one or more employees. You can also include a direct link to one or more records, or include a screenshot. You can add others to the conversation any time or leave the conversation using small icons in the conversation window. See more details in the help menu - the question mark.
If the recipient of your message is not in the system, they will automatically get an email indicating they have a message in the Employee Portal! Any replies to the email will be added to the conversation as a new message.
Similar to other tools, the icon will turn dark blue once a message has been attached or 'pinned' so you see it when you open that record.

You will see a notification in your Action menu at the top of your main workspace indicating you have a pinned conversation - the Collaboration icon alerts you like this:
Example of use by a requisition approver
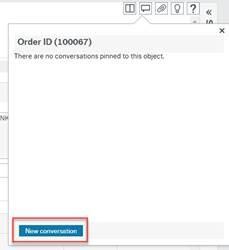
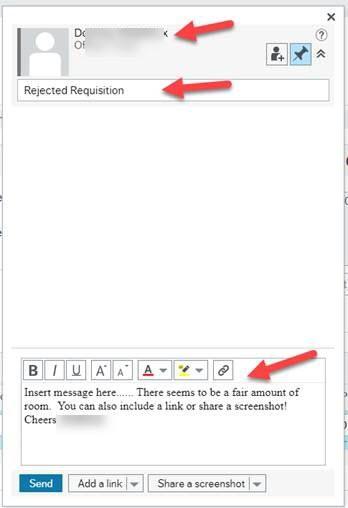
Perhaps you are an approver and want to attach a 'pinned conversation' to a Purchase Requisition that you are rejecting with more details than will fit in the comment field. Before you reject the requisition, click on the quote bubble icon and then click the New Conversation button at the bottom of that window.
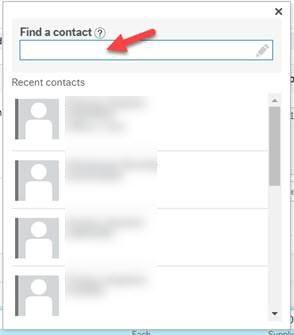
Then enter the requisitioner's name in the "Find a contact" field.
Give your conversation a title (e.g. Rejected Requisition) and enter your message below that. There are tools for formatting, adding links or screenshots if required.
Once the 'pinned conversation' has been sent you can reject the requisition. In your rejection comment you could indicate that you’ve added a 'pinned conversation' to this requisition with more detail.
The recipient(s) of the message will see a number in their Collaboration icon (two quote bubbles) that will now be orange in their Action menu letting them know they have a 'pinned conversation' message.
When the requisitioner opens the 'pinned conversation' message, they will see that the conversation is pinned to a specific Order ID (requisition #) and then right below that is the message, including who sent it.

Watch video 7 below for more details.
When you go into forms where you can enter data or you look at reports or other activities you will often see buttons along the bottom of the screen. Here are some common options:

Save - saves the work you have entered
Clear - clears the form and you can start over
New - will create a new record (such as supplier) for whatever screen type you are in
Copy - will duplicate the type of entry that you have made
Export - allows you to send a copy of the material you are viewing into a different document format that you can download such as an Excel sheet or Word doc. This function is not always available to all users even though it appears as an option.

Print preview - will often let you see what your data will look like in a form before you print it
Submit form - send the data you have entered into the form to someone else for approval. In the case of a Payroll deduction set up such as McLotto when you hit Submit form, the form goes to Payroll to check over first and they set it up if everything seems accurate. Hitting this button does not automatically set it up in the the system.
Save as draft - this allows you to enter data and then if you get called away or need to check on something you can save it in draft form before coming back to complete and then submit your final version for approval. It is recommended that you have all of your details prepared in advance.
Watch video 5 below on Troubleshooting and see the Troubleshooting flowchart.
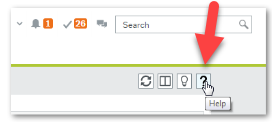
You can find context sensitive system help by clicking the question mark in the top right area of the workspace.
This help feature is not managed by VIU, but by the vendor, Unit4.
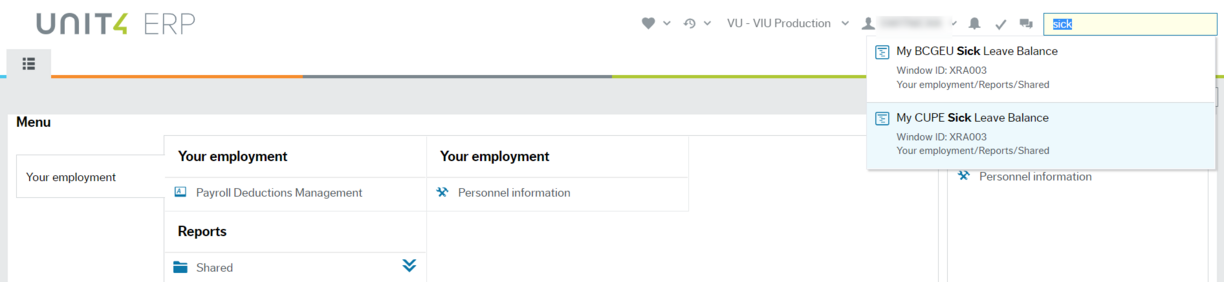
The Search function is the box right above this. It allows you to search for activities, files specific reports, records or forms throughout the system. An example is typing 'sick' in this box. A list of relevant items pops up for you to choose from.
Watch video 9 below for more details.
You can 'favourite' an activity tab that you use often by clicking the heart in the top right corner of the window once you have that tab open. The heart box will turn dark blue. Then it will appear in your Favourites section on the right side of the screen. You can click it again to remove it from the list.

You can also access this list by clicking on the small 'v' beside the heart icon at the top of your workspace.

The clock and circular arrow icon beside the heart shows you your list of recently opened items. This list can also be found below the Favourites list on the right below your Favourites list. It changes as you open items.
Managing documents
Watch video 8 below for more details.
The system contains a "Document archive." This holds files that have been attached to a record, object or entry such as for an employee or supplier. An example is a payslip or supplier contract. Most common document file types are supported such as PDFs and JPGs. You can tell if a specific record has a file attached because the paperclip icon will be dark blue. If no file is attached it will be white. You can see in your own personnel information record that there are payslips attached:

When you click on the paperclip to open the Document archive, a window pops up showing you what is available in that record by presenting you with a list of folders on the left. If you hover over the folder with your mouse you can see the number of documents in that folder. Using the toolbar at the top of this window you can change how the documents are viewed, sort them and search for specific criteria. You also have an Actions dropdown menu useful for printing. This actions menu will also pop up if you right click on a document.
Double-click on a document to open and view it in the viewing pane.
You can explore document options in more detail by clicking on the question mark icon in the top left of this window for more assistance.
Printing documents
You can print by highlighting the document in the viewing pane and choosing Print from the Actions menu.
Double-click to open the document in the viewing pane and then use the full screen icon to open the document in its own window.
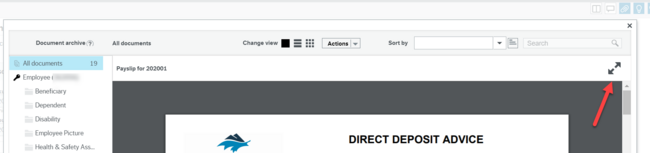
From there you can hover near the top right corner of that window with your mouse to expose the print icon.
When finished click the X in the top right to close this view and go back to where you were.
You can also right click on the document when it is the viewing pane to print.
These tools work best with the Google Chrome browser.
The ability to delete documents has been restricted for audit reasons.
a) If you have attached a document in error and you have not yet saved your transaction, you will need to clear your transaction and start over.
b) If you have already saved your Finance transaction, you will need to inform either Accounts Receivable (Sales Orders) or Procurement (Purchase Requisitions & Goods Receipts) that an incorrect document was attached. Accounts Receivable or Procurement will then reject the task back to you in workflow, at which point you will have the option to either:
- Close the Purchase Requisition or Sales Order and start over, or
- Rename the incorrect document as “Document to be deleted” and then attach the correct document, if applicable. Accounts Receivable or Procurement will submit a request to remove the document to be deleted, if applicable.
Specific instructions for particular transactions will be on the page for that transaction type.
In general, you use the paperclip to attach a document to your transaction or record.
Be sure not to use a Portfolio PDF - only single PDFs (not batches of different documents or emails rolled into one Portfolio PDF) can be understood by the system.
Click on the paperclip to go to the document archive screen.
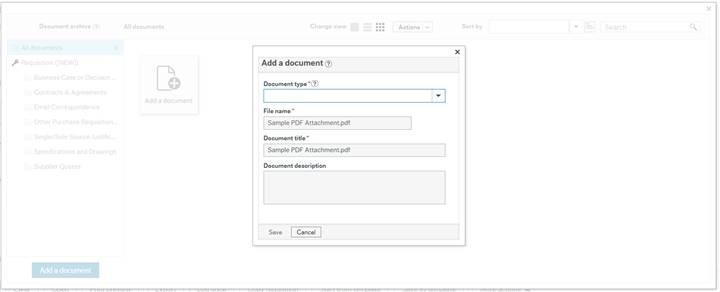
Choose your document type from the dropdown list (various types will appear appropriate for that transaction).
Click on the “Upload” button and find the folder where you have saved your document. Click on the name of your document to highlight and click “Open” to upload the file. You can add a description if you like. Press “Save” and close your document load screen.
Your image will be presented on your screen. Close the document archive screen and notice that your paperclip icon is now blue to indicate that there is a document attached to your transaction
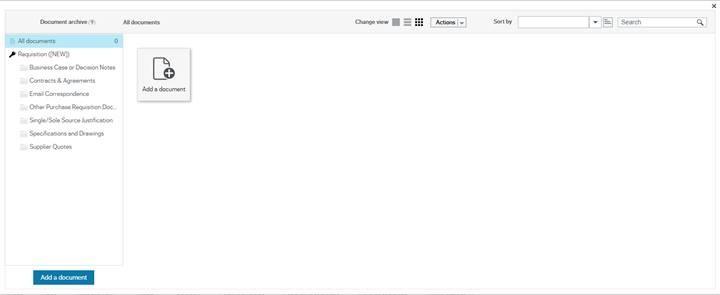
In some cases (depending on what type of activity window you are in) you will need to click on the blue “Add a document” button.
First, be sure you are waiting (up to 10 seconds!) for the "Document archive" to load in the window after you click on the paperclip icon.
If you have trouble attaching documents the standard way with the window popping up, you can try the alternate “drag and drop method”:
1. Locate the file in your Windows Explorer and keep that window open on your desktop or one of your monitors if you have more than one:
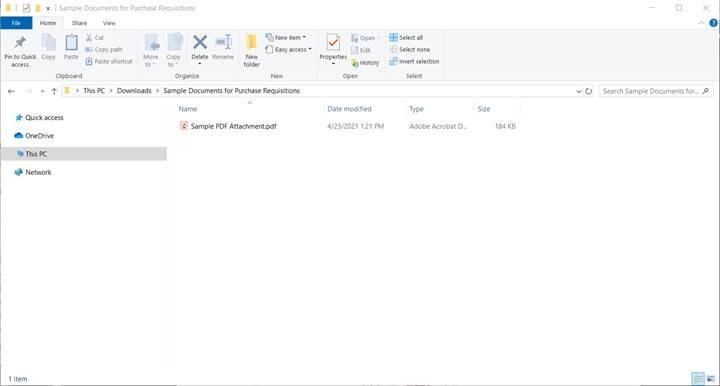
2. If, for example, you are in the FIS module and you have the Purchase Requisition activity open, click the paperclip icon so the "Document archive" window opens:
3. Drag your file from Windows Explorer and drop it anywhere in the "Document archive" screen. You will receive an “Add a document” prompt. Select the appropriate document type (mandatory) and enter in a document description (optional). Click Save.
4. You should now see your document in the "Document archive"
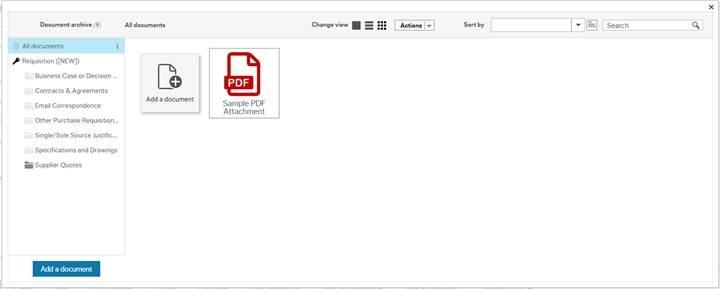
Click the X at the top right corner of this window to return to your Purchase Requisition (or wherever you started). You will see the paperclip icon now has a blue box indicating a file is attached!
General information
VIU has developed an amazing team of Tech Champions. These dedicated employees have graciously signed on to support their fellow colleagues as we all learn the new systems. Please email AURORA_Help@viu.ca to be added to the team. You will receive ongoing training (and treats) and your fellow employees will appreciate you even more! The following people can guide you as you explore the Employee Portal - please be kind to them since they are learning too. Names in bold have basic training for the Finance (FIS) modules:
| Name | Department or area |
|---|---|
| Kim Macaulay | Adult Basic Education |
| Vhea Obrero | Ancillary Services |
| Melissa Townsend | Ancillary Services |
| Annette Woolf | Arts and Humanities |
| Sheila Davidson | Arts and Humanities |
| Rob Barcelos | Athletics and Recreation |
| Tawnya Hoff | Centre for Experiential Learning |
| Lillian Morpak | Centre for Experiential Learning |
| Agia Doering | Cowichan Campus |
| Holly Dalrymple | Cowichan Campus |
| Heather Lloyd | Cowichan Campus - PD & T |
| Kim Tooby | Cowichan Campus |
| Kim Lesiuk | Cowichan Campus |
| Michelle Whitehead | Cowichan Campus - Finance Assistant |
| Niki Scarfo | Cowichan - PD & T |
| Allison Lucier | Cowichan - Program Assistant |
| Kathryn Oldham | Education |
| Rasmey Meas | English Language Centre |
| Margot Croft | Environment and Sustainability |
| Liette Masse | External Relations |
| Catherine Barber | Facilities |
| Christine Goddu | Facilities |
| Irene Bomhof | Facilities Services and Campus Development |
| Kathryn Jepson | Faculty of Management |
| Mike Taylor | Food Services |
| Carolyne Rickett | Graduate Programs - Mgmt |
| Hanne Bartlett | Health & Human Services |
| Linka van As | Health & Human Services |
| Rossanne Sutherland | Health & Human Services Bldg 180 |
| Rose von Schilling | Health & Human Services Bldg 210 |
| Shauna Buckle | Health & Wellness Centre |
| Cherie McLennan | Human Resources |
| Dana Swarts | Human Resources |
| Diane Rembold | Human Resources |
| Donna Nelson | Human Resources |
| Alison Todd | Human Resources |
| Tammy Williams | Human Resources |
| Colleen Cooper | Information Technology |
| Rebecca Relkov | Information Technology |
| Lora Cai | International Marketing, Recruit and Bus Dev |
| Simah Dodd | International Student Services |
| Liz Laidlaw | Library |
| Alyson Winks | Marketing, Analytics, Recruitment & Communication |
| Michele Lacey | Milner Gardens |
| Ariel Verhoeks | Mount Arrowsmith Biosphere Region Research Institute (MABRRI) |
| Kim Warkentine | Office of Aboriginal Education & Engagement |
| Monica Tysowski | Office of the President |
| Stephanie Didsbury | Office of the President |
| Shelley-Anne Gajda | Peer Supported Learning |
| Melissa Manhas | Records |
| Lorraine Coates | Registration Centre |
| Glenys Wood | Research Chairs |
| Lyn Locke | Scholarship, Research and Creative Activity |
| Marta Devellano | Science and Technology |
| Zoe Anderson | Science and Technology |
| Rae-Anne Savard | Science and Technology Administration |
| Brittany Parker | Student Affairs |
| Carol Mahedy | Student Affairs |
| Chris Yeast | Student Affairs |
| Maddy Thomas | Trades & Applied Technology |
| Shannon McKenzie | Trades & Applied Technology |
| Sarah Morrison | Trades & Applied Technology |
| Tanya Reiber | Trades & Applied Technology |
| Jolene Edmunds | University Secretariat |
| Joanne Rihani | University Secretariat |
**Refer to "How do I sign on to the Employee Portal" at the top under Employee Orientation or watch video 1 below on Accessing the Employee Portal.
Student employee: You cannot use your student ID to access the system. You need your employee login credentials or employee email address and password. If you have tried to use your student info you will get redirected to an old system page. You need to then clear your cache and open a fresh instance of Google Chrome to start over using your employee credentials.
Non-active employee: As an added security measure, if you do not have an active position at VIU (such as casuals or sessionals) you can sign in to the system (for 6 months after last position end date), but you won't be able to see your information. The home screen will be empty.

We understand that while this does improve the integrity of our system, it does pose challenges for intermittent employees. The Project team is currently working with the consultants for solutions. You can contact your payroll clerk to email you a payslip to your VIU email address or reach out to HR if you need further information.
When you become active again your information will be available.
Using a mobile device: You will find using the Chrome browser works best and not all devices will support the HRIS functionality. Due to the variety of devices available, we are not able to troubleshoot your specific needs so please check with your service provider. Use a laptop or computer to access HRIS for optimal results.
If you cannot sign on please contact ITHelp@viu.ca for support.
You can watch video 5 below on Troubleshooting for more details.
You may be able to sign on, but you don't see any data in your workspace. This is likely because you are a non-active employee. As an added security measure, if you do not have an active position at VIU (such as casuals or sessionals) you may be able to sign on to the system (for 6 months after your last position end date), but you won't be able to see your information. The home screen or workspace will be empty.
We understand that while this does improve the integrity of our system, it does pose challenges for intermittent employees. We encourage you to print your payslips before your final work date. Contact your payroll clerk to email your final payslip to your VIU email address or reach out to HR if you need further information.
When you become active again, all your information will be available.
* If you do have an active position and still can't see anything, contact AURORA_Help@viu.ca to investigate for you.
In front of each "activity" in your workspace is an icon indicating what type of activity it is. Here is a chart from the Help menu with highlights for the three key types of activities you see in your workspace as a basic user:
The non-highlighted types will appear as new functionality is rolled out.
See video 4 below for navigation info. When you see this symbol you can click on it to see a sub-menu:
When you see the chevrons upside down you can click on them to close that sub-menu:
At this time employees will not be able to upload a photo to their HRIS account due to concerns of size, content and specifications. We encourage you to update your photo in your VIU Outlook email as well as the Telephone Directory System (TDS).
There is no longer a dedicated kiosk computer outside the payroll office to assist those who don't use a computer in their role at VIU. You can ask your area Tech Champion for assistance. They have extra training to support you in navigating the software. The list of Tech Champions is at the top of each page on this website. Alternatively, you can check with area Finance or Admin Assistants for help.
You can access the Employee Portal from your home computer, tablet, laptop, smartphone or any device with Internet.
There is no longer a dedicated kiosk computer outside the payroll office. During regular working hours a payroll clerk may assist you with tips on logging on and navigating through your information - they have some written step-by-step instructions.
Employees can also access a computer terminal at the library.
A new streamlined version of the employee directory went live in mid-September, 2021. It has been updated to integrate with the Employee Portal (Unit4 ERP) and the Office Inventory System (OIS). It displays:
- employee name
- title
- department
- location
- phone
- local
- mail drop
When searching by name only one employment will display, similar to the current employee directory.
The data is pulled from three different sources:

Only RFT, RPT, TFT, TPT, LTC, TSES appointments show in the directory. Only current active appointments will be displayed.
If an employees’ building, room, or phone is incorrect please have the employee contact their departmental OIS coordinator to correct, usually the dean’s assistant, a program assistant, or faculty secretary.
If an employee thinks that their name, department, title, campus, mail drop, or email is incorrect please have them email HR@viu.ca.
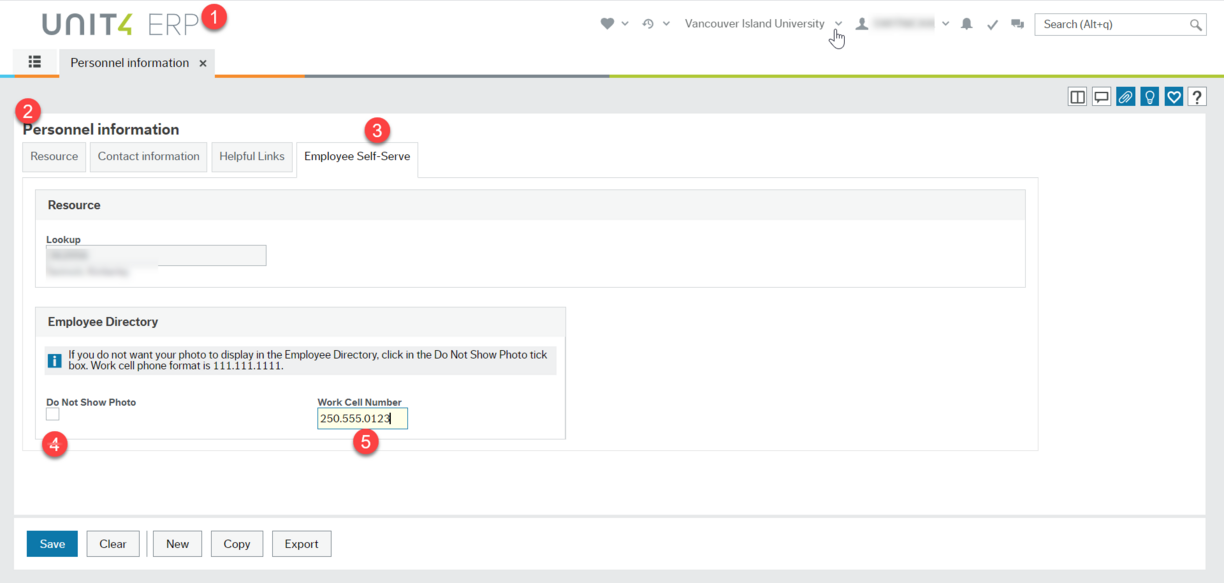
Employees who do not wish to have their photo displayed in the directory can:
- Sign on to the Employee Portal
- Click on "Personnel information" under heading: Your employment
- Click on Employee Self-Serve tab
- Click the box under "Do Not Show Photo" to disable
- An option to display Work Cell Number in the directory can also be entered
Updating photos
If employees email a photo of themselves to library@viu.ca and indicate that they would like their picture in the employee directory updated, this can be done through our photo ID system. The photo should meet the photo requirements listed on the photo ID page.
It is not necessary to replace the photo ID card itself. If employees would like to replace their card because it has been lost or damaged, this can be done at no charge and be printed with an updated photo.
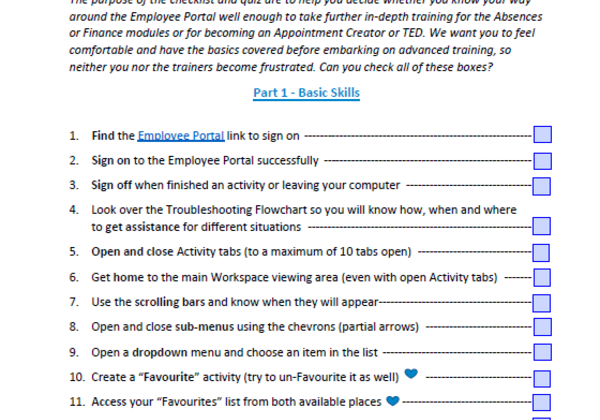
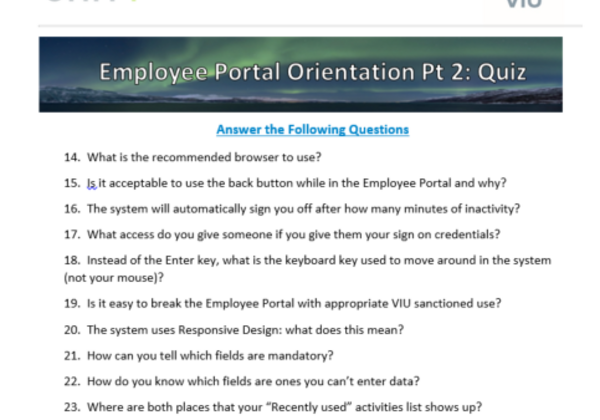
Prerequisites for further training: Basic skills checklist and quiz
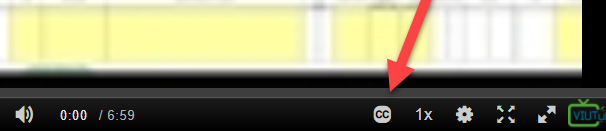
Training video tips
- Enlarge videos by clicking on arrows in bottom right of the video.

- Click on the 1x on the bottom of the video to adjust the playback speed faster or slower.
- Closed captions can be turned off by clicking the "cc" on the bottom of the video.
- For specific instructions such as accessing a Payroll or HR report or your payslip, see the appropriate page on the training website. More details are on the home page or use the menu on this page.
Naming convention - video transcript.txt
Explains the names used for components of the Employee Portal:
- Recruit (HR recruitment module)
- HRIS - Human Resource Information System (module for HR and Payroll)
- FIS - Financial Information System (module for Sales, Procurement, Treasury, etc.)
- SRS - Student Records System (Legacy system connected to the Employee Portal)
1. Accessing the Employee Portal - video transcript.txt
- The many ways to find the link to sign on: email, the VIU Employees page, top of any page on training website, using the search function or from Payroll website
- What the sign on page should look like
- Use Google Chrome as your browser
- How to "bookmark" the link using the Chrome browser
- How and why to sign off when you aren't in front of your computer
2. Browser, workspace and security - video transcript.txt
- Tips like using Google Chrome and don't use the back button
- What your workspace is (the viewing area) and what you should have in it
- When your screen view may change
- How to use single-sign-on to sign on
- Why to keep your credentials private, for both your security and VIU's
- How to sign off when you aren't in front of your computer
3. Moving around in the Employee Portal - video transcript.txt
- How to open items in your main workspace or viewing area
- How to get back to the main workspace with the home icon
- How the tab key is crucial - the main navigating tool other than your mouse
- How Responsive Design rearranges the screen depending on screen size or your device
- The system is sturdy and you won't likely break it with responsible use
4. Specific navigation tools - video transcript.txt
- How the main menu works
- Activity tabs and how to use them
- How to get back to the home screen
- How to use the different directional arrows to find what you are looking for (such as folders, sub-menus, dropdown lists and keyboard arrows)
5. Troubleshooting - video transcript.txt
- The training website is an online training manual
- The Troubleshooting flowchart: when to ask whom, what
- Common Q & A
- Help within the Portal (help button, search and helpful links)
- Usual support channels (training sessions, colleagues, Tech Champions, help emails)
6. Employee Portal data entry - video transcript.txt
- The tab key is your main navigation tool
- Mandatory fields have a red asterisk
- "Greyed out" fields are auto-populated and can't be overwritten
- Blue highlighted lines show you the active record
- 6 ways to enter data: type, cut & paste, space bar, mouse click, drop-down lists, tab key
7. Buttons on bottom of screen - video transcript.txt
- Submit form - submit via workflow for verification and set-up
- Save - will save your entries
- Save as draft - option to save data prior to completion
- Clear - start over again
- Export - convert data to another format to view or download
- Print preview - see your document before printing it
- Ok - confirm data as entered
8. Viewing and printing documents - video transcript.txt
- Determine if there are documents available on a record
- What documents are
- How to view documents
- How to print documents
9. Favourites and recently used lists - video transcript.txt
- Create a "Favourite" using the heart icon
- Remove a "Favourite" using the heart icon
- Access "Favourites" from upper action menu and "Favourites" box
- Access "Recently used" items from "Recently used" box and action menu